Access your Back Office at your fingertips.
Download the app now on Google Play Store.
Scan the QR code
You can also scan QR code with your phone to download the app.
How to add a team member on Lendsqr
Updated
On this page
Managing a lending operation is rarely a solo effort. As your organization grows, you will need additional team members to help manage customers, process loans, monitor transactions, and handle operational tasks within the Lendsqr Admin Console. Team management ensures that responsibilities are properly distributed while maintaining security, accountability, and controlled access to sensitive financial data.
Lendsqr provides a structured way to invite and manage team members directly from the admin console. Each team member is assigned specific roles and permissions, ensuring they can only access the parts of the system relevant to their responsibilities. This makes it easier for lenders to scale operations without compromising control or compliance.
This guide explains what team management is, why it matters, and the step-by-step process for adding a team member to your organization.
Understanding team management in Lendsqr
Team management in Lendsqr refers to the system used to organize, control, and monitor users who operate within the admin console. These users are typically internal staff members such as loan officers, customer support agents, risk analysts, or administrators.
Each team member is granted access based on roles and permissions. These roles determine what actions a user can perform, such as approving loans, viewing customer data, managing transactions, or configuring system settings.
For example, a support agent may only need permission to view customer profiles and respond to inquiries, while a super admin may have full control over loan products, settings, and team configuration.
This structure ensures that sensitive operations are protected and only accessible to authorized personnel.
Why adding team members matters
As lending operations scale, workload increases across multiple functions such as customer onboarding, loan approval, repayment monitoring, and risk management. Without proper team structure, this can lead to inefficiencies or operational bottlenecks.
Adding team members allows lenders to distribute responsibilities effectively. It also improves operational speed because tasks can be handled in parallel rather than sequentially.
Another key benefit is security. By controlling access levels, lenders reduce the risk of unauthorized actions within the system. Each team member only sees what is necessary for their role, which helps protect customer data and financial operations.
Finally, structured team management improves accountability. Every action taken within the system can be traced back to a specific user, making it easier to audit activities when needed.
Requirements before adding a team member
Before you can invite a new team member, your account must have the appropriate permissions. Only users with a Super Admin role or those with Create Team Member permission can add new users to the system.
If you do not have the required permissions, the “Invite a Member” option will not be available in your settings menu.
It is also important to decide in advance what role the new team member will play. Assigning the correct role ensures that access levels align with job responsibilities from the beginning.
Step-by-step guide to add a team member
Adding a team member in Lendsqr is a simple process that can be completed directly from the admin console. The interface is designed to make onboarding fast and consistent.
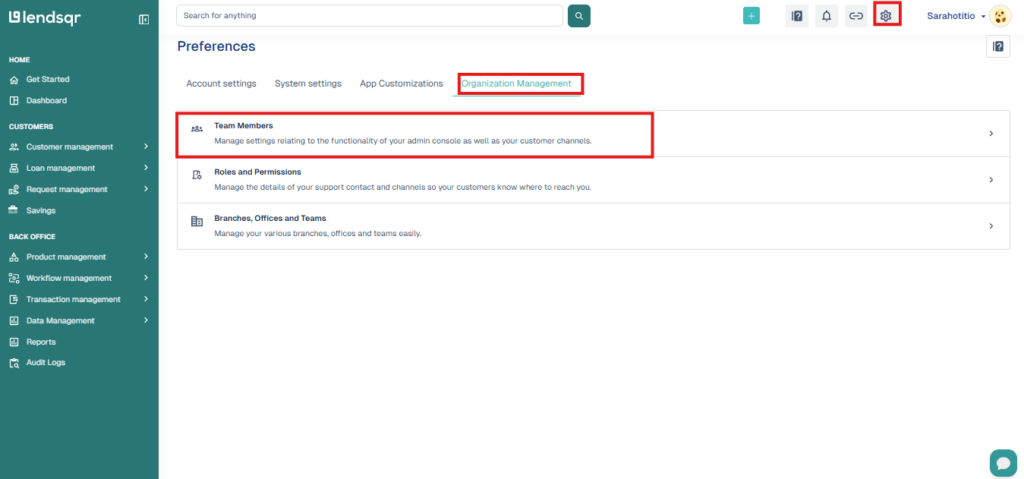
Step 1: Open the settings menu
Start by logging into your Lendsqr Admin Console.
From any page on the platform, navigate to the top-right corner of the screen and click the settings icon. This icon gives you access to organizational configuration tools, including team management features.
Once clicked, you will be redirected to the settings area where different administrative options are available.
Step 2: Navigate to team members
Within the settings page, locate the Organization Management section.
Under this section, click on Team Members. This area displays all existing team members within your organization and provides tools for managing their roles and access.
This page acts as the central hub for controlling who has access to your admin console.
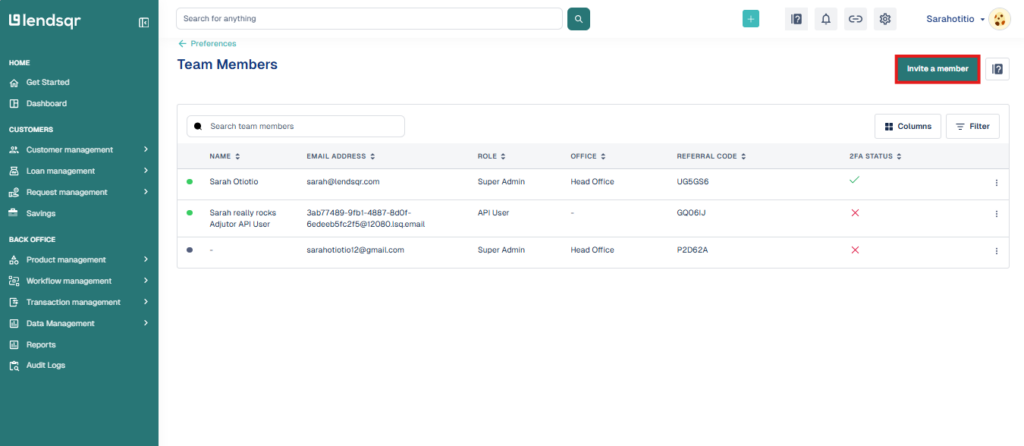
Step 3: Invite a new member
On the Team Management page, locate the “Invite a Member” button, usually positioned at the top-right corner.
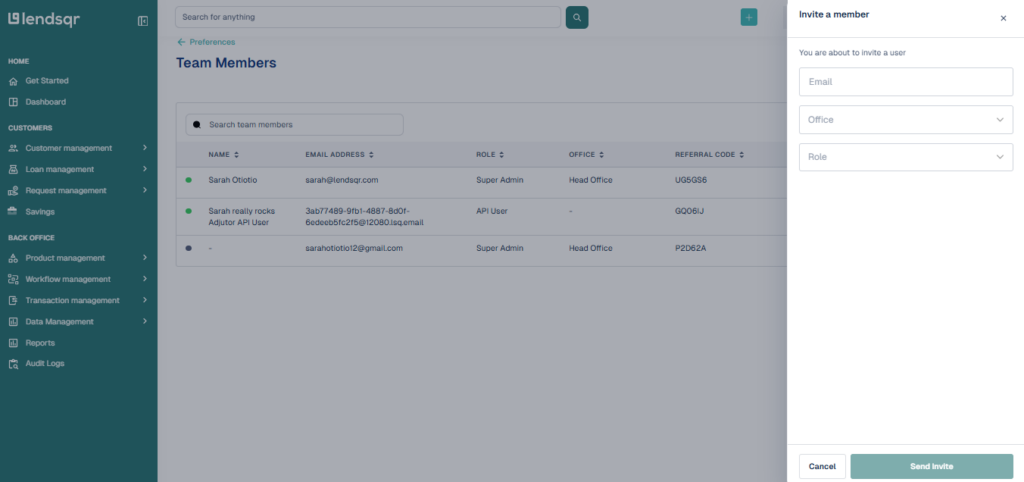
Clicking this button opens a modal window where you can enter the details of the new team member.
At this stage, you will be required to input the team member’s email address. This email will be used to send an invitation to join your organization.
You will also need to assign a role to the user. The role determines what the team member can do within the system once they accept the invitation.
Step 4: Assign roles and permissions
Selecting the correct role is a critical part of the onboarding process.
Lendsqr supports role-based access control, meaning each role comes with predefined permissions. These permissions define whether a team member can view customers, manage loans, approve transactions, or access system configurations.
For example, assigning a role such as “Account Manager” may restrict access to only assigned customers, while an admin role may provide broader system access.
Proper role assignment ensures operational security and prevents unnecessary exposure of sensitive data.
Step 5: Send the invitation
After entering the email address and selecting the appropriate role, click “Send Invite”.
An invitation email will be sent to the team member. The recipient must accept the invitation and complete their account setup before they can access the admin console.
Once accepted, the new team member will automatically appear in your Team Management list with the assigned role and permissions.
Managing team members after the invitation
After a team member has been added, administrators can continue to manage their access.
This includes updating roles, assigning them to specific offices or branches, or deactivating access when no longer required.
Lenders can also assign account managers to specific customers, ensuring that team members are responsible for defined customer segments. This improves accountability and helps organize customer support workflows more effectively.
To ensure effective team operations, lenders should follow a few best practices when managing team members.
First, always assign roles based on least privilege principles. This means giving users only the access they need to perform their duties.
Second, regularly review team access to ensure that inactive users are removed or updated. This helps maintain system security and reduces unnecessary risk.
Third, structure your team based on operational functions such as customer support, loan processing, and risk management. This improves clarity and workflow efficiency.
Finally, ensure that all team members understand their responsibilities within the platform to avoid confusion or operational overlap.
Conclusion
Adding team members in Lendsqr is a straightforward but important process that supports operational scaling and secure lending operations. By using role-based access control and structured team management tools, lenders can ensure that their internal teams operate efficiently while maintaining full visibility and control.
Proper team setup not only improves productivity but also strengthens security and accountability across the lending organization. As your operations grow, effective team management becomes a key driver of smooth and scalable lending performance.
Watch the video below to illustrate how to add and manage team members for your organization