Access your Back Office at your fingertips.
Download the app now on Google Play Store.
Scan the QR code
You can also scan QR code with your phone to download the app.
How to upload documents and files when adding a note
Updated
On this page
Admins often need to keep track of important user activities by adding notes or comments in the admin console. Sometimes, these notes aren’t enough on their own, and supporting documents, screenshots, or files
Admins often need to keep track of important user activities by adding notes or comments in the admin console. Sometimes, these notes aren’t enough on their own; supporting documents, screenshots, or files might be needed to give the full picture. With this feature, admins can easily upload and attach documents or files while adding a note or comment, making it simpler to share key information with other team members and keeping everything organized in one place.
Why document attachments matter in customer management
Effective customer management in lending operations requires more than just text notes. While written comments capture observations, decisions, and interactions, many situations demand supporting documentation that text alone cannot provide. A loan officer might need to attach a photo of a customer’s damaged ID for compliance review. A collections agent might need to upload proof of payment that a customer sent via WhatsApp. A manager might need to attach email correspondence that clarifies a disputed transaction.
Without the ability to attach files directly to customer notes, this supporting documentation gets scattered across email inboxes, chat applications, local hard drives, and shared folders. When team members need to review a customer’s history, they must hunt through multiple systems to piece together the complete picture. Critical information gets lost, misplaced, or overlooked because it exists separately from the central customer record.
Document attachment capability solves this fragmentation by creating a single source of truth. Every relevant piece of information, whether text notes or supporting files, lives together in the customer’s profile within the admin console. Anyone reviewing the customer’s account sees the complete context immediately without searching external systems.
Types of situations requiring document attachments
Understanding common scenarios where document attachments prove valuable helps you leverage this feature effectively in your daily operations.
Identity verification and KYC documentation
When customers submit identity documents during onboarding or account updates, loan officers often need to flag issues for review. Perhaps the uploaded ID photo is blurry and needs resubmission. Perhaps details on the ID do not match application information. Perhaps the document appears altered or suspicious. In these cases, attaching the problematic ID image to a note creates a clear record for compliance teams or managers to review, with the specific document in question directly visible rather than requiring them to navigate to a separate document repository.
Payment proof and transaction disputes
Customers frequently provide payment evidence through channels like WhatsApp, email, or SMS when they claim to have made payments that did not reflect in the system. Rather than forwarding these images through multiple communication channels, the receiving staff member can immediately attach the payment proof to a customer note. When collections or finance teams later investigate the disputed transaction, they see the customer’s evidence directly in context with the note explaining the situation.
Loan application supporting documents
Sometimes loan applications require additional documentation beyond standard identity verification. A business loan might require invoices, contracts, or business registration documents. An emergency loan might require medical bills or repair estimates. Rather than storing these supporting documents in a separate file system disconnected from the loan application, attaching them to notes on the customer’s profile keeps all application materials together for easy review.
Conversation screenshots and correspondence
Important conversations with customers often happen through WhatsApp, SMS, social media, or email. When these conversations contain commitments, clarifications, complaints, or other significant information, capturing screenshots and attaching them to customer notes creates permanent records. If a customer later disputes what was discussed or agreed, the attached screenshots provide clear evidence.
Field visit documentation
For lenders who conduct field visits for verification, collections, or relationship management, field agents often take photos documenting the visit. Pictures of business premises, inventory, family situations, or living conditions provide valuable context for credit decisions and collections strategies. Attaching these photos to notes creates visual records that help remote teams understand situations without physically visiting locations.
Compliance and audit trails
Regulatory compliance and internal audits often require demonstrating that proper procedures were followed. Attaching relevant documents to notes creates audit trails showing what information was reviewed and what steps were taken. If regulators question why a particular loan was approved or how a specific situation was handled, the attached documentation provides evidence of proper procedure.
Step-by-step guide to uploading documents when adding notes
Follow these steps to attach files to customer notes in the Lendsqr admin console.
Step 1: Log in to your admin console and navigate to customer management
Access your Lendsqr admin console using your credentials. After successful login, locate the customer management section in the main navigation menu. This section might be labeled Customers, Customer Management, Borrowers, or similar, depending on your system configuration. Click on this section to access the customer management interface.
Step 2: Click on “Customers” and select the specific customer
Within the customer management interface, you will see a list or search function showing all customers in your system. The list might display customer names, account numbers, phone numbers, or other identifying information, depending on your view settings. Locate the particular customer you want to add a new comment or note on by browsing the list or using the search function to find them quickly.
Click on the customer’s name or account entry to open their detailed profile page. This action loads the comprehensive customer dashboard showing their personal information, loan history, transaction records, account status, and other relevant details.
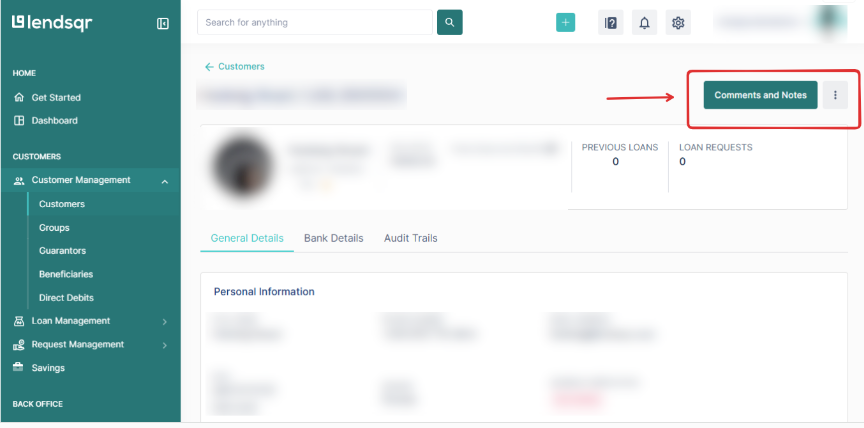
Step 3: Access the notes and comments section
After clicking on your customer, look for the Notes and Comments option at the top right of the customer dashboard on the admin console. This section is where all historical notes, comments, and attached documents for this customer are stored and displayed. The location at the top right ensures easy access regardless of which section of the customer dashboard you are viewing.
Click on Notes and Comments to open the notes interface. This action typically opens a side panel or dedicated section showing the chronological history of all notes and comments added to this customer’s profile by various team members.
Step 4: Add your note or comment
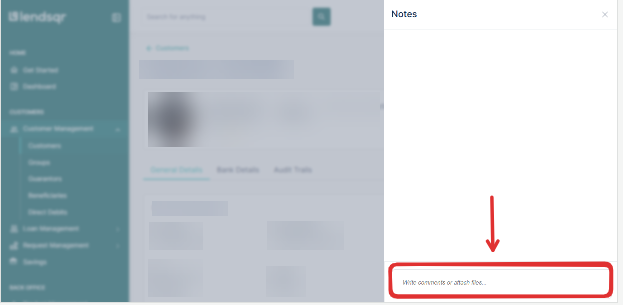
A side panel will then appear, displaying the notes and comments interface. This panel shows existing notes in chronological order, with the most recent typically appearing at the top or bottom depending on your system’s display settings. Each existing note shows the content, author, timestamp, and any attached files.
Proceed by clicking on the comment field within the panel to add your note. This field is typically clearly labeled as Add Comment, Add Note, or similar. Clicking activates the text input area where you can type your note content. Enter the text of your note, clearly explaining the situation, observation, decision, or information you want to document.
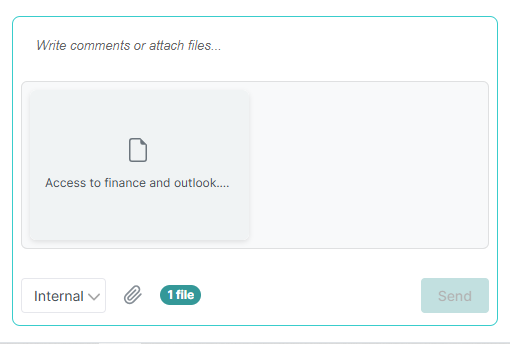
Step 5: Attach documents or files
After entering your note text, look for the attachment icon, which typically appears as a paperclip symbol near the text input field. Click on the attachment paperclip icon to activate the file upload interface. Once clicked, you can upload any image or file related to that specific customer to provide supporting documentation or additional context.
The file upload interface typically allows you to browse your computer’s file system to select files for upload. Navigate to the location where your document, image, or file is stored. Select the file you want to attach. The system may support attaching multiple files to a single note, depending on configuration, allowing you to attach several related documents at once if needed.
Step 6: Review and save your note
After attaching your files, review both your note text and the attached files to ensure everything is correct and complete. Verify that the note text clearly explains the situation and that the correct files are attached. Once satisfied, click the Save, Submit, or Post button to finalize adding the note with attachments to the customer’s profile.
The system processes your submission and adds the note to the customer’s notes history. The note appears in the chronological list along with any previously existing notes. The attached files are displayed alongside your note text, typically as clickable thumbnails or links that other team members can click to view or download.
Best practices for using document attachments
To maximize the value of document attachments while maintaining organized, professional customer records, follow these best practices.
Write a clear note text explaining the attachments
Always include text in your note that explains what the attached files are and why they are relevant. Simply attaching a file without explanation creates confusion for other team members who later review the customer’s history. They see an attachment but do not understand its significance or context.
For example, rather than just attaching an ID photo with no comment, write a note like “Customer submitted new ID for verification. Please note the address on this ID differs from the address in our system. Attachment shows the updated ID for compliance review.” This context makes the attachment immediately understandable to anyone reviewing the record.
Use descriptive file names
Before uploading files, rename them with clear, descriptive names that indicate their content. Generic file names like IMG_1234.jpg or Document.pdf provide no information about content.
Descriptive naming becomes especially important when customers have multiple attachments in their history. Clear file names allow team members to quickly identify which attachment they need without opening every file.
Attach files to the most relevant note
If you are adding multiple notes about different topics for the same customer, attach each file to the note it relates to rather than attaching all files to a single note. This organization keeps related information together and makes it easier to find specific documentation later.
For example, if you are adding a note about a payment dispute and a separate note about an address update, attach the payment proof to the payment dispute note and attach the new ID with updated address to the address update note.
Respect file size and format limitations
Be aware of any file size limits or format restrictions the system enforces. Large video files or uncommon file formats might not upload successfully. If you need to attach large files, consider compressing images, using PDF format for documents, or splitting large files into smaller segments.
Maintain customer privacy and data security
Remember that attached files become part of the customer’s permanent record and may be visible to other authorized team members. Do not attach files containing sensitive information unrelated to the note’s purpose. Do not attach personal documents from other customers. Do not attach internal deliberations or communications that should remain confidential.
Regular review and cleanup
Periodically review the attached documents to ensure they remain relevant and necessary. If regulations or internal policies require deleting certain documents after retention periods expire, establish processes for identifying and removing outdated attachments.
Who can view the attached documents?
Document visibility typically follows the same permission structure as notes and comments themselves. Team members who have permission to view customer notes can generally view attached documents as well. However, specific permission configurations may vary depending on your organization’s admin console setup and role-based access controls.
If your organization has implemented strict role-based permissions, verify whether your role allows viewing attachments from notes created by other team members. Some configurations might restrict attachment viewing to note authors and supervisors while allowing broader access to note text.
Technical considerations and limitations
Understanding the technical aspects of the document attachment feature helps you use it effectively within its capabilities.
Supported file types typically include common formats like JPEG and PNG for images, PDF for documents, and possibly Microsoft Office formats like DOCX or XLSX, depending on configuration. Verify which formats your specific implementation supports to avoid upload failures.
File size limits exist to prevent system performance issues and storage consumption problems. These limits might range from a few megabytes to tens of megabytes per file, depending on your subscription tier and configuration. Large files exceeding limits will fail to upload with error messages indicating the size restriction.
Upload speed depends on your internet connection quality. Large files may take considerable time to upload, especially on slower connections. Plan accordingly and avoid attempting uploads during time-critical situations where delays would be problematic.
Storage considerations matter for organizations with high document attachment volumes. Attached files consume storage space that may be limited or metered depending on your subscription plan. Monitor storage usage and implement document retention policies if storage limits become constraining.
By leveraging document attachment capability thoughtfully and following best practices, you transform customer notes from simple text records into comprehensive documentation that provides complete context for every customer interaction, decision, and situation your team encounters.