Access your Back Office at your fingertips.
Download the app now on Google Play Store.
Scan the QR code
You can also scan QR code with your phone to download the app.
How to configure a loan request checklist on your loan product
Updated
On this page
Unexpected requirements in the loan process can lead to frustration, causing borrowers to abandon their applications. To tackle this, incorporating a loan request checklist into your loan product ensures that borrowers are fully informed about what’s required upfront.
Imagine a small business owner applying for a loan to expand their operations. Without a checklist, they might begin the application without knowing they need documents like tax returns, business registration certificates, or a bank statement. Midway through the process, they’re asked for additional documents they weren’t prepared for. This unexpected request can create frustration, delay the process, and possibly cause them to abandon the application altogether.
However, with a loan request checklist clearly presented upfront, listing all required documents and eligibility criteria, the borrower knows exactly what’s needed and can gather everything before starting the application. This approach simplifies the application journey, builds trust, and reduces abandoned applications significantly.
Lendsqr lets you configure this checklist directly on each loan product, using JSON to define the title, the checklist items, and whether borrowers see the system defaults or your own custom conditions. This article explains the JSON structure and walks through each configuration option.
What a loan request checklist means
A loan request checklist is a predefined list of requirements that a borrower must meet or provide before completing a loan application.
These requirements may include:
Personal information
Identification documents
Proof of income
Bank statements
Guarantor details
Business records (for SME loans)
Instead of discovering these requirements step by step, the borrower sees them up front or during the application flow.
This improves clarity and reduces uncertainty.
How to configure the checklist
Here’s how you can set up a Loan Request Checklistto enhance your customer experience:
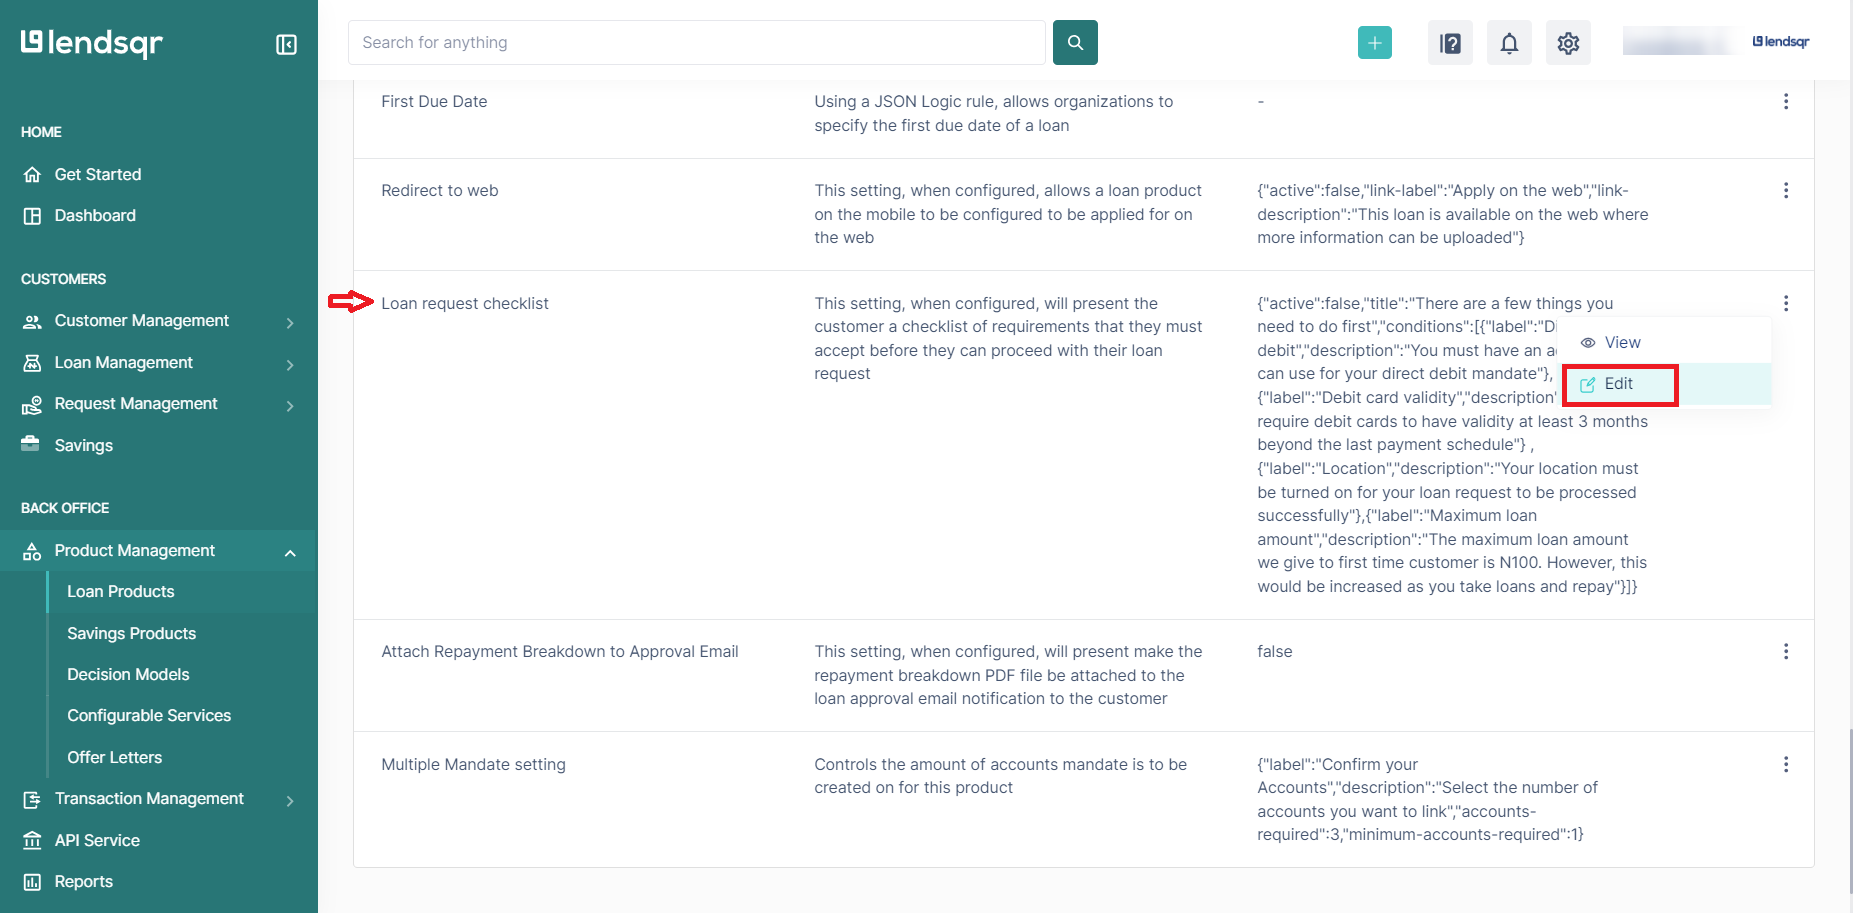
From the main dashboard, go to “Product Management” and select “Loan Products“. This displays all your existing loan products.
Click on the loan product you want to configure, or click “Create loan product” to start a new one.
Navigate to the “Product Settings” tab on the loan product page.
Scroll through the attributes list until you find “Loan Request Checklist“. Click the more options button (⋯) and select “Edit“.
Update the JSON value as required. See the configuration options below for the full details.
Click “Save” to apply the changes to the loan product.
Understanding the JSON configuration
The checklist is configured using a JSON object with the following fields:
active: Controls whether the checklist screen is shown to borrowers. Set to true to enable it, or false to hide it. When set to false, borrowers skip the checklist screen entirely and proceed directly to the application.
title: The heading text that appears at the top of the checklist screen on the borrower’s app. You can customise this to match your platform’s tone.
is_custom_conditions: Determines whether the platform uses Lendsqr’s system defaults (false) or your own custom conditions (true). When set to false, the conditions defined in this JSON are ignored, and the platform shows its built-in checklist items instead.
conditions: An array of checklist items. Each item has two fields:
label: the short title of the checklist item, displayed as a heading.
description: the supporting text explaining the requirement in more detail.
Option 1: Use the system default checklist
By default, the checklist is active and uses Lendsqr’s system-configured conditions. You do not need to change anything; this is the state when you first open the attribute. To explicitly apply the system defaults, paste the following JSON into the attribute field:
{"active":true,"title":"There are a few things you need to do first","is_custom_conditions":false,"conditions":[{"label":"Direct debit","description":"You must have an account you can use for your direct debit mandate"},{"label":"Debit card validity","description":"We require debit cards to have validity at least 3 months beyond the last payment schedule"},{"label":"Location","description":"Your location must be turned on for your loan request to be processed successfully"},{"label":"Maximum loan amount","description":"The maximum loan amount we give to first time customer is N100. However, this would be increased as you take loans and repay"}]}
Option 2: Disable the checklist
To hide the checklist screen entirely, so borrowers skip it and go straight to the application form, set active to “false”:
{"active":false,"title":"There are a few things you need to do first","is_custom_conditions":false,"conditions":[{"label":"Direct debit","description":"You must have an account you can use for your direct debit mandate"},{"label":"Debit card validity","description":"We require debit cards to have validity at least 3 months beyond the last payment schedule"},{"label":"Location","description":"Your location must be turned on for your loan request to be processed successfully"},{"label":"Maximum loan amount","description":"The maximum loan amount we give to first time customer is N100. However, this would be increased as you take loans and repay"}]}
Option 3: Use your own custom conditions
To define your own checklist items, set is_custom_conditions to “true” and update the label and description values in the conditions array. You can also add more items or remove default ones:
{"active":true,"title":"There are a few things you need to do first","is_custom_conditions":true,"conditions":[{"label":"Direct debit","description":"You must have an account you can use for your direct debit mandate"},{"label":"Debit card validity","description":"We require debit cards to have validity at least 3 months beyond the last payment schedule"},{"label":"Location","description":"Your location must be turned on for your loan request to be processed successfully"},{"label":"Maximum loan amount","description":"The maximum loan amount we give to first time customer is N100. However, this would be increased as you take loans and repay"}]}
Replace the label and description values with the specific requirements for your loan product. You can add as many condition items as needed.
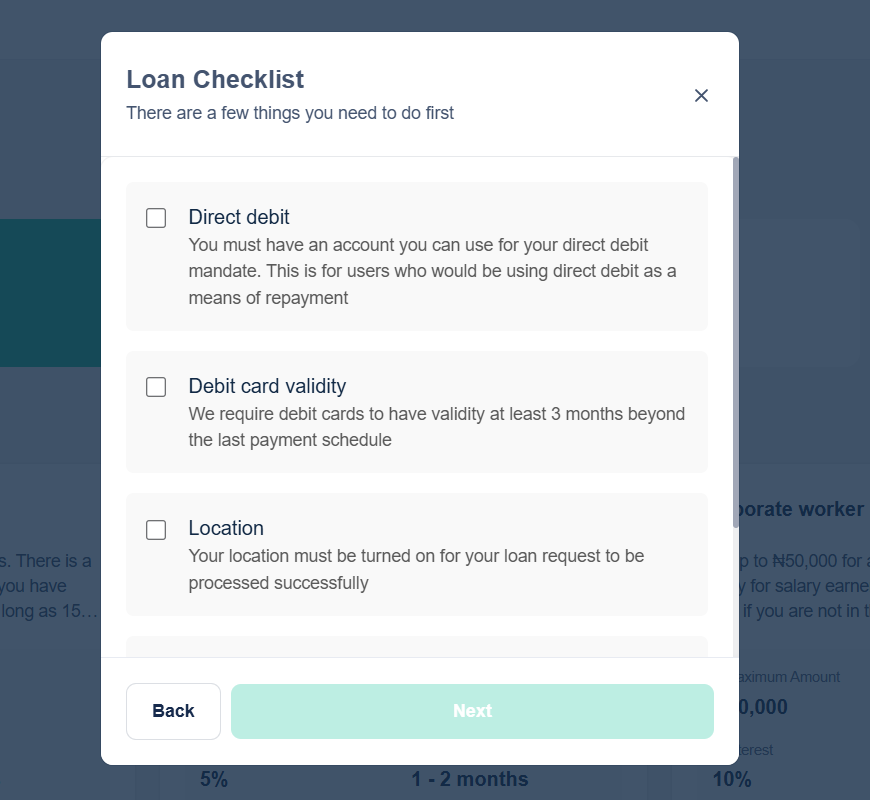
What borrowers see
After saving, borrowers applying for that loan product will see the checklist screen before they can submit their application. Each condition is displayed with its label and description. They must acknowledge all items before proceeding.
Handling errors and failed checklist completion
In some cases, borrowers may encounter issues while trying to complete checklist requirements.
Common failure situations include:
Upload errors due to unsupported file formats
Poor network connection during submission
Incorrect document type uploaded
Incomplete or unreadable documents
When this happens, borrowers may see prompts to retry or correct the issue before proceeding.
From the lender’s perspective, these failures often appear as incomplete applications.
To reduce this, lenders should:
Provide clear instructions for each checklist item
Use simple language that avoids confusion
Ensure document requirements are realistic and easy to fulfill
Loan request checklists are a simple but powerful way to improve how borrowers interact with your lending process. By clearly stating requirements upfront, you reduce confusion, improve completion rates, and ensure that every application meets your minimum standards.
With Lendsqr, you can configure checklists directly within each loan product, allowing you to tailor requirements based on your lending strategy.


 in Lendsqr for loan verification")
 feature")