Access your Back Office at your fingertips.
Download the app now on Google Play Store.
Scan the QR code
You can also scan QR code with your phone to download the app.
Managing system settings
Updated
On this page
System settings are the configurations that drive your organization’s operations on the Lendsqr admin console. These settings control different aspects of both the admin console and the customer-facing mobile app, giving administrators a centralized place to manage providers, third-party integrations, access token keys, communication preferences, user verification requirements, and more.
Getting these settings right from the start ensures your lending platform behaves exactly the way your business intends. Whether you are onboarding users for the first time, rolling out a referral program, or tightening identity verification requirements, system settings is where those decisions are enforced.
What you can do in system settings
The system settings section provides administrators with a wide range of controls across several functional areas. Specifically, you can:
Configure and manage core system behavior: This covers administrative controls that govern how the platform operates across both the admin console and customer-facing channels, including provider settings and integration configurations.
Define onboarding requirements: You can set KYC document rules and verification criteria that users must satisfy when signing up, ensuring your platform stays compliant with regulatory and business standards.
Manage user segmentation through tiers: Tier configurations allow you to control what different categories of users can access and do within the platform, enabling progressive privileges and feature segmentation.
Set up and control communication flows: Notification settings let you configure how and when both admins and users receive communications, covering channels such as email, SMS, and in-app notifications.
Configure referral programs: You can define the incentives and rules that govern how users earn rewards for inviting others to the platform.
Manage customer-facing fees: This covers charges applied across products and services, as well as the support contact details that customers see when seeking assistance.
Important notes before you begin
There are two things worth knowing before you start making changes in system settings:
First, the fields and options you see in the system settings section depend on the integrations that have already been set up for your organization. If a particular provider or configuration option is not visible, it may not yet be activated for your account.
Second, certain providers and their corresponding attributes cannot be changed directly from the admin console. If you need to switch a provider or update a configuration that is locked, you will need to contact Lendsqr support at support@lendsqr.com.
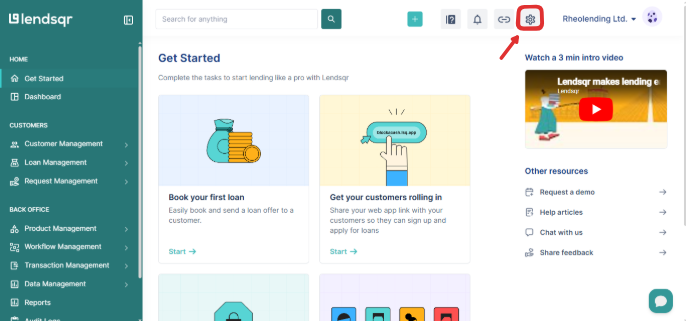
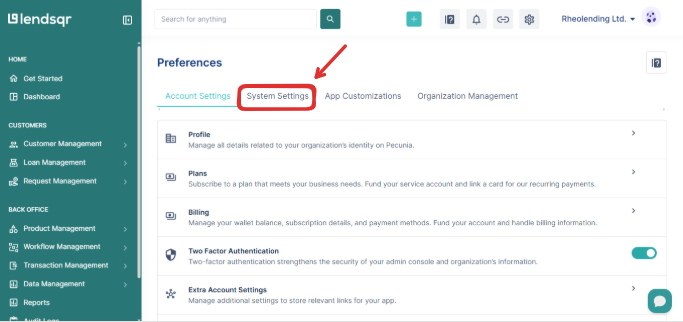
How to navigate to system settings
1. Log in to the Admin Console
2. Click on the “Settings” icon at the top of the page.
3. Select the “System Settings” tab on the settings page.
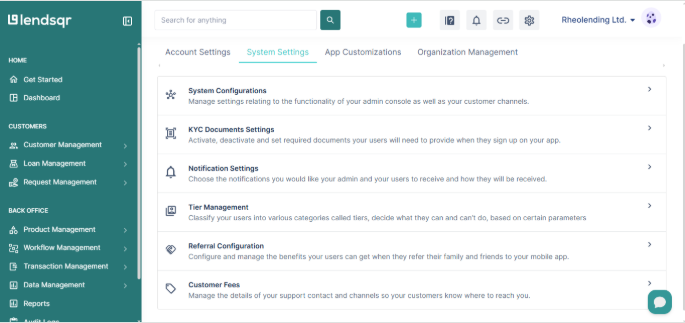
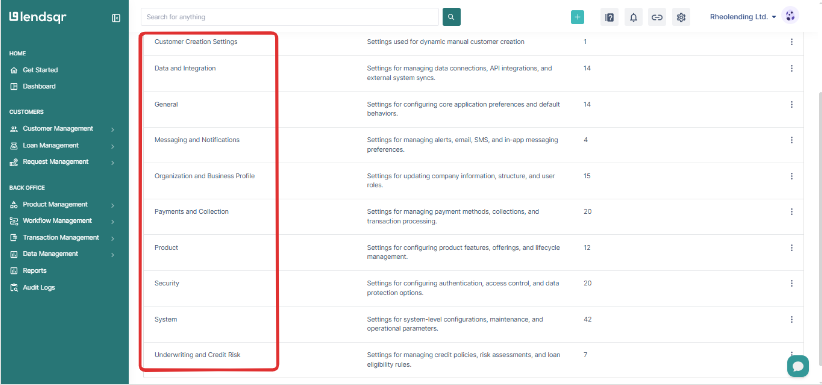
Categories of system settings
The system settings section is organized into six distinct categories. Each one addresses a specific operational area of your platform. Understanding what each category does helps you make informed decisions when configuring your organization.
1. System configurations System configurations control the overall behavior and functionality of the admin console and the connected customer channels. This is the broadest category within system settings. It includes provider settings, integration credentials, access keys, and other configurations that define how the platform operates at a foundational level.
The specific fields available here will depend on the integrations active on your account. For example, if your organization uses a specific SMS gateway or payment provider, the configuration fields for those services will appear here. If a provider needs to be changed, this is where an admin would normally make that update, subject to what is editable directly on the console.
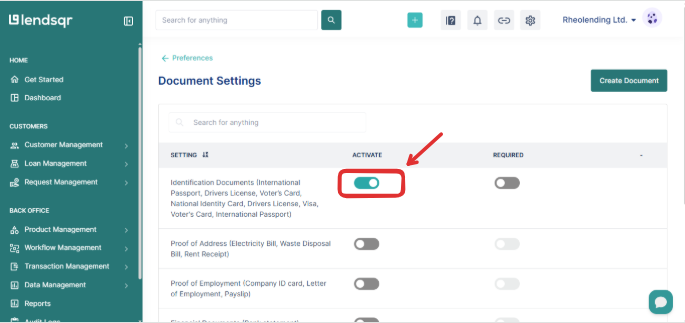
2. KYC documents settings This category manages the identity verification requirements that users must meet during onboarding. KYC, which stands for Know Your Customer, is the process lenders use to verify the identity of borrowers before extending credit or services.
From this section, administrators can activate or deactivate the specific documents users are required to submit when signing up. For instance, you may require users to upload a valid government-issued ID, a proof of address, or a bank verification number (BVN) confirmation. The settings here ensure that your onboarding flow is aligned with both regulatory requirements and your internal business rules.
If you activate too many required documents, users who cannot easily produce them will abandon the onboarding flow before completing signup. If you activate too few, you may approve borrowers whose identities have not been adequately verified, which creates credit risk and potential regulatory exposure. The right configuration depends on your borrower profile: a platform targeting salaried employees with verifiable income may require more documents than one targeting low-income informal workers who lack formal ID..
To activate a required document, go to the KYC Documents Settings section, locate the document type, and toggle it on. Documents with the toggle off will not be shown to users during onboarding.
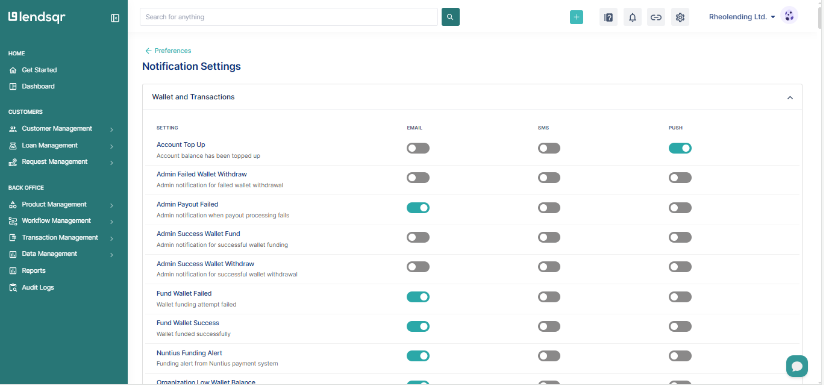
3. Notification settings Notification settings govern how communication is delivered across the platform. They allow administrators to define which notifications are sent, to whom they are sent (users, admins, or both), and through which channels those notifications are delivered.
Supported channels typically include email, SMS, and in-app notifications. For example, you can configure whether borrowers receive an SMS when their loan is approved, or whether your admin team gets an email alert when a new loan request is submitted for review.
Getting notification settings right ensures that all parties receive timely and relevant information without being overwhelmed by unnecessary alerts. It also ensures your customers feel informed throughout their loan lifecycle, which contributes to trust and repayment behavior.
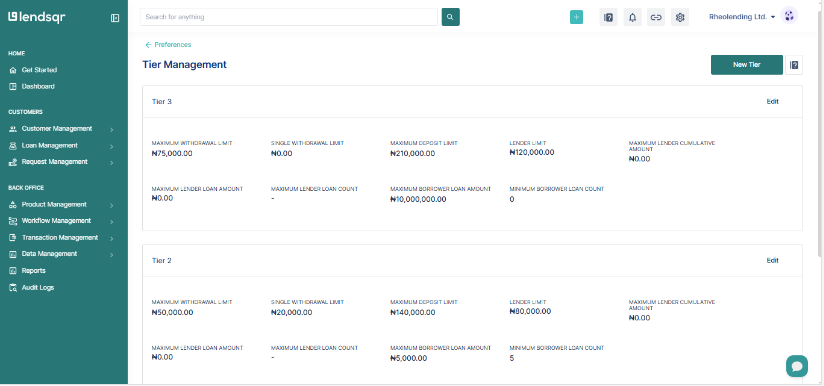
4. Tier management Tier management is used to classify users into different groups based on predefined criteria. Each tier determines what users are allowed to do within the platform. For example, a user on a lower tier may be restricted from requesting loans above a certain amount, while a higher-tier user may have access to more products or higher limits.
This category gives administrators control over user access and feature segmentation. Tiers can be designed around verification levels, so a user who has completed full KYC moves to a higher tier with broader permissions, while a partially verified user remains in a more restricted tier. This creates a structured and controlled way to progressively expand what users can do as they demonstrate compliance and reliability.
A common misconfiguration is setting tier thresholds that are too high for the majority of your target users, effectively locking most people out of core products. Review your user demographics before setting tier limits.
5. Referral configuration Referral configuration defines how your organization’s referral program operates. A referral program is a user acquisition strategy where existing users are incentivized to bring in new users, typically in exchange for a reward such as a cash bonus, loan discount, or account credit.
From this section, administrators can configure the rules and rewards attached to the referral program. This includes defining what counts as a qualifying referral, what the reward value is, and how rewards are disbursed to referring users.
A well-configured referral program can significantly reduce customer acquisition costs while building a community of engaged borrowers. The referral configuration settings in this section allow you to set that up in a way that is sustainable and tied to actual business outcomes.
6. Customer fees The customer fees category manages the charges that are applied to users for various services or transactions on the platform. This section ensures that all applicable fees are clearly defined and consistently applied.
In addition to fee configuration, this section also supports the communication of support contact details and channels. This means customers can easily find out where to go when they have questions or disputes about charges applied to their accounts.
Keeping this section accurate and up to date is important for transparency. Borrowers who understand the fees they are subject to are less likely to dispute charges, and lenders who communicate clearly about fees tend to have better customer satisfaction outcomes.
How to modify system settings
Once you are in the system settings section, you can make changes within each category as needed. For a detailed walkthrough of how to update specific fields, toggle options, and save changes across each category, refer to the companion article: How to modify your system settings.