Access your Back Office at your fingertips.
Download the app now on Google Play Store.
Scan the QR code
You can also scan QR code with your phone to download the app.
How to modify your system settings
Updated
On this page
Every lending business has specific rules for how it runs. Some lenders need to accept Verve cards. Others need to switch their disbursement provider or update an API key that connects their platform to a third-party service. These are not cosmetic changes. Getting them wrong can break core functions like loan disbursement, repayment collection, or borrower notifications.
System settings in Lendsqr control key operational workflows such as disbursement, scoring, and user access. Modifying these settings impacts how your organization processes loans, manages approvals, and enforces compliance. Making the right adjustments ensures smooth operations, while incorrect changes can disrupt critical workflows.
This guide shows you exactly how to change a system setting on Lendsqr, using the example of enabling Verve card acceptance. Every other setting follows the same process.
What are system settings in Lendsqr?
System settings are configurations that determine how your organization’s lending platform behaves. They sit inside the System Configuration section of your Lendsqr admin console and cover nine major categories: data and integration, general, messaging and notifications, organization and business profile, payments and collection, product, security, system, and underwriting and credit risk.
For example, if you want borrowers to repay loans using Verve cards, you need to enable that option under Payments and Collection. If you want to switch your credit scoring provider, you do that under Underwriting and Credit Risk. If a payment provider changes your API credentials, you update that under Data and Integration.
These settings apply across your entire platform. A wrong value can affect every loan application or repayment attempt on your system. That is why the process requires care.
Understanding why modifying system settings matters
Think of system settings as the operating rules of your lending business. When a borrower repays a loan, the platform checks these settings to know which payment methods to accept, which provider to charge, and how to notify both parties. When a new application comes in, the platform checks these settings to know which scoring engine to use.
A lender running a payroll-backed product, for instance, may need to enable direct debit while keeping card-based repayments off. A lender expanding to new markets may need to update their disbursement provider to one that supports local transfers. Both changes happen in system settings. Additionally, the effect of such changes could enforce security and smoother operations. For instance, updating the disbursement approval threshold ensures that high-value loans are double-checked by managers before release, reducing the risk of errors or fraud.
Updating these settings lets you adapt your lending operations without waiting for technical support every time your business needs evolve. Some of the key system configurations that can be modified are:
Data and integrations
Messaging and notifications
Payments and collections
Organization and business profile
Underwriting and credit risk
Verification
Before you begin
System settings are sensitive. Incorrect values can interrupt live services for your borrowers. Before making any change, note the following:
Do not share these settings or their values publicly.
Only modify settings you understand. If you are unsure, contact Lendsqr support at support@lendsqr.com before making changes.
Changes take effect immediately across your platform.
Only team members with the appropriate administrative permissions can access and modify system settings.
How to modify a system setting: step-by-step guide
The steps below use the example of enabling Verve card acceptance to demonstrate the modification of a system setting. This is one of the settings under Payments and Collection, but the same process applies to every setting across all categories.
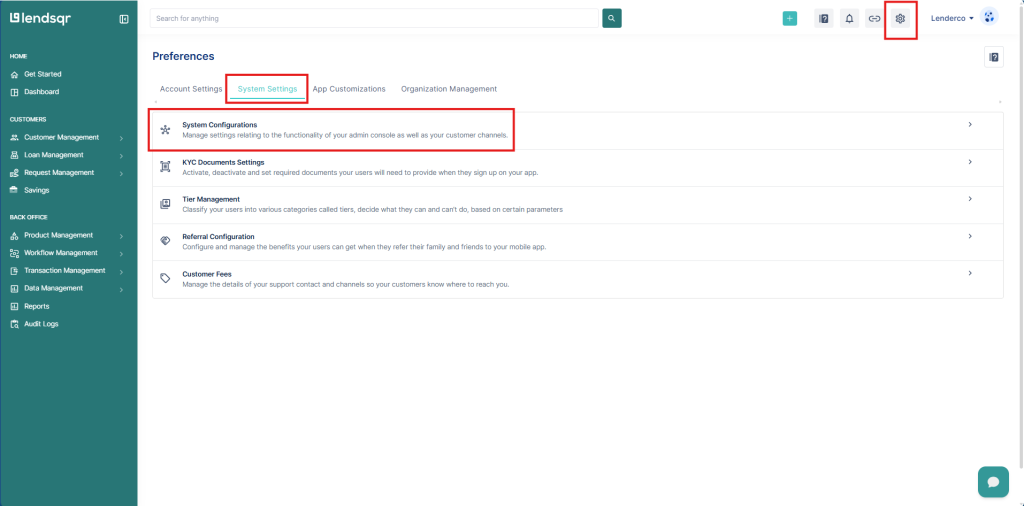
Select “System Configurations” under the System Settings section
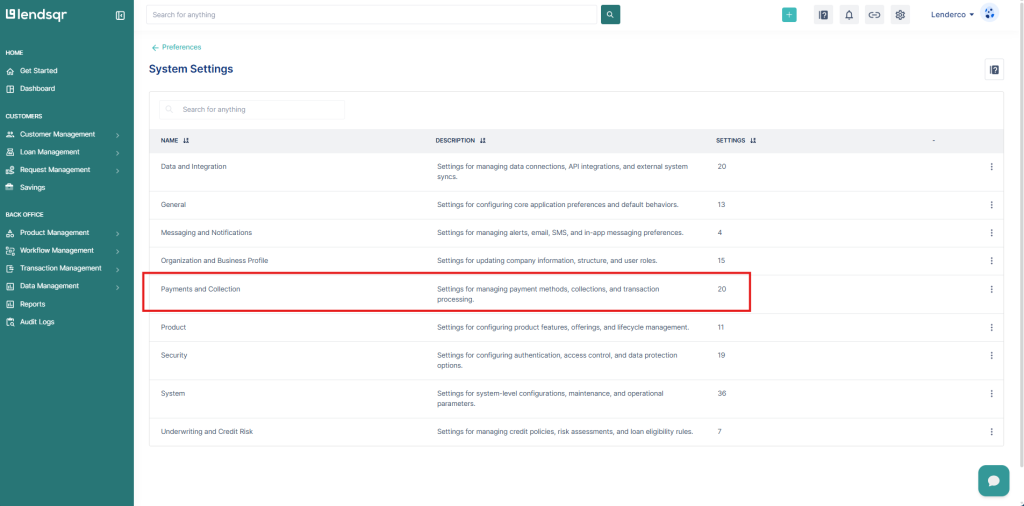
On the System Configuration page, browse or search for the specific setting you want to change. In this example, select Payments and Collection.
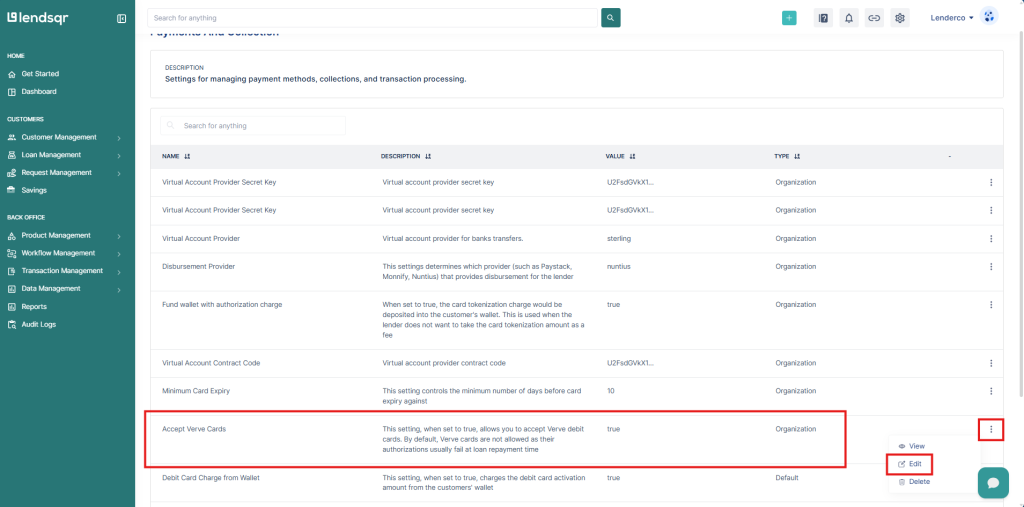
Once selected, you can click the Edit button.
Depending on the fields expected for the respective settings, enter the value and save changes. In this scenario, select “Accept Verve cards” and the More icon besides it.
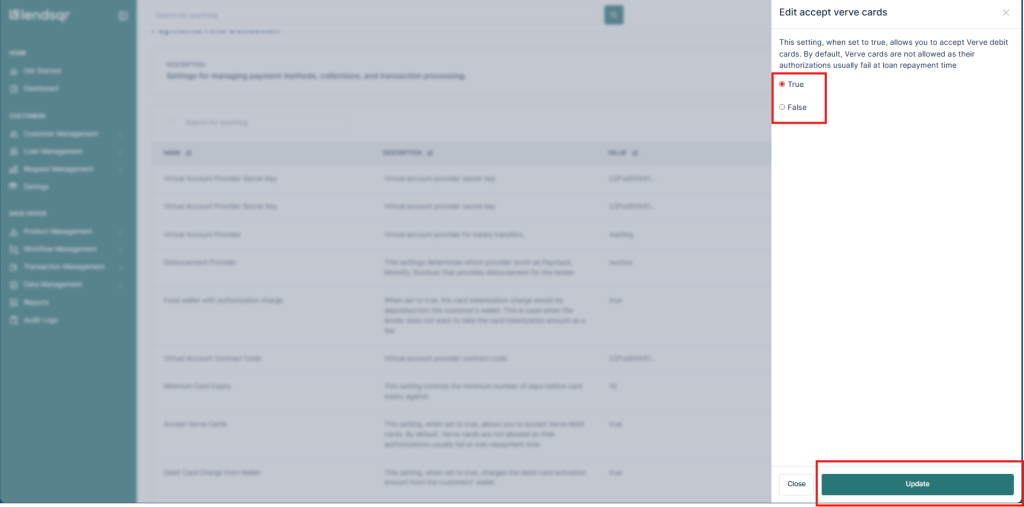
To complete the change, we then select “True” and click on “Update“
Modifying the values of your settings
And voila, your change applies immediately. Borrowers on your platform can now use Verve cards for loan repayments.
For other settings, the fields and options will differ. Some settings require you to enter text values like API keys or provider names. Others use toggles or dropdowns. The structure is always the same: locate the setting, click the edit or more options control, enter the correct value, and save.
Work in stages when updating multiple settings. Change one setting, verify it works as expected, then move to the next. This makes it easy to identify which change caused a problem if something does not work.
For high-impact settings like disbursement provider credentials or scoring configurations, test with a small loan transaction before relying on the new setting for your full portfolio.
Keep a record of the values you are replacing before making any update. If you need to roll back a change, having the old value on hand saves time.
Learn more
To understand the full list of categories and what each setting controls, read the companion guide: Managing system settings.
For broader context on how lending operations are configured on Lendsqr, visit the Lendsqr blog, which covers topics like credit risk management, platform setup, and lending best practices.