Access your Back Office at your fingertips.
Download the app now on Google Play Store.
Scan the QR code
You can also scan QR code with your phone to download the app.
Activating a guarantor requirement for your loan product
Updated
On this page
When a borrower defaults on a loan, the lender absorbs the loss. That is the blunt reality of unsecured lending. One of the most practical ways to reduce that exposure is to require a guarantor before disbursing a loan. A guarantor is a third party who agrees to take on repayment responsibility if the borrower fails to pay.
Lendsqr lets you configure this requirement directly on any loan product. You can choose whether to require one guarantor or more, depending on the risk level of the product. This guide explains what the guarantor requirement does, how it affects the loan approval flow, and how to set it up in your admin console.
What a guarantor requirement does in lending
A guarantor requirement means a borrower cannot receive a loan until at least one other person has reviewed and accepted responsibility for the debt. That person, the guarantor, typically completes a verification step to confirm their consent.
This matters for lenders for several reasons.
It raises the psychological barrier to default. A borrower who knows a friend or family member is on the hook for their debt is less likely to walk away from repayment. The social accountability works alongside the financial one.
It gives lenders an additional recovery path. If the borrower stops paying, the lender can pursue the guarantor. This is especially useful for loan products where borrowers have limited credit history or where income verification is difficult.
It signals borrower intent. A borrower willing to involve a guarantor is making a more serious commitment than one who is not. Lenders often find that borrowers with guarantors perform better on average than those without.
Not every loan product needs a guarantor. The decision depends on the risk profile of the product and the borrowers it targets.
First-time borrowers: Someone applying for their first loan has no repayment history with your platform. A guarantor adds a layer of accountability while you build a track record with that borrower. Once they repay successfully, future loans can proceed without one.
High-value loans: For loans above a certain threshold, the financial consequence of default becomes significant. Requiring a guarantor for larger amounts is a proportionate response to higher exposure.
Thin-file borrowers: Borrowers with limited or no formal credit history are harder to assess using traditional scoring. A guarantor supplements that gap, giving the lender an additional point of accountability.
Group or community lending: In some lending models, members of a group guarantee each other’s loans. Requiring a guarantor per member formalizes this arrangement within the loan product structure.
How guarantor validation affects the loan approval flow
Once you activate the guarantor requirement on a product, it becomes a mandatory step in the borrower’s application journey. The loan cannot proceed to approval or disbursement until the required number of guarantors have completed validation.
Here is how the flow typically works. A borrower submits a loan request and nominates their guarantor or guarantors. Each guarantor receives a notification and completes a verification step, which may include confirming their identity and accepting the guarantee terms. Once all required guarantors validate, the application moves forward in the review queue.
This adds time to the approval process, which is a trade-off lenders should plan for. If your product targets borrowers who need a fast turnaround, a single guarantor requirement keeps the delay manageable. If your product serves higher-risk segments where accountability matters more, requiring two guarantors may be worth the longer timeline.
It is also worth planning for the edge case where a guarantor declines or fails validation. If one guarantor declines, the borrower needs to nominate a replacement. The loan stays pending until the required number of validated guarantors is in place. If you require two guarantors and one declines, the borrower must find and submit a new one before the application can continue.
Your team should monitor applications sitting in the pending guarantor state, since delays here sometimes reflect a borrower who is struggling to find willing guarantors, which can itself be a useful signal about loan quality.
Step-by-Step: How to activate the guarantor requirement
Follow the steps below to configure your loan product with a guarantor requirement in the Lendsqr Admin Console:
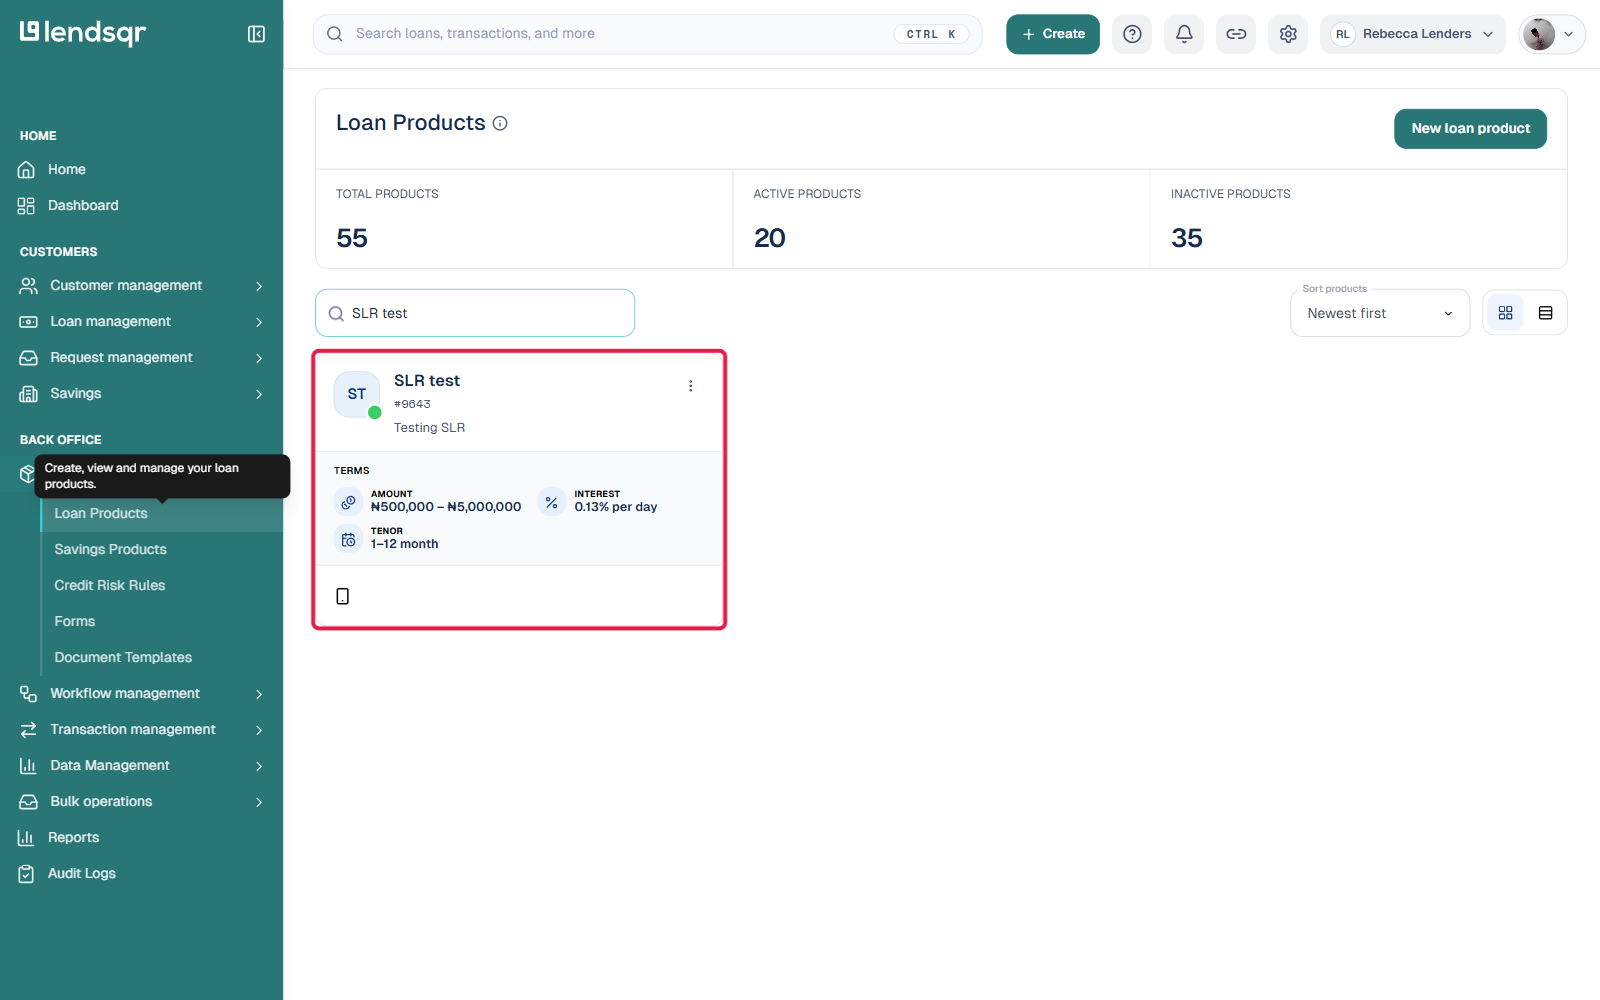
Go to “Loan Products” under the Product Management section.
Select an existing loan product or create a new one.
Ensure the loan product is saved before proceeding.
2: Open Product settings and find the guarantor options
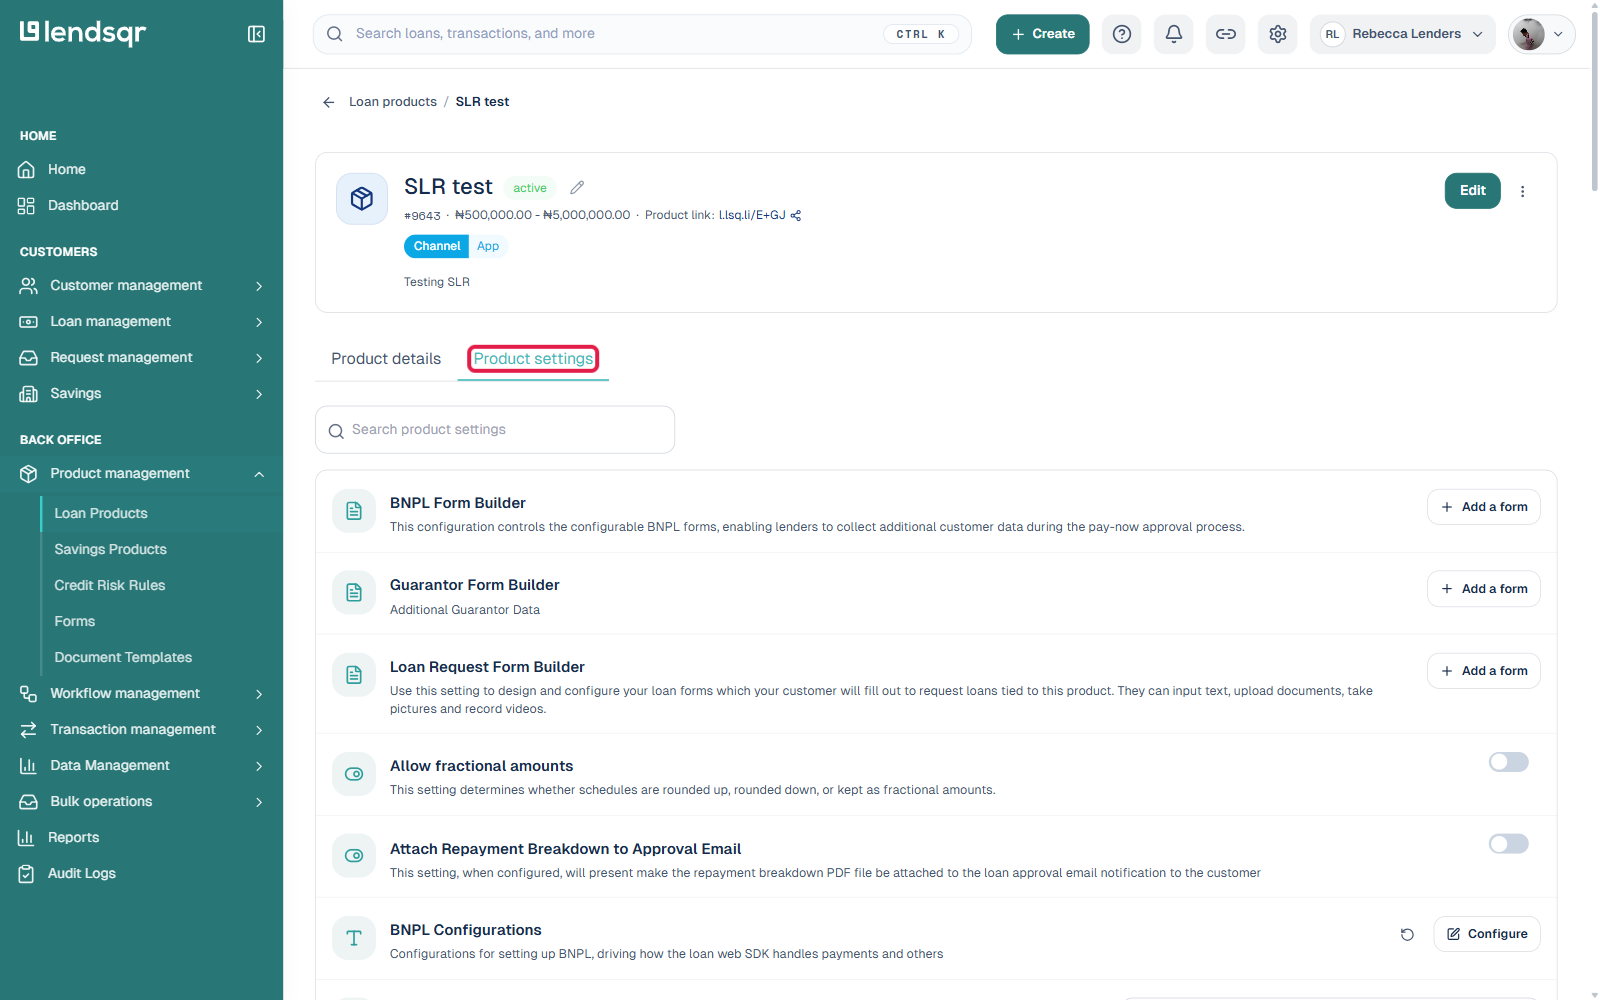
Open the loan product and click the “Product settings” tab (next to “Product details”).
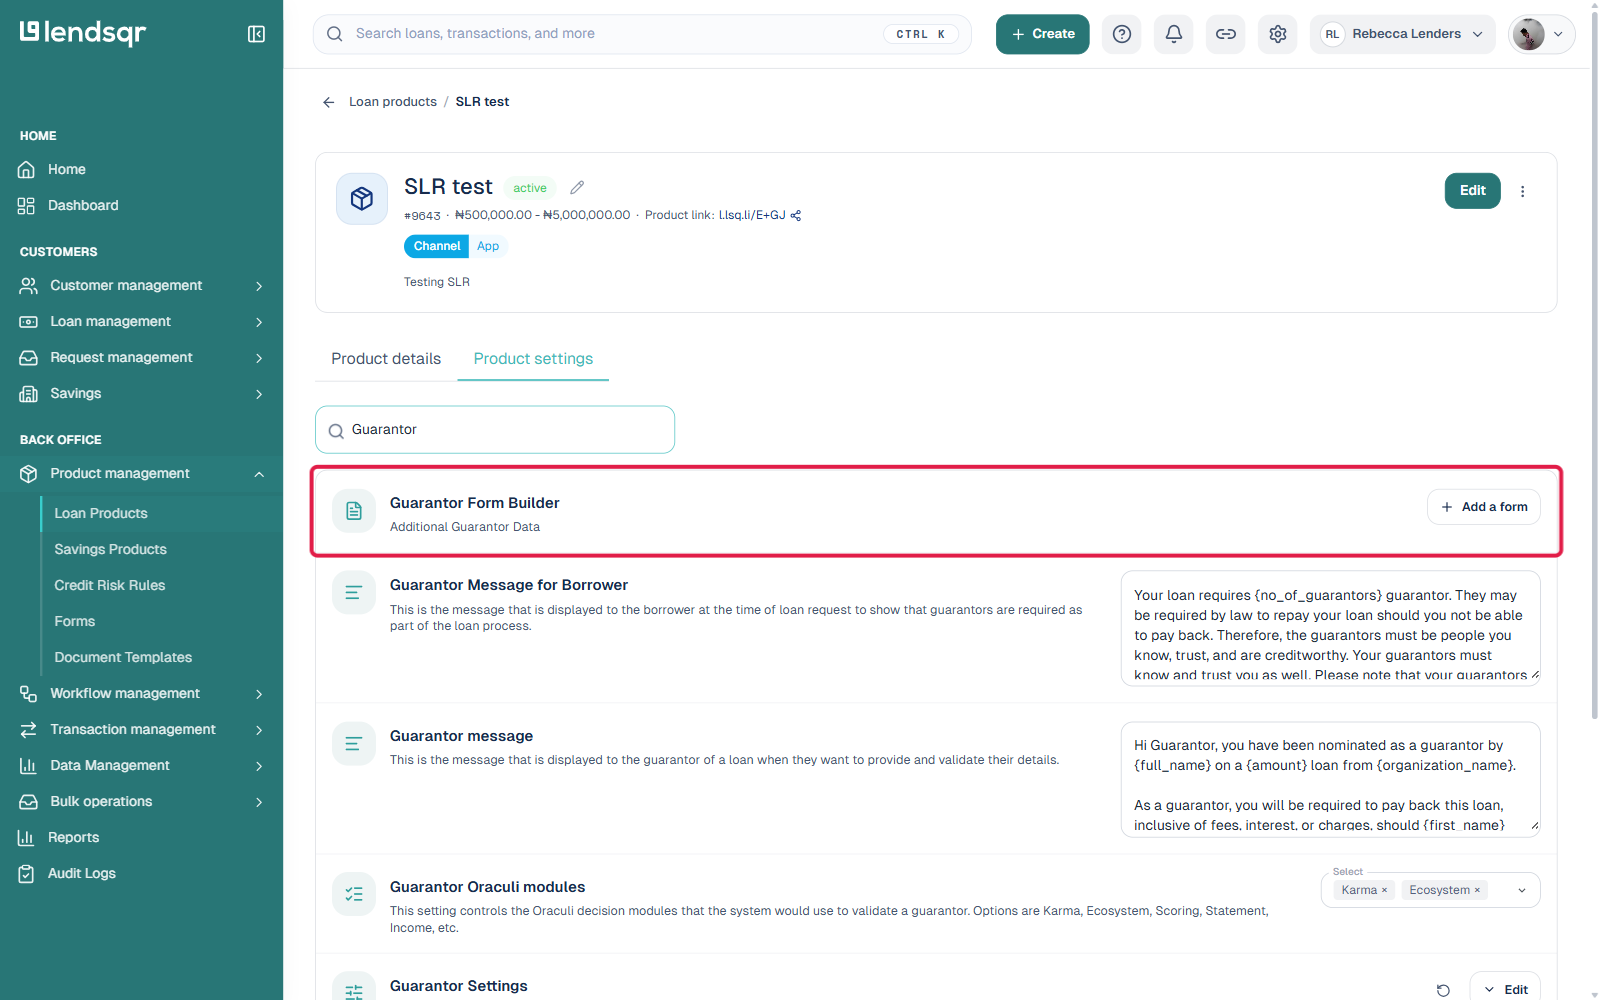
This opens a long, searchable list of individual settings rather than a single form. Type “Guarantor” into the “Search product settings” box at the top to filter the list down to just the guarantor-related settings.
3: Turn on “Guarantor Required” and set the count
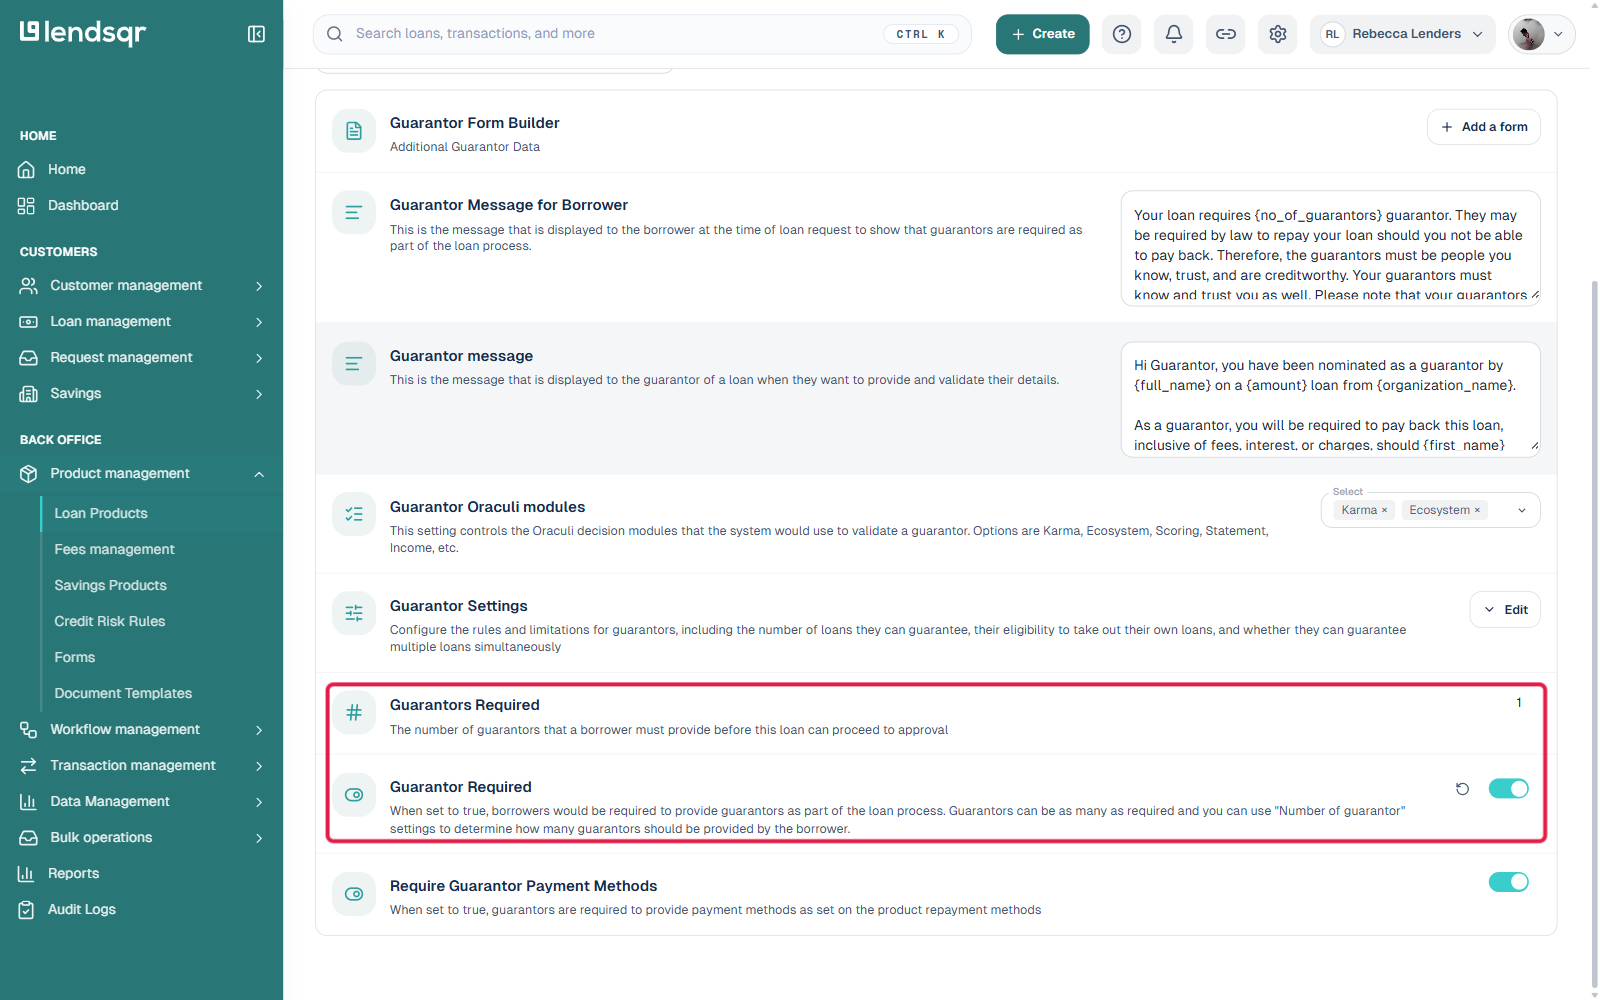
Find “Guarantor Required” in the filtered list and switch its toggle on. Unlike the old flow, there’s no separate modal or “Edit” step: each setting in this list applies as soon as you change it, and a small revert icon appears next to it so you can undo the change if needed.
Find “Guarantors Required” (a separate row just above it) and set the number of guarantors a borrower must provide, e.g. 1 or 2.
While you’re in this filtered view, a few related settings are worth knowing about: “Guarantor Message for Borrower” and “Guarantor message” customize the text shown to the borrower and to each nominated guarantor respectively, “Guarantor Oraculi modules” controls which decision-engine checks run against a guarantor, “Guarantor Settings” configures limits like how many loans one person can guarantee at once, and “Require Guarantor Payment Methods” determines whether guarantors must also provide a repayment method, drawn from whichever repayment methods are already enabled on the product.
Collecting additional data from guarantors with the Guarantor Form Builder
The built-in guarantor requirement covers identity verification and, optionally, a payment method. If your loan product needs more than that from a guarantor, for example a relationship-to-borrower field, an employer reference, or any other custom detail, you can attach a form to the product that collects it.
This is what the “Guarantor Form Builder” row at the top of the guarantor settings does. It is labelled “Additional Guarantor Data” and has an “Add a form” button. Clicking it opens a picker where you can attach a form your organization has already built, or create a new one from scratch using the same drag-and-drop form builder used for loan application forms: add fields such as short text, dropdowns, file uploads, or ID verification widgets, arrange them into pages, and publish the form. Once attached, that form is presented to each nominated guarantor as part of their verification step, in addition to the standard identity and payment method checks.
A product does not need a Guarantor Form Builder form attached for the guarantor requirement to work, this is an optional way to collect extra information beyond what Lendsqr asks for by default.
How to confirm it is active
Since each setting applies immediately, there’s no separate save step to confirm. To double-check the current state at any time:
Go back to the Product settings tab and search “Guarantor” again.
The “Guarantor Required” toggle shows the current state directly: on (teal) means active, off (grey) means inactive. A revert icon next to it means it has been changed from the product’s default.
To learn more about managing guarantor details on individual borrower profiles, read the guide on how to manage guarantor details. For practical guidance on identifying risky guarantors before approving a loan, visit the Lendsqr blog.