Access your Back Office at your fingertips.
Download the app now on Google Play Store.
Scan the QR code
You can also scan QR code with your phone to download the app.
How to enable E-Mandate Direct Debit for Lenders in Lendsqr
Updated
On this page
Direct debit has long been a key feature within Lendsqr, allowing lenders to automatically collect repayments from borrowers without requiring repeated manual intervention. However, the traditional direct debit process, which relies heavily on bank-side approvals, can sometimes be slow and operationally demanding.
To address this, Lendsqr introduces E-Mandate, a faster and more streamlined approach to mandate activation. This feature allows borrowers to approve their mandates digitally with minimal friction, reducing turnaround time and improving the overall repayment setup experience.
This guide explains how E-Mandate works, how it differs from manual mandate activation, and the exact steps required to enable it within your admin console.
Understanding e-mandate direct debit
E-Mandate is a digital mandate activation process that simplifies how borrowers authorize automatic repayments. Instead of relying on manual documentation and bank processing, borrowers can complete the mandate setup through a guided digital flow.
Once activated, the mandate allows the system to automatically debit the borrower’s account when repayments are due. This ensures consistency in collections and reduces the risk of missed payments.
An important point to note is that this configuration applies globally. Once you select a mandate activation type, all loan products that use direct debit as a repayment method will follow the selected approach.
Mandate activation options
Lendsqr provides two options for mandate activation. Understanding how each option works will help you choose the one that best fits your operational needs.
Manual mandate activation
When the manual option is selected, borrowers are required to complete the mandate process themselves during the loan application flow.
They will be prompted to add their bank account details and either sign on-screen or upload a signed document. This information is then sent to the bank for processing and activation.
While this method is reliable, it can take longer due to the involvement of manual verification and bank-side processing.
E-mandate activation
When E-Mandate is selected, the process becomes significantly faster and more automated.
After successfully applying for a loan, the borrower receives an SMS with instructions on how to approve the mandate. As part of the process, the borrower is required to transfer a small activation fee to a designated account. Once this step is completed, the mandate is typically activated within 24 hours.
This method reduces friction, speeds up activation, and improves the borrower experience.
Access and permission requirements
Before attempting to configure mandate activation, it is important to confirm who has the appropriate permissions to update this setting.
Not all administrators may have access to modify system-level configurations such as mandate activation type. You should clarify with a super admin within your organization to determine exactly which roles are authorized to make these changes.
If you do not have the required access, request the necessary permissions or ask an authorized user to complete the configuration on your behalf. This step helps prevent unauthorized changes and ensures proper governance over critical system settings.
Step-by-step guide
Follow the steps below to enable E-Mandate direct debit within your Lendsqr admin console.
Ensure that you have the necessary permissions to access system settings and make configuration changes. Without the appropriate access level, you may not be able to modify mandate settings.
Step 2: Access the settings menu
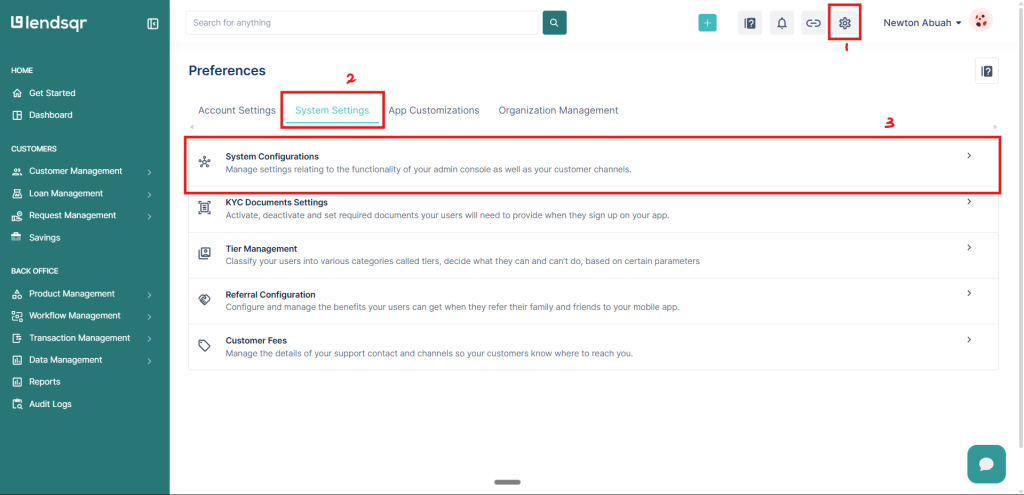
Once you are logged in, navigate to the top right-hand corner of the interface and click on the settings icon.
This will open the main settings panel, where system-level configurations are managed.
Step 3: Navigate to system configurations
Within the settings panel, locate and select the System Settings tab.
From there, click on System Configurations to access a broader range of configurable system options.
This section contains the controls needed to manage how mandates are activated across your platform.
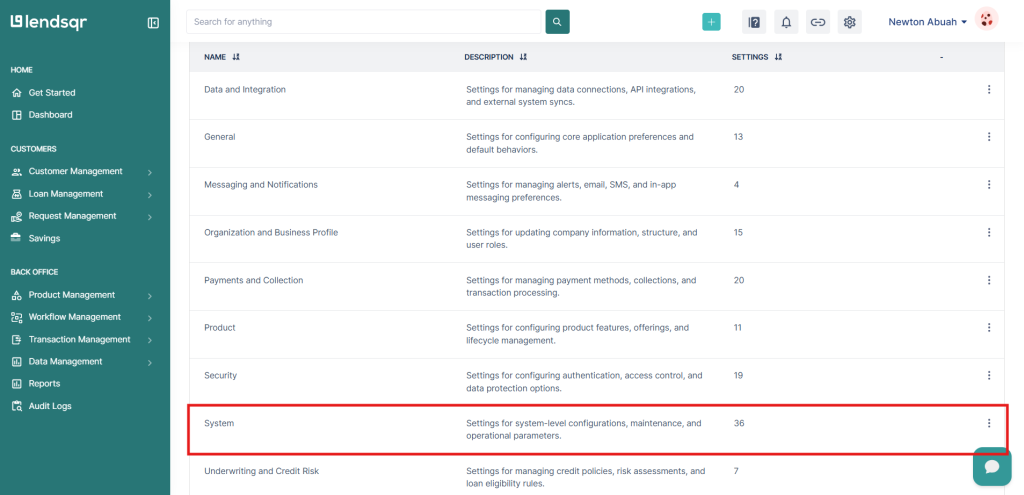
Step 4: Open system settings
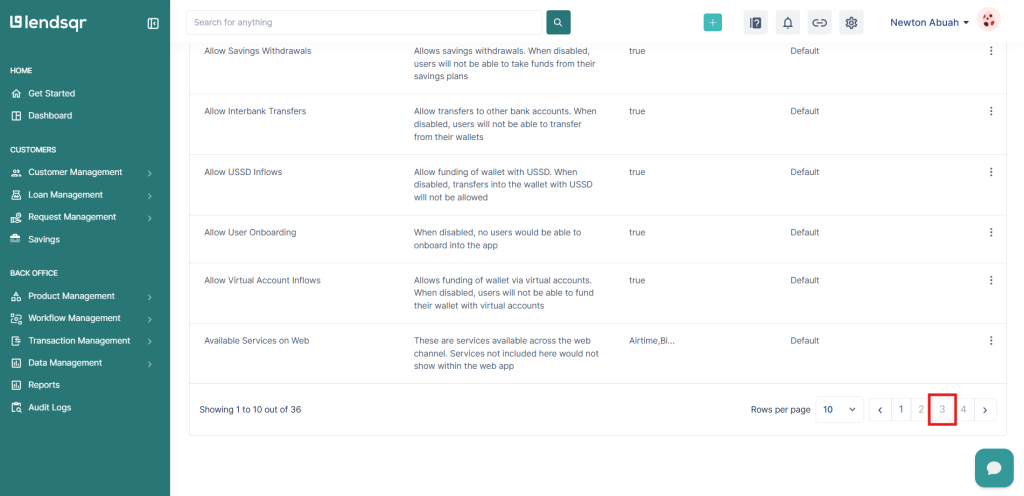
Under System Configurations, find and click on System Settings.
This area includes various operational controls that affect how different features behave within the system, including mandate activation.
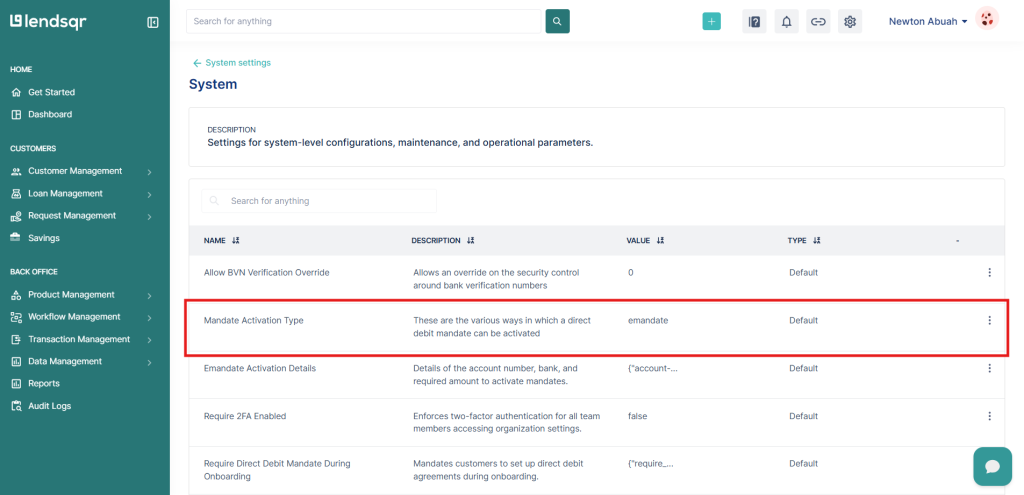
Step 5: Edit mandate activation type
On the system settings page, locate the option labeled “Mandate Activation Type.”
Click on the Edit option next to it. This will allow you to modify how mandates are activated for all applicable loan products.
Step 6: Select your preferred mandate activation method
Choose between Manual and E-Mandate based on your operational preference.
If you select Manual, borrowers will go through the traditional process of adding their account details and completing a signature step, after which the bank processes the mandate.
If you select E-Mandate, borrowers will receive an SMS after applying for a loan. They will follow the instructions provided, including transferring a small activation fee, after which the mandate will be activated within approximately 24 hours.
Once you have made your selection, save your changes to apply the configuration.
Step 7: Confirm activation and proceed with loan operations
After saving your preferred option, the selected mandate activation method will automatically apply to all loan products that use direct debit.
Once a borrower successfully completes the mandate activation process, you can proceed with loan disbursement. The system will then automatically debit the borrower’s account when repayments are due.
After the mandate is activated, the repayment process becomes automated.
On each repayment date, the system will attempt to debit the borrower’s account based on the agreed schedule. This reduces the need for manual follow-ups and improves collection efficiency.
It is important to ensure that mandates are successfully activated before disbursing loans. This guarantees that repayment mechanisms are in place from the start of the loan lifecycle.
Common errors and how to fix them
While setting up and using E-Mandate is generally straightforward, there are a few common issues that may arise.
One common issue is insufficient permissions to access or edit the mandate activation setting. This can prevent administrators from making necessary updates. To fix this, confirm access with a super admin and ensure that the correct permissions are granted.
Another issue is selecting the wrong mandate activation type. This can lead to an unintended borrower experience. To resolve this, revisit the system settings, verify your selection, and update it if necessary.
Borrowers not completing the E-Mandate process is another frequent challenge. This often happens when users do not follow the SMS instructions or are unaware of the required steps. To address this, provide clear communication and reminders to guide borrowers through the process.
Delayed activation may also occur. While E-Mandate is typically completed within 24 hours, delays can happen if the required steps are not fully completed. In such cases, confirm that the borrower has completed the transfer and allow sufficient processing time.
Incorrect or incomplete bank details can prevent successful mandate activation. If this occurs, the borrower may need to restart the process with accurate information.
Finally, changes not reflecting in the system may be due to unsaved configurations. Always ensure that you save your changes after updating the mandate activation type.
Best practices for using e-mandate
When implementing E-Mandate, it is important to ensure that borrowers clearly understand the process. Providing clear instructions and setting expectations around the activation timeline can help reduce confusion.
Monitor mandate activation rates to identify any drop-offs in completion. If many borrowers fail to activate mandates, consider improving communication or simplifying instructions.
Align your mandate activation method with your target audience. Borrowers who are comfortable with digital transactions may prefer E-Mandate, while others may require manual options.
Regularly review the performance of your direct debit system, including successful debits, failed attempts, and repayment consistency.
Conclusion
E-Mandate direct debit offers a faster and more efficient way to set up automated loan repayments within Lendsqr. By reducing reliance on manual processes and enabling digital mandate activation, it improves both operational efficiency and borrower experience.
The setup process involves selecting your preferred mandate activation type within the system settings and applying it across all relevant loan products. Once configured, the system ensures that repayments are automatically collected as scheduled.
By confirming access permissions with a super admin, following the correct setup steps, addressing common errors, and applying best practices, lenders can streamline their repayment processes and improve overall collection performance.