Access your Back Office at your fingertips.
Download the app now on Google Play Store.
Scan the QR code
You can also scan QR code with your phone to download the app.
Creating multiple whitelists entries
The “Create Multiple” option helps you onboard many customers to the whitelist quickly by uploading their details in bulk using an Excel sheet. It’s ideal when you want to target a specific group like salary earners from a partner organization, loyal customers with good repayment history, or pre-approved individuals for a new loan product.
For example, if you’re launching a loan product for verified employees of a company, ask their HR to share a staff list with BVNs and other required fields. You can then upload this data and whitelist all qualifying employees at once. This gives them access to benefits like special interest rates, flexible tenors, or exemptions from requirements like guarantors.
The create multiple feature was designed specifically to save lenders time when dealing with large volumes of borrowers who need to be added to the whitelist. Rather than entering each borrower’s details manually one by one, which can take hours or even days depending on the size of your target group, you can prepare all the information in a single Excel document and upload everything at once.
This bulk upload functionality becomes particularly valuable in several scenarios. If you have partnered with a corporate organization to offer loans to their employees, you might receive a list of hundreds or thousands of eligible staff members. Manually entering each person would be impractical. Similarly, if you are running a promotional campaign targeting customers who have demonstrated excellent repayment behavior, you can compile their information and whitelist them all simultaneously to give them access to preferential loan terms.
The system is built to handle large volumes efficiently. Whether you are uploading 50 borrowers or 5,000, the process remains the same. The platform processes the Excel sheet, validates the information, and creates whitelist entries for all qualifying borrowers in the document.
When to use the create multiple option
There are specific situations where the create multiple option becomes not just convenient but essential for efficient operations. Understanding when to use this feature helps you streamline your lending operations and serve your customers better.
One common use case is when launching targeted loan products. Let’s say you want to introduce a special loan offering for verified civil servants in your state. You would work with relevant government agencies to obtain a list of eligible employees, complete with their BVNs and employment details. Instead of asking each civil servant to apply individually and then whitelisting them one at a time, you can prepare the entire list and upload it in one go. This approach allows you to activate the loan product for all qualified individuals simultaneously.
Another scenario is when you are expanding into a new customer segment. If you have identified a group of potential borrowers through market research or partnership agreements, you can prepare their details in advance and whitelist them before officially launching your services to that segment. This preparation ensures that when you announce the new loan product, eligible customers can immediately access it without delays.
The feature also proves valuable when managing seasonal lending programs. For instance, if you offer back to school loans to parents and have compiled a list of eligible borrowers based on previous interactions or referrals, you can whitelist them all just before the school resumption period. This timing ensures they can access the funds exactly when they need them.
Corporate partnerships represent another major use case. Many lenders collaborate with businesses to offer salary advance loans or emergency loans to employees. When such partnerships are formalized, the employer typically provides a verified list of employees who meet the criteria for the loan product. Using the create multiple option, you can onboard the entire workforce quickly and make the loan product available to them within hours rather than weeks.
Preparing your data for bulk upload
Before you begin the upload process, proper data preparation is critical. The quality and accuracy of your Excel sheet directly impact how smoothly the upload will go and whether all your borrowers will be successfully whitelisted.
Start by downloading the template sheet provided on the platform. This template is not just a suggestion but a necessary tool. It comes pre-formatted with all the required column headers and the exact structure the system expects. Using this template eliminates formatting errors that could cause the upload to fail or process incorrectly.
When filling in the template, pay close attention to the required fields. These typically include the borrower’s BVN, which serves as the primary identifier in the Nigerian lending ecosystem. The BVN must be entered exactly as it appears in official records. A single digit error will cause the system to reject that entry or, worse, link the whitelist benefits to the wrong person.
You will also need to specify loan product details for each borrower. This includes the interest rate they qualify for, the minimum and maximum loan amounts they can access, the minimum and maximum tenor options available to them, and whether they are exempt from providing guarantors. If different borrowers qualify for different terms, you can customize each row accordingly. For instance, senior employees might qualify for higher loan amounts and longer tenors than junior staff.
Accuracy is non-negotiable when preparing your data. Double check every BVN, every email address, and every phone number. A wrong email means the borrower will not receive notifications about their whitelist status. An incorrect phone number might prevent them from completing verification steps. These small errors can create significant customer service issues down the line.
It is also wise to verify that all the borrowers you are uploading actually meet your lending criteria. The whitelist feature gives these borrowers special privileges, so you want to ensure they genuinely qualify. If you are whitelisting based on employment with a specific company, confirm that all names on the list are current employees. If you are using repayment history as a criterion, verify that the data is up to date.
Step by step process for uploading multiple borrowers
Once your Excel sheet is properly prepared and verified, you are ready to begin the upload process. Here is how to do it step by step.
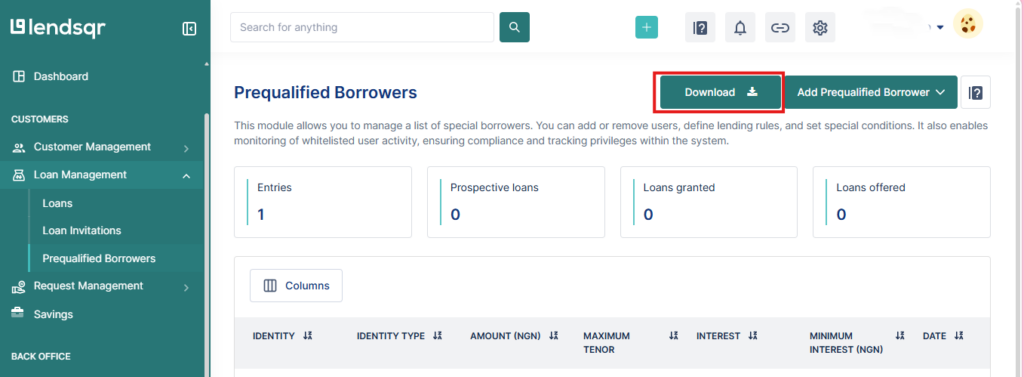
Step 1: Navigate to prequalified borrowers
Log into your Pecunia dashboard and navigate to the loan management section. Look for the prequalified borrowers option, which is where all whitelist management happens. When you click on it, you will see a list of borrowers who have already been whitelisted. This list might be empty if you are using the feature for the first time.
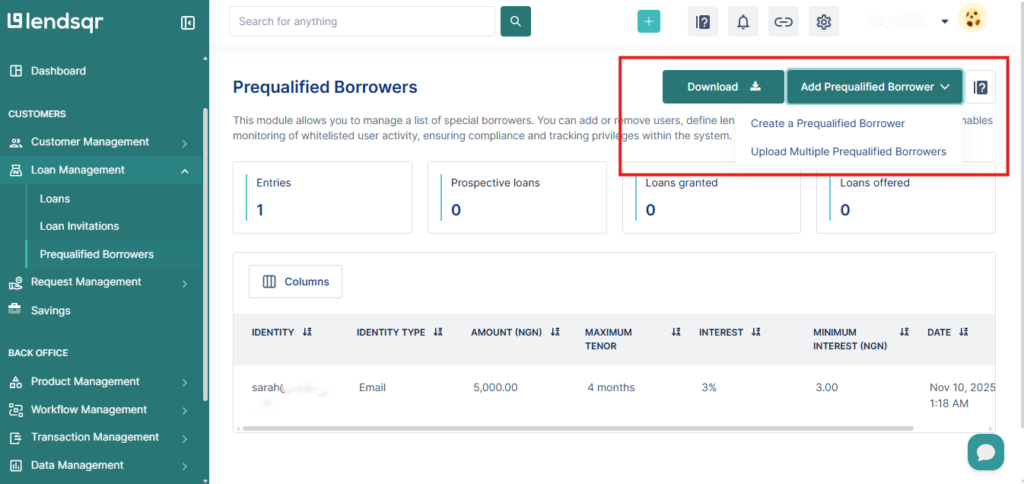
Step 2: Click on “Add prequalified borrower”
At the top of the page or in a prominent position, you will find a button labeled “Add Prequalified Borrower.” Click on this button. A modal or dropdown will appear giving you two options. The first option is to create a single prequalified borrower, which is useful when you only need to whitelist one person. The second option is to upload multiple prequalified borrowers, which is what you need for bulk uploads.
Step 3: Select the option to upload multiple prequalified borrowers
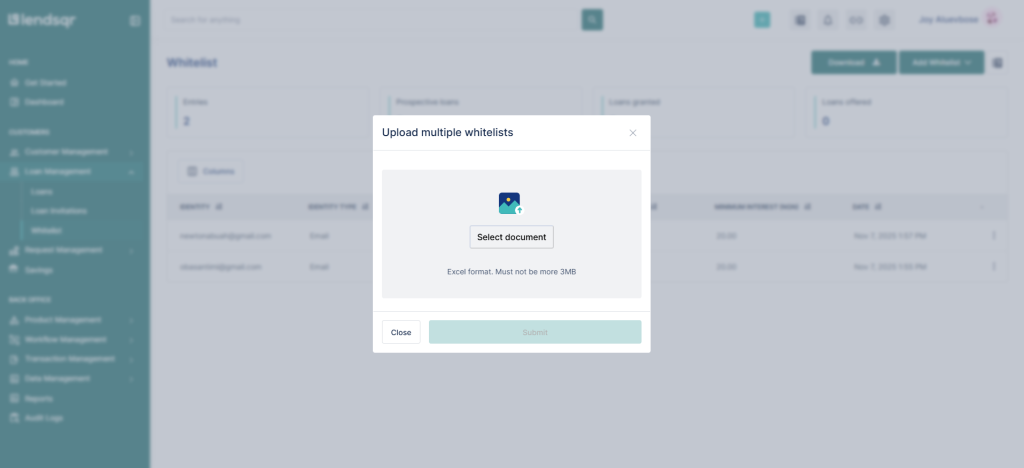
Select the option to upload multiple prequalified borrowers. This action will open a new interface designed specifically for bulk uploads. You will see instructions on the screen and a button or area where you can upload your Excel file.
Before uploading, make sure you have used the correct template. Click on the option to download the template sheet if you have not already done so. This template comes pre-filled with the required format and field headers. Using any other format may cause errors during processing.
Step 5: Enter the necessary details in the template
Fill in the customer information directly into the downloaded template sheet. These fields are the same as those listed in the single entry whitelist. You will need to enter details such as BVN, loan product terms, interest rates, minimum and maximum tenors, guarantor requirement, and any other fields specified in the template. Be thorough and accurate with every entry.
Step 6: Save the completed sheet
Once all necessary details have been entered correctly, save the sheet. Make sure your Excel sheet is saved and closed before uploading. Some systems cannot read files that are currently open in Excel. Save the file in a compatible format, typically .xlsx or .xls, as these are the standard Excel formats.
Step 7: Upload the sheet
Click on the upload button or drag your file into the designated upload area on the create multiple interface. The system will begin processing your file immediately. Depending on how many rows of data you have uploaded, this might take a few seconds or a few minutes. Do not close the browser or navigate away from the page while the upload is processing, as this could interrupt the process and cause errors.
Step 8: Review the upload summary
Once the upload is complete, the system will display a summary. This summary shows how many borrowers were successfully added to the whitelist and if there were any errors. Common errors include duplicate BVNs, missing required fields, or data that does not match the expected format.
What happens after the upload
After successfully uploading your borrowers, several things happen on the backend. The system creates individual whitelist profiles for each borrower in your Excel sheet. These profiles are linked to their BVNs, so when they log into your platform or apply for a loan, the system automatically recognizes them as whitelisted customers.
The special terms you specified in the Excel sheet are applied to their accounts. If you set a preferential interest rate of 2% per month instead of your standard 3%, that is what they will see when they apply for a loan. If you exempted them from providing guarantors, the system will not require guarantor details during their loan application process.
Best practices for using the create multiple feature
To get the most value from the create multiple feature, follow these best practices.
Always start with a small test upload before processing large volumes. Upload 5 or 10 borrowers first to confirm that your Excel sheet format is correct and the system processes the data as expected. Once the test is successful, proceed with the full upload.
Keep detailed records of who you whitelist and why. Maintain a master copy of every Excel sheet you upload along with notes about the criteria used to select those borrowers. This documentation becomes valuable for audits, performance analysis, and future decision making.
Regularly review your whitelist to ensure it remains relevant. Business conditions change, partnerships end, and borrower circumstances evolve. Set a schedule to audit your prequalified borrowers list, perhaps quarterly, to remove individuals who no longer meet the criteria or add new ones who now qualify.
Finally, monitor the performance of your whitelisted segments. This data will help you refine your whitelisting criteria over time and identify which segments deliver the best returns.
The create multiple feature transforms what could be a tedious manual process into an efficient, scalable operation. By understanding when to use it, how to prepare your data properly, and following best practices, you can onboard hundreds or thousands of borrowers quickly while maintaining accuracy and delivering an excellent customer experience.


 feature")

