Access your Back Office at your fingertips.
Download the app now on Google Play Store.
Scan the QR code
You can also scan QR code with your phone to download the app.
How to bulk edit multiple loan repayment schedules on Lendsqr
Updated
On this page
Sometimes a single loan’s repayment schedule needs to change. But what happens when dozens of loans need the same adjustment at the same time? Opening each loan individually and editing it row by row is not just tedious but also a real operational risk. Errors creep in, updates get missed, and borrowers end up with inconsistent schedules. Lendsqr’s bulk edit feature lets you update the repayment schedules for multiple loans in one upload.
You prepare a spreadsheet with the corrected schedule data, upload it against the loan, and the system applies the changes immediately. As a result, what would take hours of manual work gets done accurately in a few minutes.
This guide explains when bulk editing is the right choice, how to prepare your file correctly, the risks to be aware of, and the step-by-step process for completing it on Lendsqr.
When to use bulk editing versus individual edits
Not every schedule change calls for a bulk upload. Understanding the difference helps you choose the right approach and avoid unnecessary complexity.
Use individual edits when you need to adjust the schedule for a single loan. For example, if one borrower requests a payment date shift due to a personal circumstance, editing that loan’s schedule directly from the loan profile is faster and carries less risk than preparing a full upload file.
Bulk editing, on the other hand, is the right tool when multiple loans need the same type of structural change. Consider these common scenarios where bulk editing makes practical sense.
A regulatory change requires all active loans to reflect a new interest rate or revised repayment structure. In that case, a lender might need to update hundreds of loan schedules to comply before a set deadline. Similarly, when a lender extends a grace period to a specific cohort of borrowers, updating each loan individually becomes impractical. Furthermore, if a data entry error during loan booking resulted in incorrect due dates across a product cohort, fixing each loan one by one would take far too long.
In each of these situations, bulk editing allows lenders to make accurate, consistent changes across many loans in a controlled, repeatable way. That said, because the changes affect multiple borrowers at once, the stakes are also higher. A wrong entry in a bulk file can impact many loans simultaneously. This is why careful preparation and review matter greatly before submitting a bulk edit.
How bulk edits affect repayment tracking and reporting
When you submit a bulk edit, the system replaces the existing repayment schedule entries for the affected loan with the new data you uploaded. This update flows through to every part of the platform that depends on schedule data.
Specifically, the due dates your borrowers see in their app will reflect the updated schedule. Automated reminders and direct debit collection triggers will also align with the new dates and amounts. In addition, your loan reports will pull from the updated schedule when calculating overdue amounts, repayment performance, and outstanding balances.
This is an important point: a bulk edit does not just change numbers in a table. It changes how the system behaves toward the borrower going forward. Therefore, it is critical to review the uploaded data carefully before submitting, and to keep a backup copy of the original schedule in case you need to reverse the changes manually.
Preparing your upload file
Your file must be formatted correctly with specific columns to ensure successful processing. This section provides a breakdown of how the file to be uploaded can be prepared.
Required columns
Your file must include these three columns:
due_date – The date when the payment is due (format: MM/DD/YYYY )
principal – The principal amount for this payment
interest – The interest amount for this payment
Optional columns
You may also include any of these columns as needed:
fees – Any fees associated with this payment
penalty – Penalty charges (if applicable)
principal_paid – Amount of principal already paid
interest_paid – Amount of interest already paid
fees_paid – Amount of fees already paid
penalty_paid – Amount of penalty already paid
paid_date – The date when payment was made (format: MM/DD/YYYY )
File Format Example
Your spreadsheet should look something like this:
due_date
principal
interest
fees
penalty
principal_paid
interest_paid
02/06/2026
10.00
1.00
0.00
0.00
0.00
0.00
03/06/2026
10.00
1.00
0.00
0.00
0.00
0.00
04/06/2026
10.00
1.00
0.00
0.00
0.00
0.00
Steps to upload and edit schedules
1. Find the loan and open Edit Loan Request Schedules
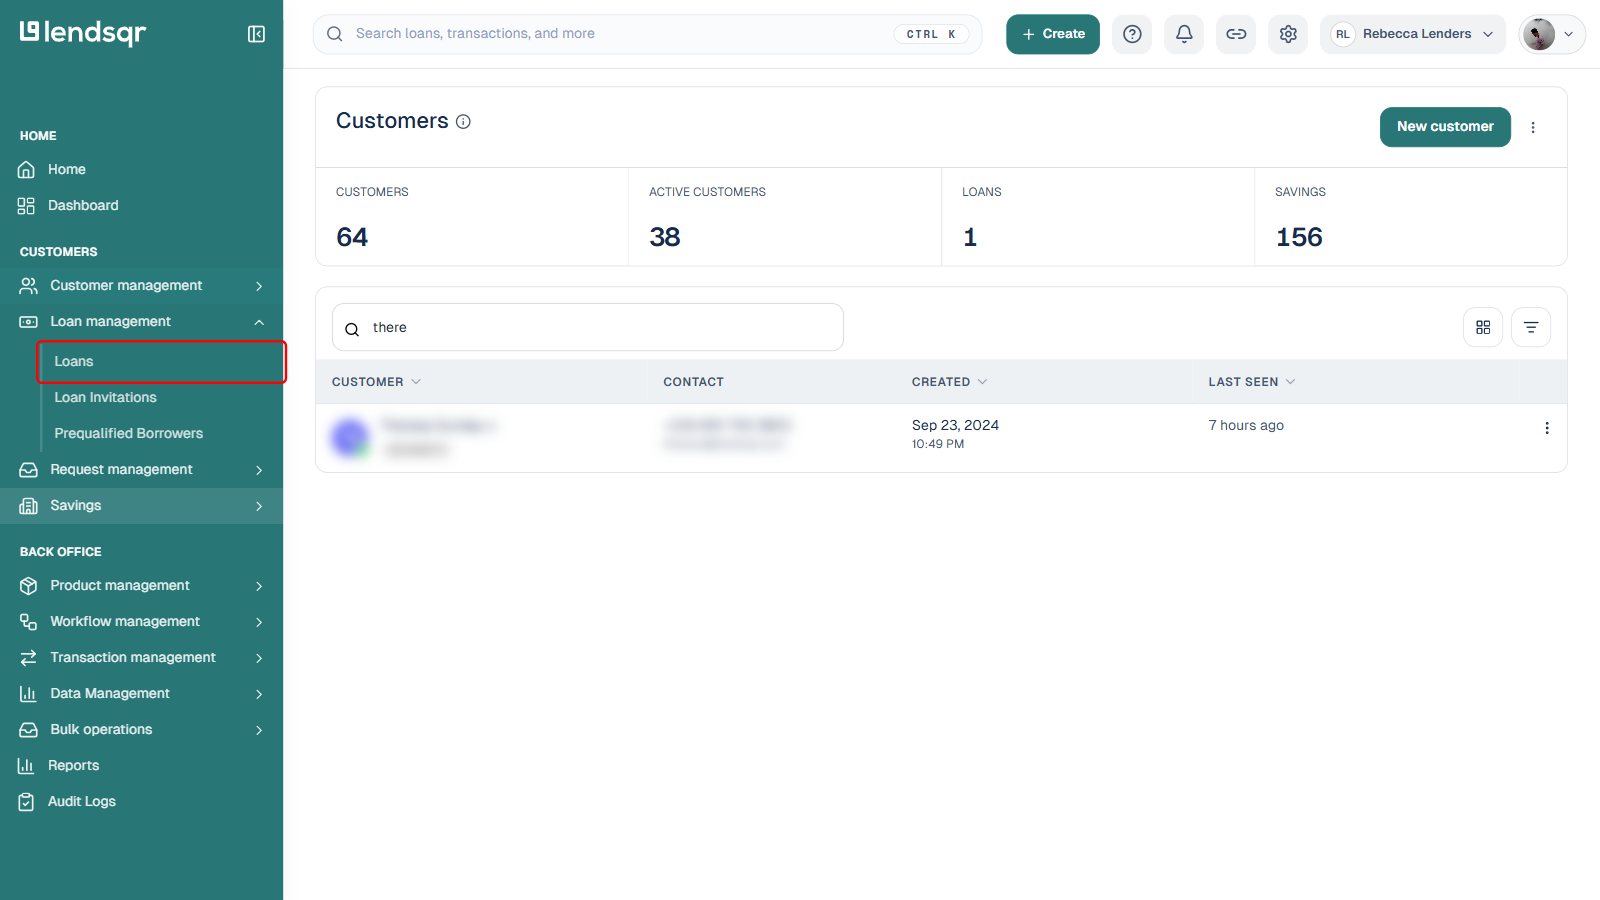
In the side menu, go to Loan management, then click Loans.
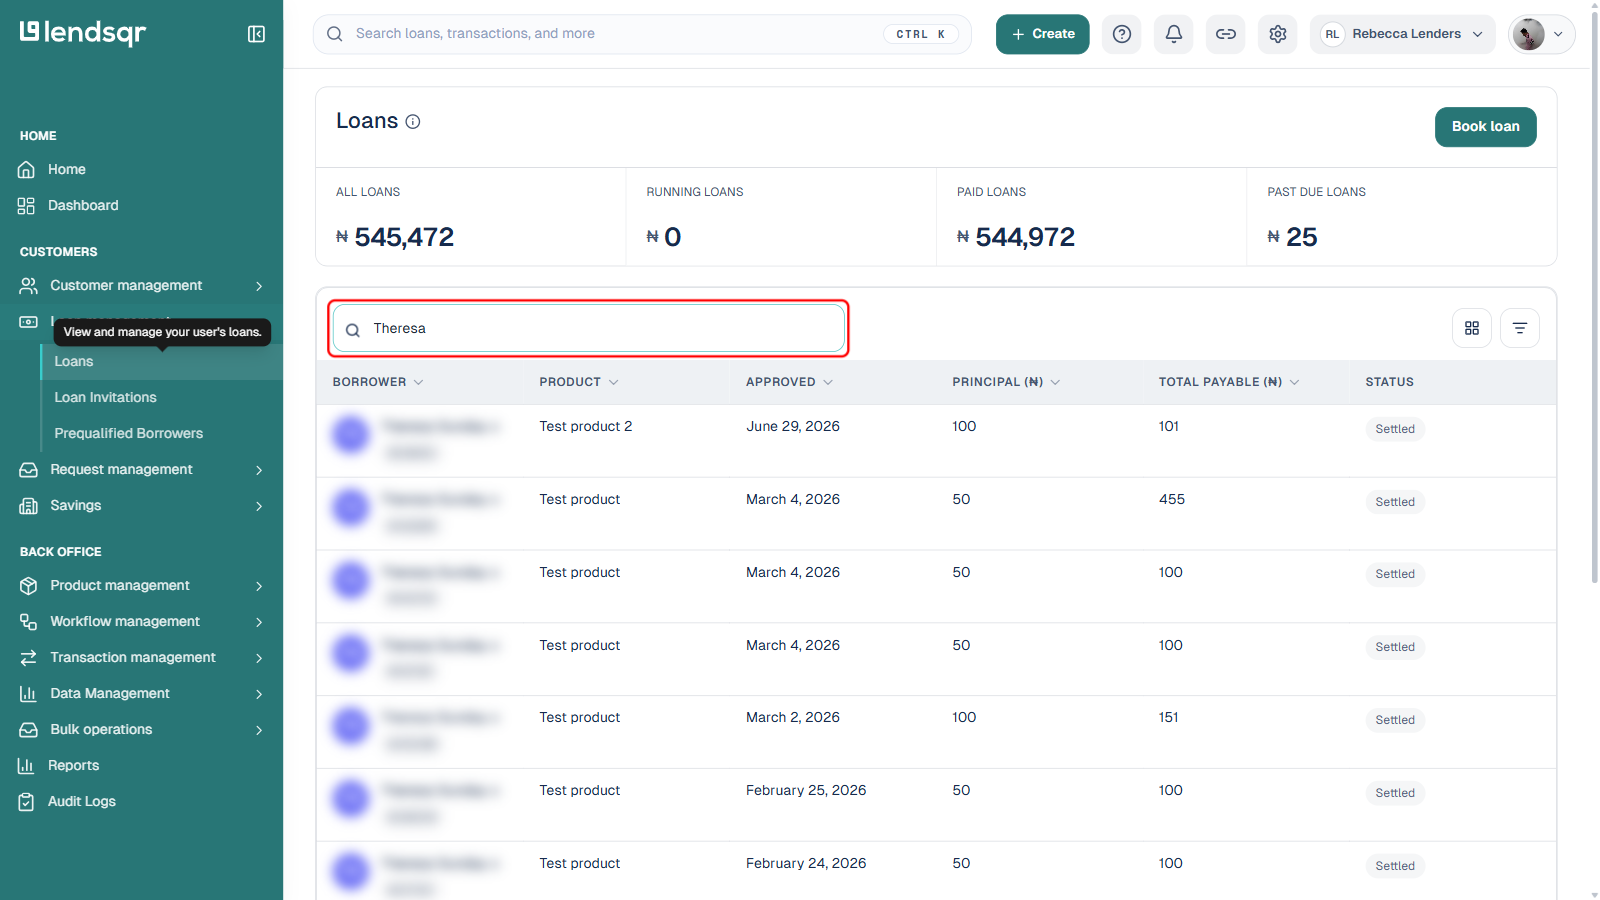
On the Loans list, use the search bar to narrow the list down to the loan you need, for example by borrower name.
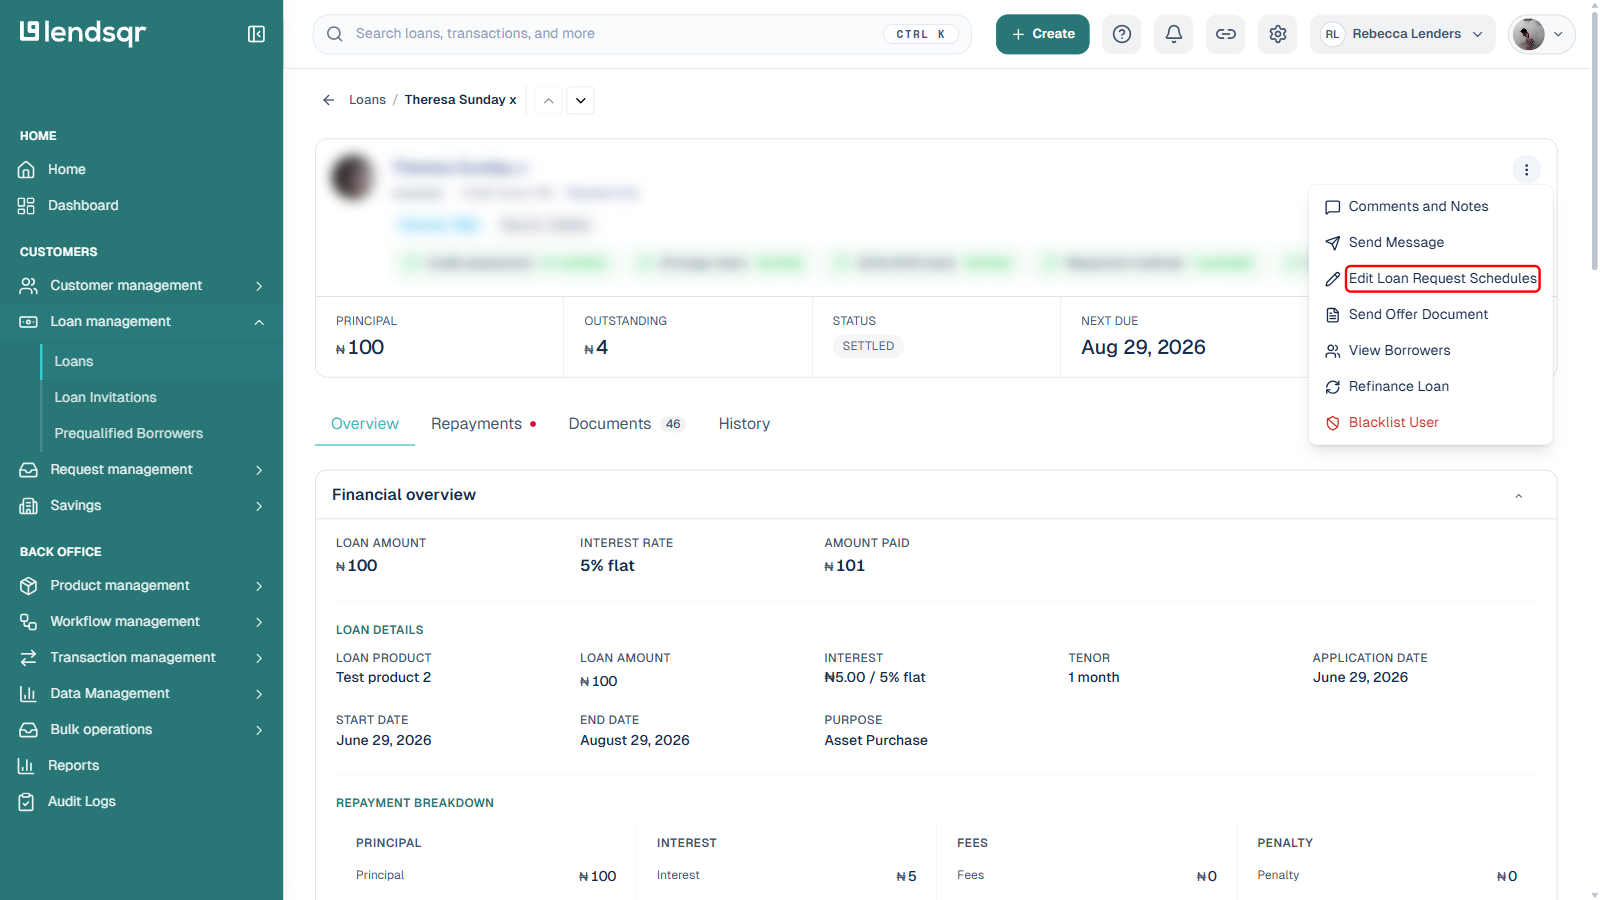
Click that loan’s row to open its detail page, then click More actions in the top-right and select “Edit Loan Request Schedules”.
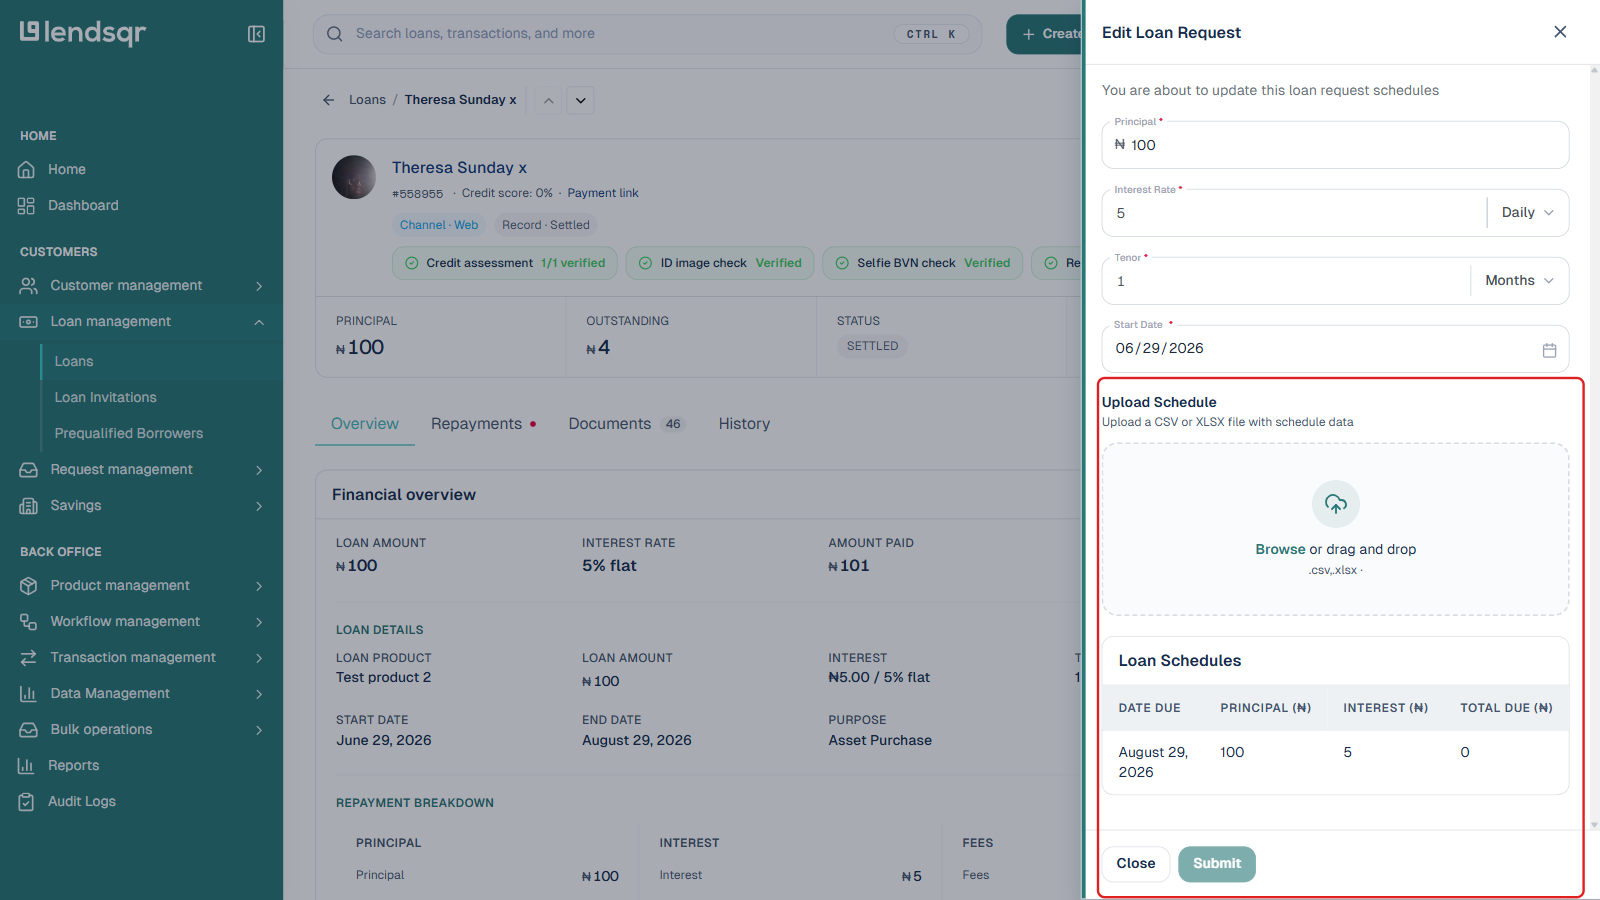
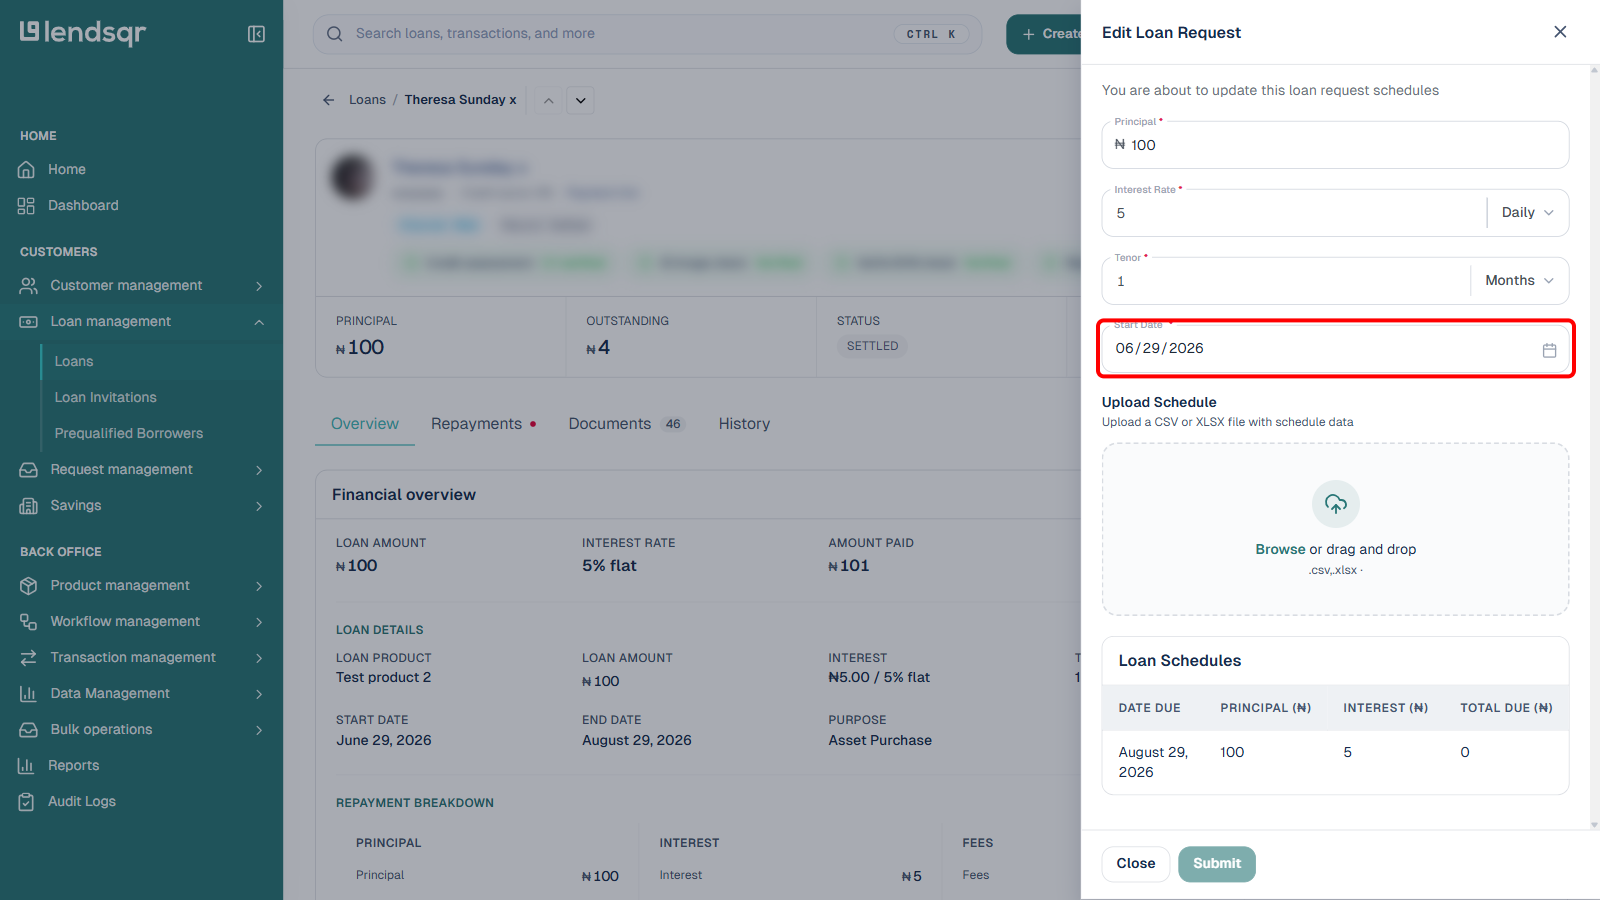
This opens the Edit Loan Request panel, with the Principal, Interest Rate, Tenor, and Start Date fields pre-filled from the loan’s current terms, the Upload Schedule dropzone, and a Loan Schedules table showing the loan’s existing schedule.
2. Set the start date
Enter the start date for your repayment schedule in the “Start Date” field (e.g., 02/01/2026).
3. Prepare your schedule file
Create a spreadsheet (CSV or XLSX) with the required columns (see “Preparing your upload file” above) and your loan schedule data.
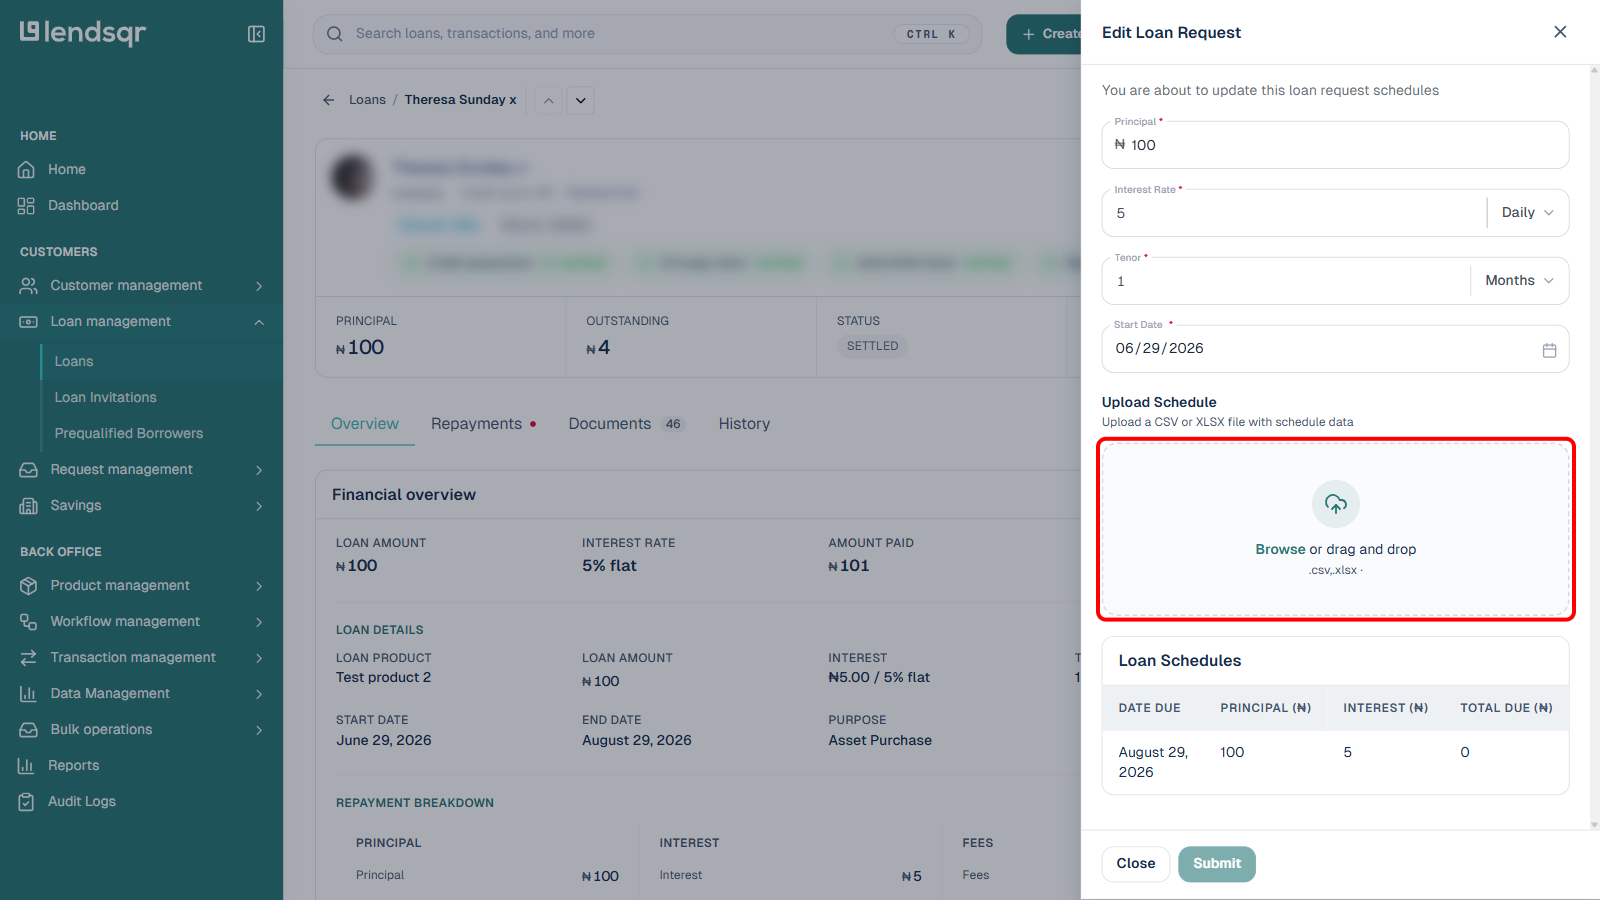
4. Click the upload area
Click the dashed “Browse or drag and drop” area below Upload Schedule. This opens your device’s file picker; you can also drag a file directly onto this area instead of clicking it.
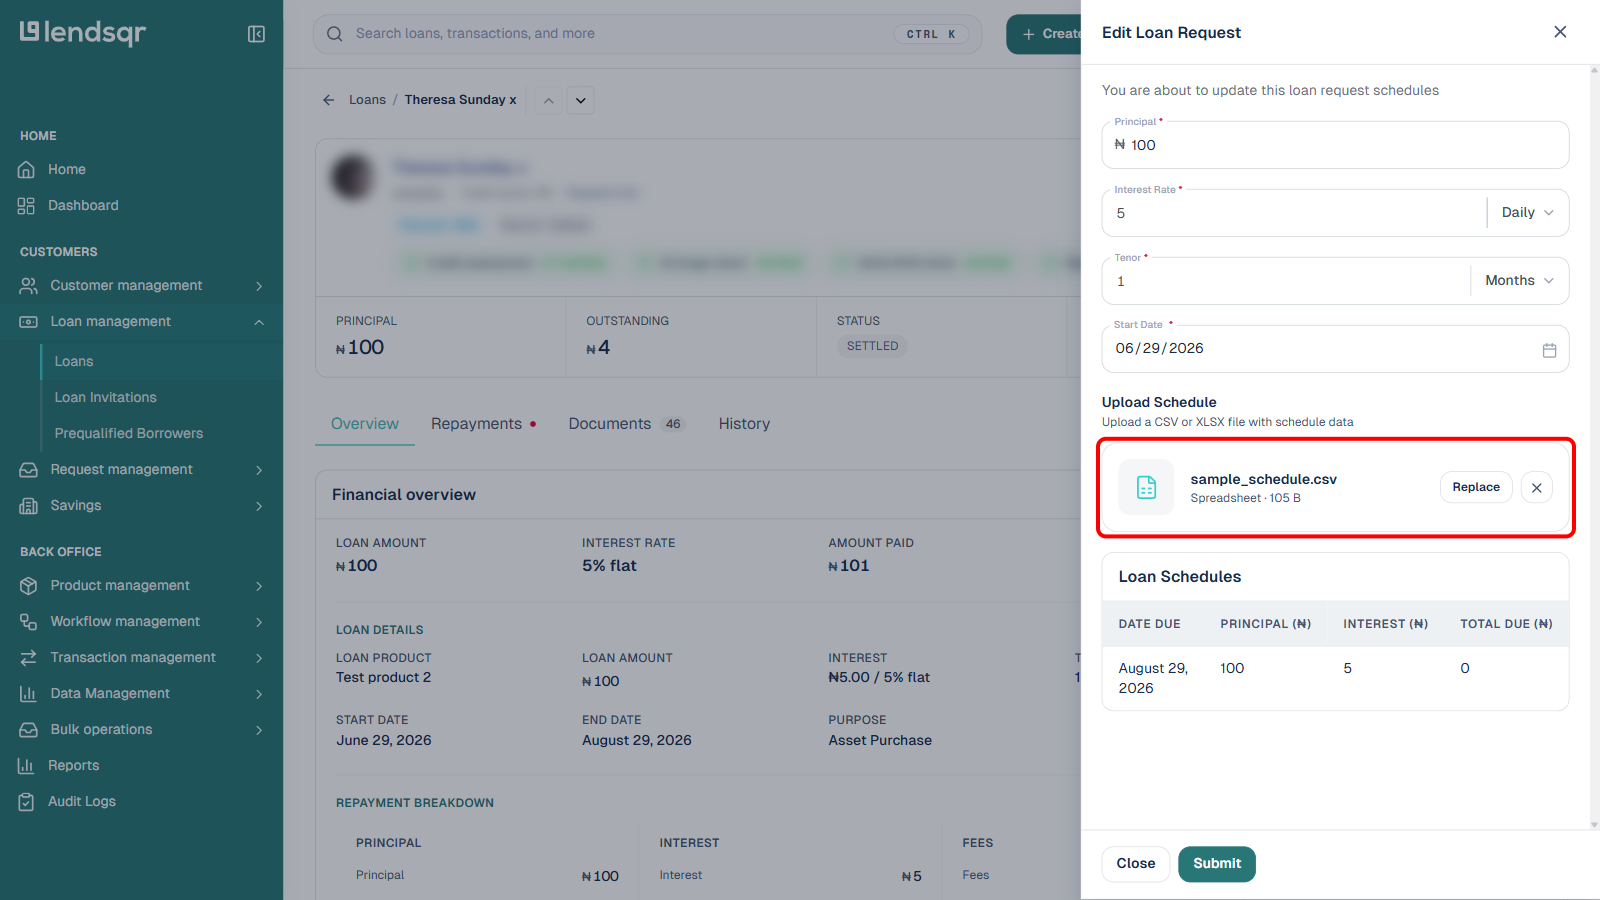
5. Select your file
Browse to locate your prepared schedule file and select it. The dropzone is replaced with the file’s name, type, and size, along with Replace and Remove options in case you picked the wrong file.
6. Review before submitting
Selecting a file does not immediately preview its contents in the Loan Schedules table below. That table still shows the loan’s existing schedule (DATE DUE, PRINCIPAL, and INTEREST for each payment) right up until you submit. Because there is no client-side preview of your upload, double-check the Principal, Interest Rate, Tenor, and Start Date fields and re-open your spreadsheet one more time to confirm it has the right rows before proceeding, since the system applies your file’s contents as soon as you submit.
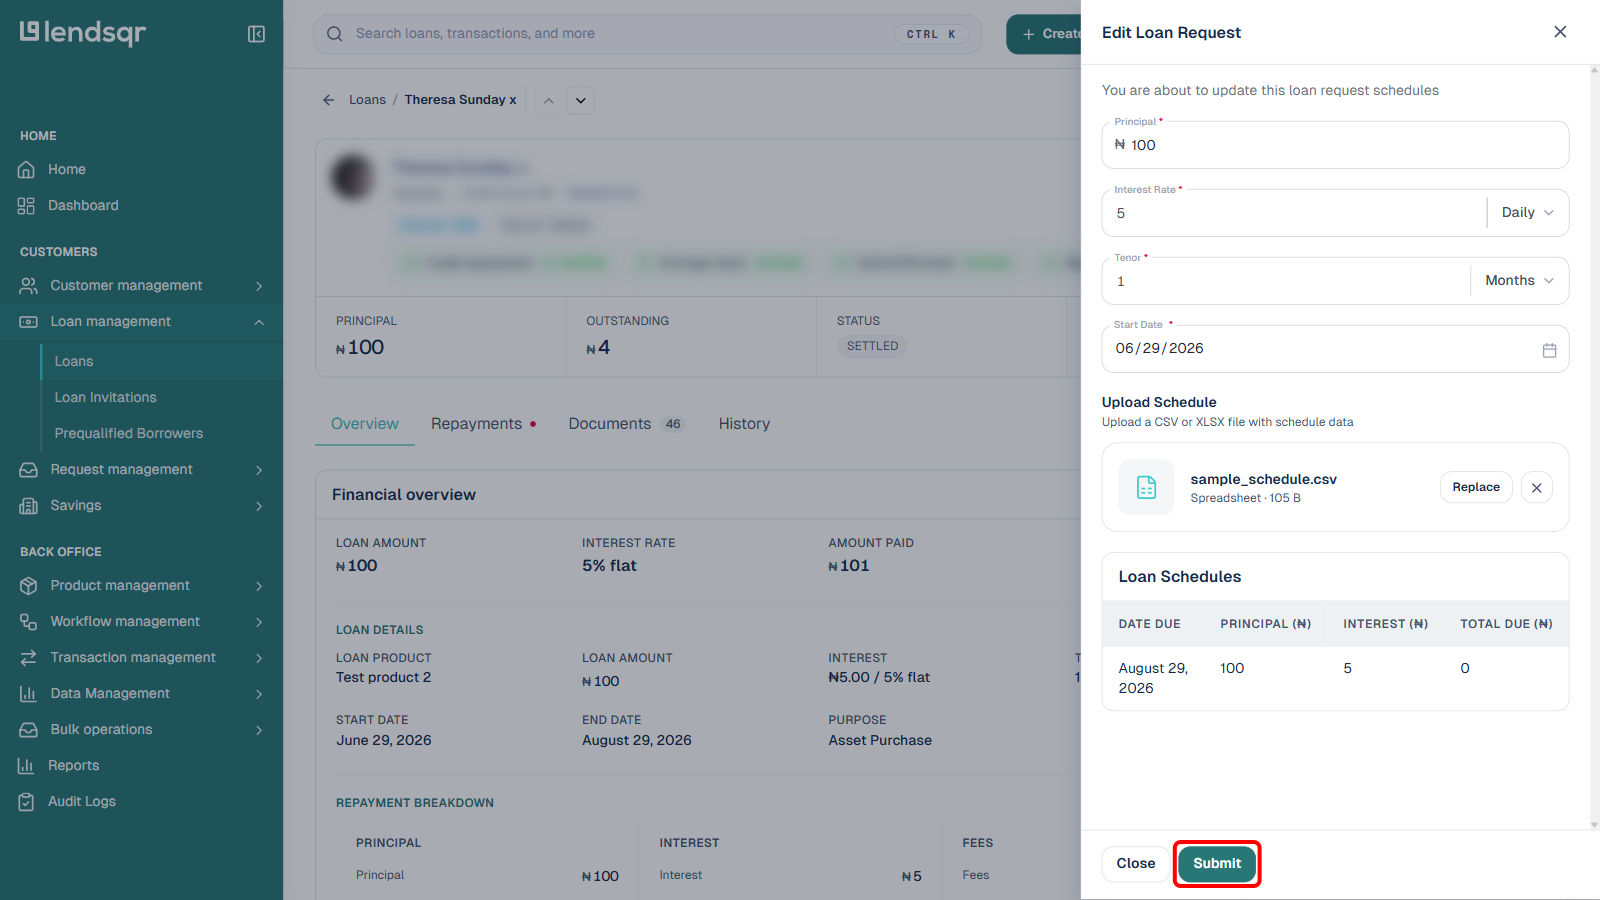
7. Submit the changes
Once you’ve selected your file and confirmed the other fields are correct, click Submit to save the new schedule. The button stays disabled until a file is selected.
Note: this Upload Schedule flow updates one loan at a time, from that loan’s own record. Uploading a file with rows for other loans will not apply changes to them — to update many loans’ schedules, repeat this process once per loan, using a fresh file with that loan’s own schedule each time.
Important Notes
Make sure all required columns are present in your file before uploading
Date formats should be consistent throughout your file
Numeric values should not include currency symbols or special characters
Double-check your data before submitting, as this will update the repayment schedules
Keep a backup copy of your original file in case you need to reference it later