Access your Back Office at your fingertips.
Download the app now on Google Play Store.
Scan the QR code
You can also scan QR code with your phone to download the app.
Understanding user statuses
Updated
On this page
In the Lendsqr Admin Console, user statuses provide a quick and reliable way to understand the state of your customer base at any point in time. They indicate whether a user is fully onboarded and able to interact with your lending product, or whether they have dropped off during registration or been restricted from access.
This distinction is important for both operational and growth workflows. By understanding user status, you can identify customers who are ready for credit offers, detect drop-offs in your onboarding funnel, and maintain clean, well-governed customer records.
User status is not just a visual indicator. It directly influences how you segment users, communicate with them, and make decisions about engagement, risk, and lifecycle management.
Step-by-step guide on how to find user statuses
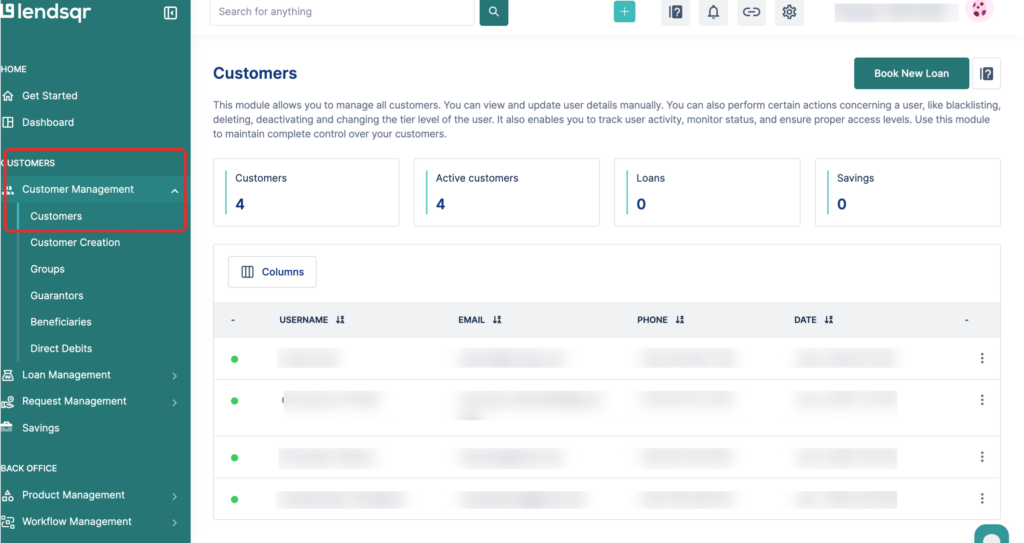
In the left sidebar, expand CustomerManagement and click Customers.
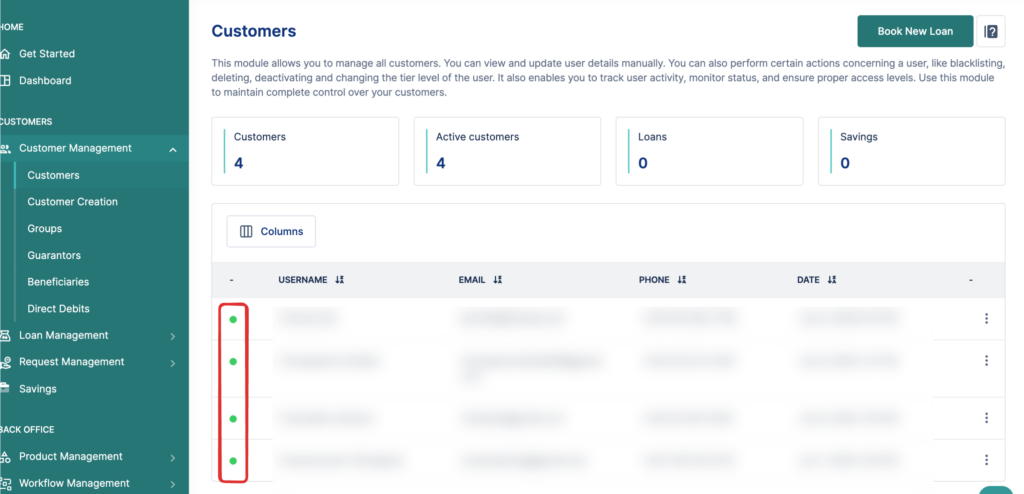
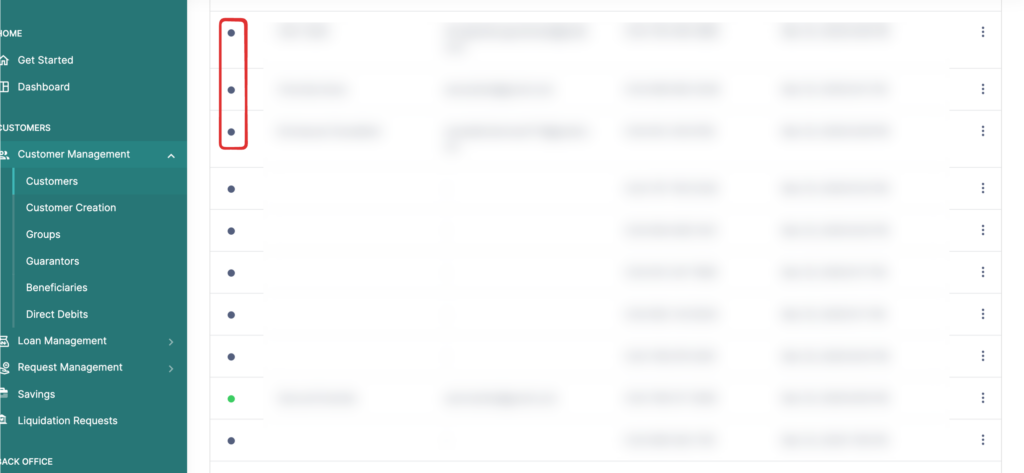
2. The main Customers page lists all registered users. Look for the Status column. Each user has a coloured dot and label:
Green – “Active”
Grey – “Inactive”
What the statuses mean
Status
Colour
Description
Active
Green
The user completed registration and can fully use the app (apply for loans, repay, view balance, etc.)
Inactive
Grey
The user started registration but did not finish, or was manually deactivated by an admin.
Note: both incomplete registrations and manually deactivated users show as “Inactive”. To see the reason for deactivation, check the user’s Audit Trail (available on the user’s profile).
How to use statuses in your workflow
Target active users Filter the list by Active to export a list of customers who are ready to receive credit offers, participate in top‑up campaigns, or undergo repayment behaviour analysis.
Follow up with inactive users Use the Inactive filter to identify customers who dropped off during registration. You can send automated reminders or schedule a call to help them complete the sign‑up.
How to tell the difference
Both incomplete registrations and manually deactivated users appear as Inactive on the main list. To understand why a user is inactive:
Click on the user’s row to open their profile.
Navigate to the Audit Trails tab.
Look for entries like:
“User registration abandoned at step X” – incomplete registration.
“User deactivated by Admin [name] on [date]” – manual deactivation.
This audit log helps you decide the right follow‑up action.
A real‑world example
Imagine a customer, Omomorowa, starts registering for your loan app. She enters her phone number and BVN but closes the browser at the “Select Loan Product” step. Later that week, you see her status as Inactive.
Using the audit trail, you confirm she didn’t complete registration. You then trigger an automated SMS campaign for users who abandoned at that step, reminding them to finish and offering a small incentive (e.g., “Complete sign‑up today and get ₦1,000 off your first loan fee”). Within a few days, Amina completes registration, and her status becomes Active.
This workflow helps you recover potential customers who might otherwise be lost.
How to change a user’s status
You can manually change a user’s status in two common scenarios:
Deactivate a user – if they violate terms, request deletion, or engage in suspicious activity.
Reactivate a user – if a deactivation was made in error or after a suspension period.
To change a user’s status:
Open the user’s profile from the customers page.
Click the three‑dot menu (⋮) and select Deactivate or Activate.
Confirm the action. The status will update immediately, and an audit log entry will be created.
Note: You cannot change a user’s status from “Inactive” to “Active” for incomplete registrations, the user must complete the registration process themselves. Only manual deactivations can be reversed by an admin.
Using statuses in your workflow
1. Export active users for campaigns
Filter the Customers page by Active.
Use the Export button to download the list.
Import the list into your marketing tool to send personalized credit offers, top‑up campaigns, or repayment reminders.
2. Automate follow‑ups for Inactive users
Filter by Inactive and export the list.
Use a tool like Lendsqr’s Mailer or integrate with your CRM to send automated reminders:
Day 1: “You’re almost there! Finish your registration.”
Day 3: “Complete sign‑up and get a special welcome offer.”
Day 7: Final reminder with support contact.
This automation reduces manual work and improves conversion rates.
Best practices for managing user statuses
Regularly monitor the distribution of Active and Inactive users to understand onboarding performance.
Use audit trails consistently to guide decision-making rather than relying on assumptions.
Automate follow-ups for users who abandon registration to improve conversion rates.
Restrict status change permissions to authorized roles to prevent misuse.
Maintain clear internal policies for when users should be deactivated or reactivated.
Conclusion
User statuses in Lendsqr provide a simple but powerful way to manage your customer lifecycle.
By understanding what each status means, how to interpret audit logs, and how to act on the data, you can improve onboarding conversion, maintain clean records, and drive more effective customer engagement.
When used properly, this feature becomes a key part of both your operational workflow and your growth strategy.

 feature")

