Access your Back Office at your fingertips.
Download the app now on Google Play Store.
Scan the QR code
You can also scan QR code with your phone to download the app.
Disbursing a loan to a third party
Updated
On this page
When a borrower takes out a loan, the assumption is usually that the funds go directly into their account. But there are real lending scenarios where that is not the most practical arrangement. A borrower may be purchasing goods or services from a vendor, paying school fees on behalf of a child, or settling a supplier invoice. In these cases, sending funds to the borrower first and trusting them to pass it on introduces unnecessary risk and friction.
Third-party disbursement solves this by allowing a lender to send the loan amount directly to another person or entity on the borrower’s behalf. The borrower still takes on the loan obligation, repayments still follow the same schedule, and the loan is still recorded against their account. The only difference is where the money lands at the point of disbursement.
This feature is particularly useful for asset-finance products, school-fee loan products, vendor-payment credit lines, and any lending model where the purpose of the loan is tied to a specific payee. It gives lenders greater control over loan utilization and reduces the risk of funds being diverted away from their intended purpose.
Before you begin
Third-party disbursement must be activated on the loan product before it can be used during approval. If the feature is not yet enabled on the relevant product, the option to disburse to a third party will not appear during the loan approval flow. To set this up, refer to How to activate third-party disbursement before proceeding with the steps below.
You should also have the third party’s bank details ready, or have already created them as a beneficiary on the admin console. If the beneficiary does not yet exist in the system, you will be able to add them during the disbursement flow.
How to disburse a loan to a third party
To disburse a loan to a third party, follow the steps below:
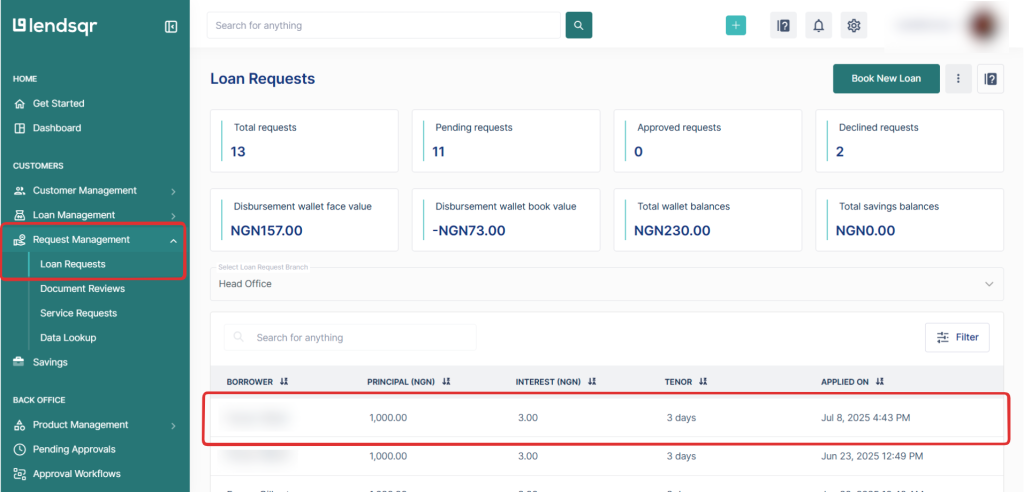
1. Step 1: Navigate to “Loan Requests” and open the relevant loan request.
Log in to the admin console and locate the “Loan Requests” section from the main navigation. Find and select the specific loan request you intend to disburse to a third party. Once selected, the system will display the full details of that loan request, including the borrower’s information, loan amount, product type, and any attached decision data.
Take a moment to review the loan details at this stage before proceeding. Confirm that the loan amount, product, and borrower information are correct, as the disbursement step that follows is not easily reversed once confirmed.
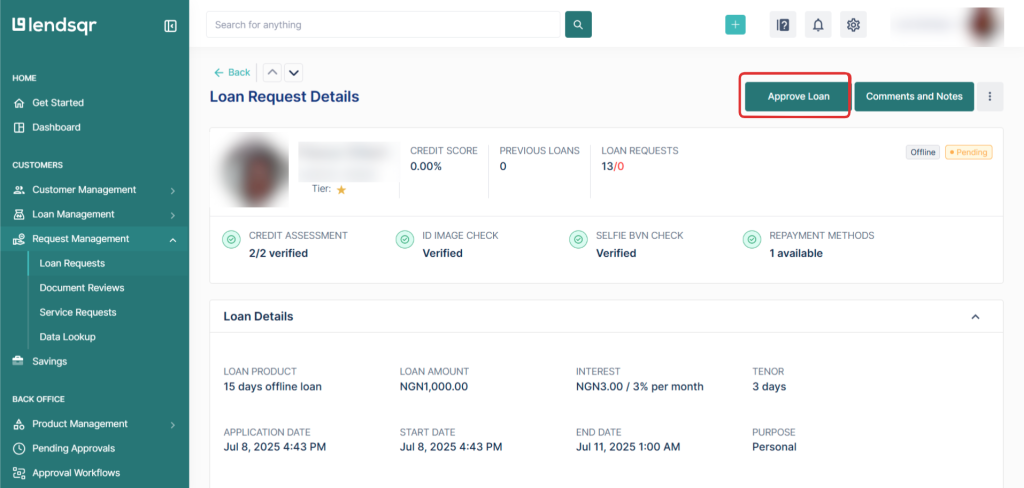
2. Step 2: Click the “Approve Loan” button.
Once you have reviewed the loan request and are ready to proceed, click the “Approve Loan” button. A modal will appear on the screen informing you that you are about to initiate a transfer to a third party. This modal is a confirmation checkpoint designed to ensure you are aware that the funds will not go to the borrower’s own account.
Read the information on the modal carefully, then click “Continue” to confirm that you want to proceed with third-party disbursement. Clicking “Continue” moves you to the next stage of the flow where you select or add the third-party beneficiary.
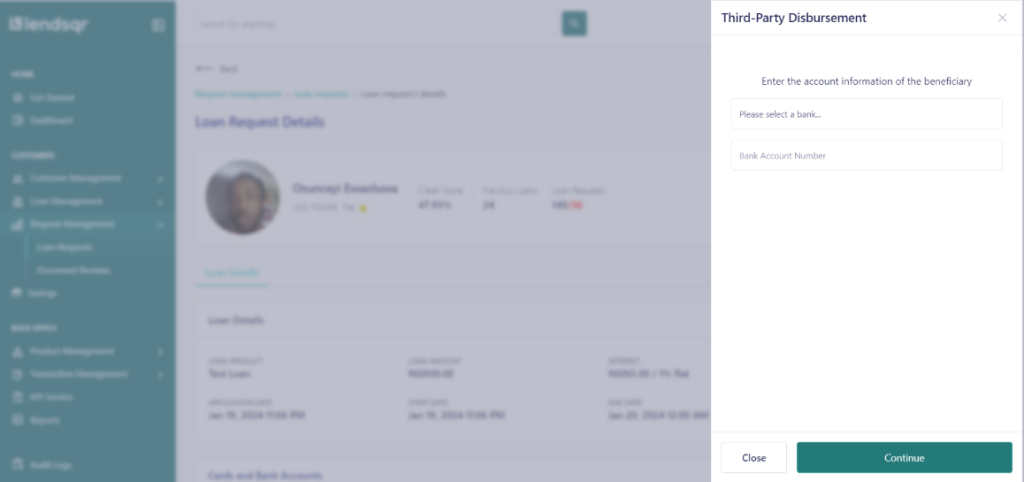
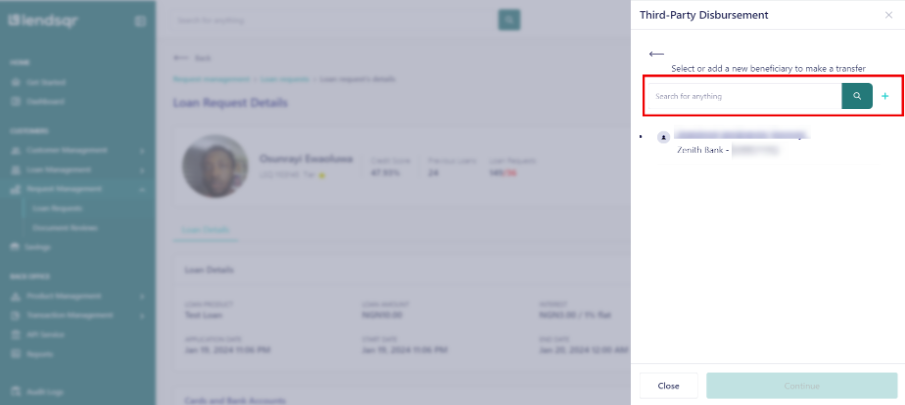
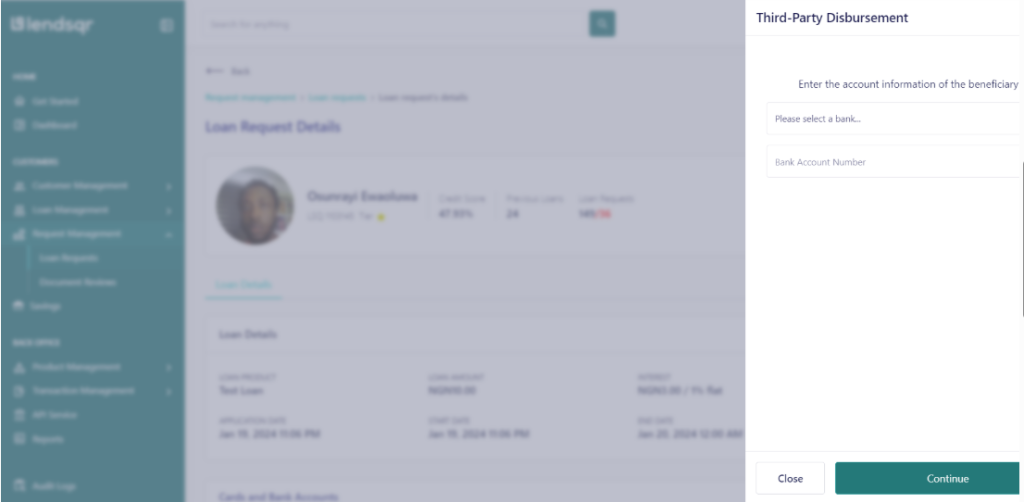
3. Step 3: Select an existing beneficiary or add a new one.
At this stage, the system will display a list of beneficiaries that have already been saved in your organization’s records. If the third party you want to disburse to is already on the list, select them from the available options. Their bank account details will be pre-populated from the saved record.
If the third party has not been added before, click the “+” sign to add a new beneficiary. You will be prompted to enter the beneficiary’s details, which typically include their name, bank name, and account number. Once entered, the system will resolve and display the account name for verification before you proceed.
Adding the beneficiary correctly at this step is important. An error in the account number or bank selection could result in a failed or misdirected transfer. Always confirm the account name that the system returns matches the intended recipient before continuing.
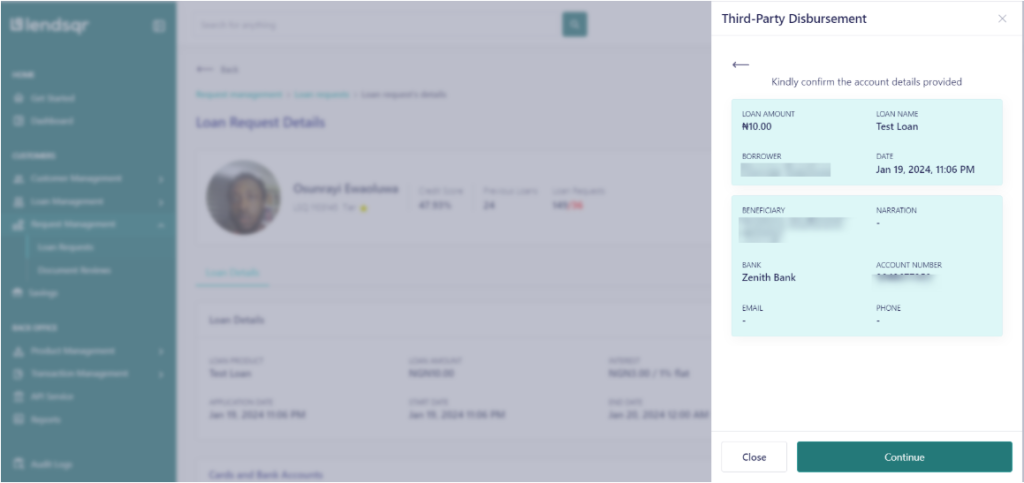
4. Step 4: Confirm the beneficiary details and click “Continue”.
After selecting or adding the beneficiary, the system will display a summary of the transfer details. This includes the beneficiary’s name, bank, account number, and the loan amount to be disbursed. Review every field carefully.
Once you are satisfied that all the details are correct, click “Continue“. A final confirmation prompt will appear asking you to click “Confirm” to authorize the payment. This is the last step before the disbursement is executed, so ensure all information has been verified before clicking.
5. Step 5: The loan is disbursed and a status modal is displayed.
After you click “Confirm“, the system processes the transfer and disburses the loan amount to the third party’s bank account on behalf of the borrower. A modal will then appear on the screen showing the status of the transfer. This status modal tells you whether the disbursement was successful or if there was an issue that needs to be resolved.
If the disbursement is successful, the loan moves from a pending state to an active state in the system, and the repayment schedule begins according to the terms of the loan product. If the transfer fails, the loan will not be marked as disbursed and you will need to retry or investigate the issue before proceeding.
6. Step 6: Email notifications are sent to the borrower.
Once the disbursement is completed successfully, the borrower receives two email notifications. The first is a loan notification confirming that their loan has been processed and disbursed. The second email contains a PDF copy of the transaction receipt as a record of the disbursement.
These emails are sent automatically by the system and serve as the borrower’s confirmation that the loan has been executed. The borrower does not receive the funds directly in this flow, but the email documentation ensures they are informed of what happened and have a receipt they can reference.
After following these steps, you have successfully completed the process of disbursing a loan to a third party.