Access your Back Office at your fingertips.
Download the app now on Google Play Store.
Scan the QR code
You can also scan QR code with your phone to download the app.
Approving and declining a loan request
Updated
On this page
Introduction
Every loan request that comes into your platform represents a decision. Approve the wrong borrower, and you increase your default risk. Decline the right one and you lose revenue and damage customer trust. Getting this decision right consistently requires more than instinct. It requires a clear process, the right information, and a reliable system to act on both.
On the Lendsqr admin console, you can review, approve, and decline loan requests directly from your dashboard. The platform surfaces the borrower’s loan profile and decision data in one place, so your team can make informed credit decisions quickly and confidently.
This guide walks you through exactly how to do that.
What happens before a loan request reaches your dashboard
Before a loan request appears in your queue, the borrower has already passed through your configured decision engine. The engine runs each application through your defined rule set, which may include identity verification, credit bureau checks, affordability analysis, fraud detection, and behavioral scoring.
By the time a request reaches your dashboard, the system has already evaluated it against your criteria. Your job is to review the outcome, assess the supporting data, and make a final call. For some lenders, the decision engine handles approvals automatically. For others, every request requires a manual review before a decision is recorded.
What to review before approving or declining
Before you approve or decline any loan request, review the following information on the borrower’s profile. Each data point informs a different aspect of the credit decision.
Borrower identity. Confirm that the borrower’s identity has been verified. Check that the name, identification document, and contact details on the profile are consistent and complete. Inconsistencies at this stage are a signal worth investigating before proceeding.
Decision data. The decision data section shows the output of your configured decision engine for this specific application. It tells you which checks the borrower passed, which they failed, and what scores or signals the system returned. Review this carefully. A borrower who passed all checks with strong scores is a different proposition from one who passed with marginal scores on affordability or fraud detection.
Loan details. Review the loan amount requested, the proposed tenor, and the repayment schedule. Confirm that the request falls within the parameters of your loan product and that the repayment structure is realistic given the borrower’s profile.
Repayment history. If the borrower is a returning customer, review their repayment history on the platform. A borrower with a consistent record of on-time repayments presents a lower risk than a first-time applicant with limited data. A borrower with prior defaults on the platform requires closer scrutiny regardless of what the decision engine returns.
Affordability signals. Check the borrower’s income verification data and any affordability metrics returned by your decision engine. Confirm that the requested loan amount and repayment schedule are within the borrower’s demonstrated capacity to repay.
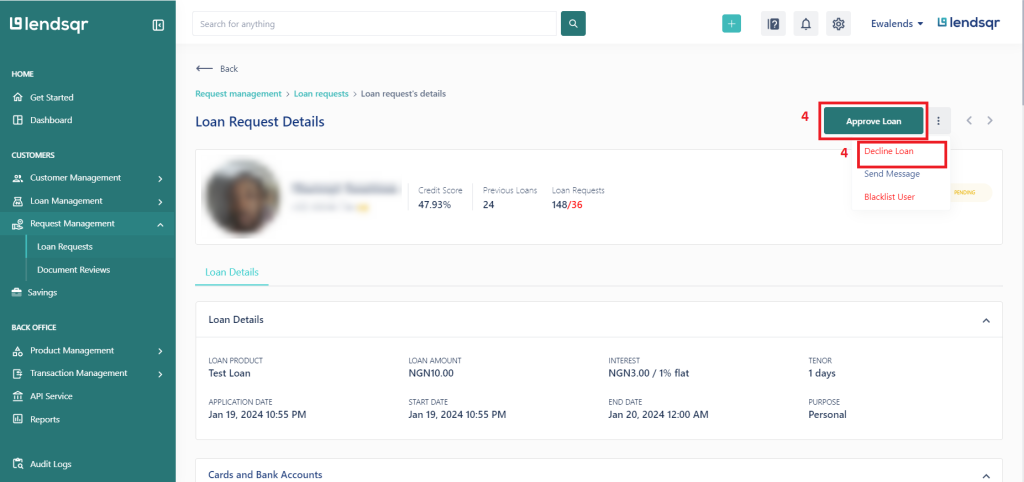
2. Navigate to the “Loan Request” tab under the“Request Management” section of your Admin Console dashboard.
3. Pick any loan on your requests queue.
4. Review the loan profile and decision data as explained in the sections above.
5. Navigate to the top right corner of the page and approve or decline the request as you see fit.
When to approve a loan request
Approve a loan request when the borrower meets your configured lending criteria and the decision data supports the application. Specifically, consider approving when:
The borrower passes all required decision engine checks without critical failures. The loan amount and tenor fall within your product parameters. The affordability data confirms that the borrower can support the repayment schedule. The borrower’s identity is verified and consistent across all data points. For returning borrowers, their repayment history shows a pattern of timely payments.
When to decline a loan request
Decline a loan request when the borrower does not meet your lending criteria or when the risk signals are too significant to overlook. Specifically, consider declining when:
The borrower fails one or more critical decision engine checks, such as identity verification or fraud detection. The affordability data shows that the requested repayment amount exceeds what the borrower can realistically manage. The loan amount or tenor falls outside your product parameters. The borrower’s profile contains inconsistencies that raise concerns about the accuracy of their application. For returning borrowers, their repayment history shows a pattern of late payments or defaults.
What happens after your decision
After approval. The loan moves into the disbursement queue. Depending on your platform configuration, disbursement may happen automatically or may require a separate confirmation step. The borrower receives a notification that their loan has been approved and will be disbursed according to the terms of the product.
After decline. The loan request closes, and the borrower receives a notification based on your communication settings. The declined request remains in your records for audit and reporting purposes. If the borrower reapplies in the future, their previous decline is visible on their profile history.
Best practices for consistent loan decisions
Consistency in loan decisioning protects your portfolio and builds trust with your borrowers. A few principles to follow.
Always base your decision on the data in front of you, not assumptions about the borrower. Two applications with similar profiles should receive similar treatment. Inconsistent decisions create compliance risk and expose your organization to disputes.
Document your reasoning for manual declines wherever possible. If your platform supports decision notes, use them. A clear record of why a loan was declined protects your organization in the event of a dispute or regulatory review.
Review your decision engine configuration regularly. If you notice that a high proportion of manually reviewed applications are being approved despite marginal decision scores, your engine may need recalibration. Similarly, if strong applicants are consistently flagged for manual review, your rules may be too restrictive.
Never approve a loan request under pressure or outside your defined credit policy. If a borrower or internal stakeholder pushes back on a decline, refer to your credit policy documentation rather than making an exception based on relationship or urgency.
Troubleshooting
The approve or decline buttons are not visible on the loan profile page. Confirm that your role includes the permissions required to make loan decisions. If you have the correct role and the buttons are still missing, contact your Super Admin or Lendsqr support.
The loan request is not appearing in my queue. Check that you are on the correct tab under Request Management. Also, confirm that the request has not already been actioned by another team member. Loan requests that have been approved, declined, or withdrawn do not appear in the active queue.
The decision data is missing or incomplete on the loan profile. This may indicate a configuration issue with your decision engine. Do not approve or decline the request without complete decision data. Escalate to your technical team or Lendsqr support before proceeding.
The borrower’s profile shows inconsistent information. Do not approve the request until the inconsistency is resolved. Flag the application for further review and contact the borrower through your standard verification channel to confirm their details before making a decision.


 feature")
