
When a borrower applies for a loan and is declined, both the lender and the borrower need to understand why. For lenders, knowing the exact reason a loan was declined helps them assess whether their eligibility rules are calibrated correctly and whether a manual review is warranted. For borrowers, understanding why they were declined gives them a clear path to improving their eligibility in future.
On the Lendsqr platform, loan eligibility is determined by a set of rules that each lender configures within their decision model. These rules are evaluated automatically by Lendsqr’s automated credit scoring engine, every time a borrower submits a loan application.
This guide explains how the eligibility process works, the most common reasons borrowers are declined, where lenders can find decline reasons on the admin console, and what both lenders and borrowers can do to resolve eligibility issues.
How loan eligibility works on Lendsqr
When a borrower applies for a loan, the application is passed through Oraculi, Lendsqr’s automated decision engine. Oraculi evaluates the borrower’s information against the rules defined in the lender’s decision model, a customised set of criteria that the lender has configured to reflect their risk appetite and lending policy.
A decision model is made up of multiple modules, each of which checks a different aspect of the borrower’s profile. These modules may include:
- Credit bureau checks — verifies the borrower’s credit history and repayment behaviour with external credit bureaus such as CRC Credit Bureau. For more on setting this up, see how to set up CRC Credit Bureau for Lendsqr.
- Karma blacklist check — checks whether the borrower appears on the Lendsqr ecosystem blacklist, which flags users with a history of fraud or default across the platform
- Ecosystem data — evaluates the borrower’s behaviour within the Lendsqr ecosystem, including their loan history and repayment performance with other lenders on the platform
- Custom scoring rules — lender-defined rules based on factors such as income level, employment status, loan-to-income ratio, or the Loan Savings Multiplier
- KYC verification — confirms that the borrower’s identity documents have been submitted and verified. KYC stands for Know Your Customer and refers to the process of verifying a borrower’s identity before approving financial services
These modules are evaluated sequentially. If a borrower fails one module, the evaluation may stop at that point and the application is declined, depending on how the lender has configured their decision model. If a borrower passes all modules, they receive a loan offer.
Essentially, Oraculi is the engine that runs your decision model. The decision model is the specific set of rules you configure within Oraculi to evaluate your borrowers.
Why some users are not eligible
There are several common reasons why a borrower may fail one or more eligibility checks and be declined for a loan.
Poor or limited credit history If a borrower has a thin credit file, meaning they have little or no history of borrowing and repaying, a credit bureau check may return insufficient data to confirm their creditworthiness. Borrowers who have previously defaulted on loans with other lenders may also fail this check.
Income does not meet the minimum requirement If a lender has configured a minimum income threshold in their decision model, borrowers whose declared or verified income falls below that threshold will be declined. This is particularly relevant for salary advance or payroll loan products where income verification is a core eligibility criterion.
Outstanding or unpaid loans Borrowers with an active unpaid loan either on the lender’s own platform or flagged through ecosystem data may be declined to prevent over-indebtedness. A lender may configure their decision model to decline any borrower who already has one or more active loans.
Incomplete or unverifiable KYC If a borrower has not submitted all required identity documents, or if their submitted documents were declined due to issues such as expiry, poor image quality, or a mismatch with their declared details, their KYC status will be incomplete. Most decision models require a fully verified KYC before a loan can be approved.
Karma blacklist If a borrower appears on the Lendsqr Karma blacklist, our shared record of users who have defaulted, committed fraud, or violated platform terms across the Lendsqr ecosystem, they will be declined regardless of their performance on other checks.
Strict lender risk criteria Some lenders operate in higher-risk markets or with stricter lending policies and configure their decision models accordingly. A borrower who would qualify on one lender’s platform may not qualify on another’s because the eligibility thresholds are different.
Real-world examples
Example 1 — Failed KYC check A borrower in Nigeria applies for a ₦50,000 personal loan. Their national ID was previously declined because the uploaded image was blurry. Because their KYC status is incomplete, the application fails the KYC verification module and is automatically declined.
What the lender sees: On the loan request details page, the Decision Data section shows “Failed Reason: KYC incomplete.”
What the lender can do: Contact the borrower to request a clear, valid ID upload. Once the document is approved and KYC is complete, the borrower can reapply.
Example 2 — Failed Karma blacklist check A borrower applies for a BNPL loan. When Oraculi runs the Karma blacklist check, it finds that the borrower’s BVN is associated with a previous default on another lender’s platform within the Lendsqr ecosystem. The application is declined immediately.
What the lender sees: The Decision Data section shows “Failed Reason: Karma blacklist.”
What the lender can do: Review the borrower’s full profile manually. If the lender determines the borrower is still creditworthy. For example, if the previous default was small and has since been settled, they can use the Whitelist feature to manually prequalify the borrower and override the automated decline for that individual without changing the decision model globally.
Example 3 — Failed savings multiplier check A borrower in Kenya applies for a KES 15,000 loan on a product configured with a Savings Multiplier of 3. The borrower’s total savings balance is KES 3,000. The calculation (3 × 3,000 = 9,000) falls short of the 15,000 requested, so the application is declined.
What the lender sees: The Decision Data section shows the failed reason for the savings multiplier check.
What the borrower can do: Increase their savings balance to at least KES 5,000 and reapply, at which point the calculation (3 × 5,000 = 15,000) would meet the threshold.
Where to find decline reasons on the admin console
Lenders have two ways to access decline information on the Lendsqr admin console.
Viewing the decline reason for a specific application
To see exactly why a specific loan application was declined, follow these steps:
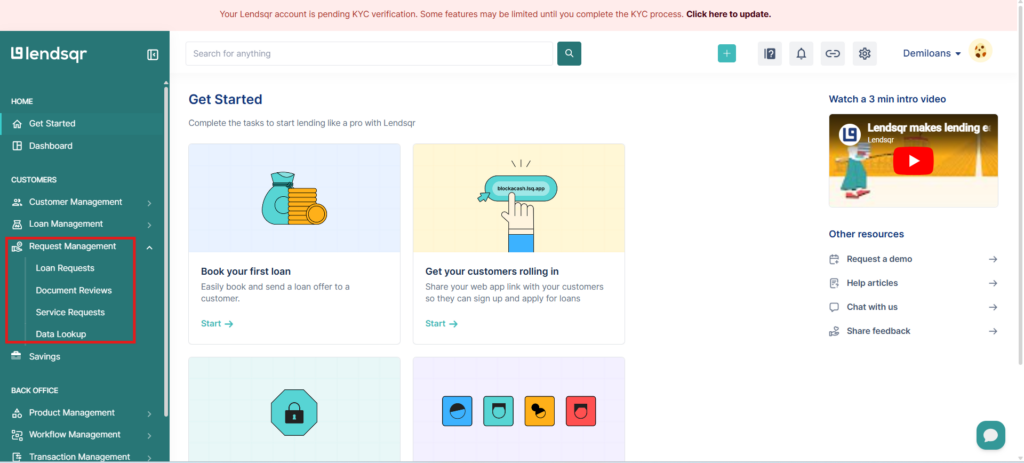
- Navigate to the Customers section on the left navigation pane and expand “Request Management”.
- Select “Loan Requests” to open the list of all loan applications.
- Click on the declined loan request you want to review to open the loan request details page.
- Locate the “Decision Data” section on the details page.
- Review the “Failed Reason” field, which shows the specific module or rule that caused the decline.
Viewing aggregated decline data in reports
To see broader patterns in declined applications across your portfolio, navigate to Back Office and select “Reports”. From here you can access the “Failed loan requests” and “Declined loans” reports, which give you an aggregated view of rejection reasons across all applications over a chosen time period.
How to manage and update your decision model
If you find that your decision model is declining too many borrowers or not declining enough, you can update the rules directly from the admin console.
To access your decision models:
- Navigate to Back Office on the left navigation pane.
- Click on “Product Management”.
- Select “Decision Models”.
From here you can review your existing decision models and edit the rules, thresholds, and modules that govern eligibility for each loan product.
Important: Any changes you make to a decision model apply globally to all borrowers applying for the loan products linked to that model. If you only want to make an exception for one specific borrower without changing the global rules, use the Whitelist feature instead.
Troubleshooting checklist for borrowers
If a borrower has been declined and wants to understand what they can do next, here is a general guide based on the most common decline reasons:
- KYC incomplete — ensure all required identity documents have been submitted and approved. Contact the lender’s support team if a document was declined to find out what is needed.
- Poor credit history — work on improving credit behaviour over time by repaying existing debts and avoiding defaults. Some lenders may accept a reapplication after a defined period.
- Insufficient savings balance — if the lender uses a Loan Savings Multiplier, increase savings on the platform to qualify for the requested loan amount, or apply for a smaller amount that the current savings balance supports.
- Outstanding loans — settle any outstanding loans before reapplying. Having multiple active loans significantly reduces eligibility on most platforms.
- Income below minimum threshold — if income verification is required, ensure the correct documentation has been submitted. If income genuinely falls below the threshold, consider applying for a smaller loan amount.
Also read: How do you check why a user’s loan failed?

