Access your Back Office at your fingertips.
Download the app now on Google Play Store.
Scan the QR code
You can also scan QR code with your phone to download the app.
Create or add a new office, branch, or team
Updated
On this page
Lending institutions often operate across multiple offices, branches, and teams, especially as they grow. Managing these structures well is important for staying compliant, improving coordination, and giving team members the right level of access. Without a clear system in place, things can get messy fast with the wrong person accessing sensitive data, staff unsure of their responsibilities, or management losing visibility into what different teams are doing.
The Offices, Branches, and Teams feature on the Lendsqr admin console helps lenders mirror their real-world organizational structure inside the platform. This makes it easier to manage staff, whether the team is small and operates out of a single location or is spread across many branches in different cities or regions.
For example, a micro-lender with just a few staff members can use this feature to assign clear roles and responsibilities from the start. On the other hand, a large financial institution with dozens of branches and hundreds of employees can manage complex hierarchies without losing oversight or control. The feature scales with your organization, so it works just as well for a growing startup as it does for an established lender.
This feature allows you to:
Create and manage office or branch hierarchies, such as headquarters, regional offices, or field locations
Assign staff to specific branches or teams based on their roles or geographic regions
Set access levels depending on job function or branch, so people only see what they need to see
Track team activities across offices for better visibility and accountability
Support teams operating in different locations while maintaining overall control from a central admin console
As a result, lenders can reduce confusion, protect sensitive data, and improve how their teams work together. The right people get access to the right tools at the right time, without unnecessary back-and-forth or manual workarounds.
By properly setting up your organization in Lendsqr, your team can work better, faster, and more securely, no matter where they are located.
Step-by-step guide to add a new office, branch, or team
Before you can assign staff or set access levels, you need to create the relevant office, branch, or team within your admin console. Follow the steps below to get started.
Step 1: Log in to your Lendsqr admin console using your credentials.
Step 2: Click the Settings (gear) icon in the top navigation of your admin console.
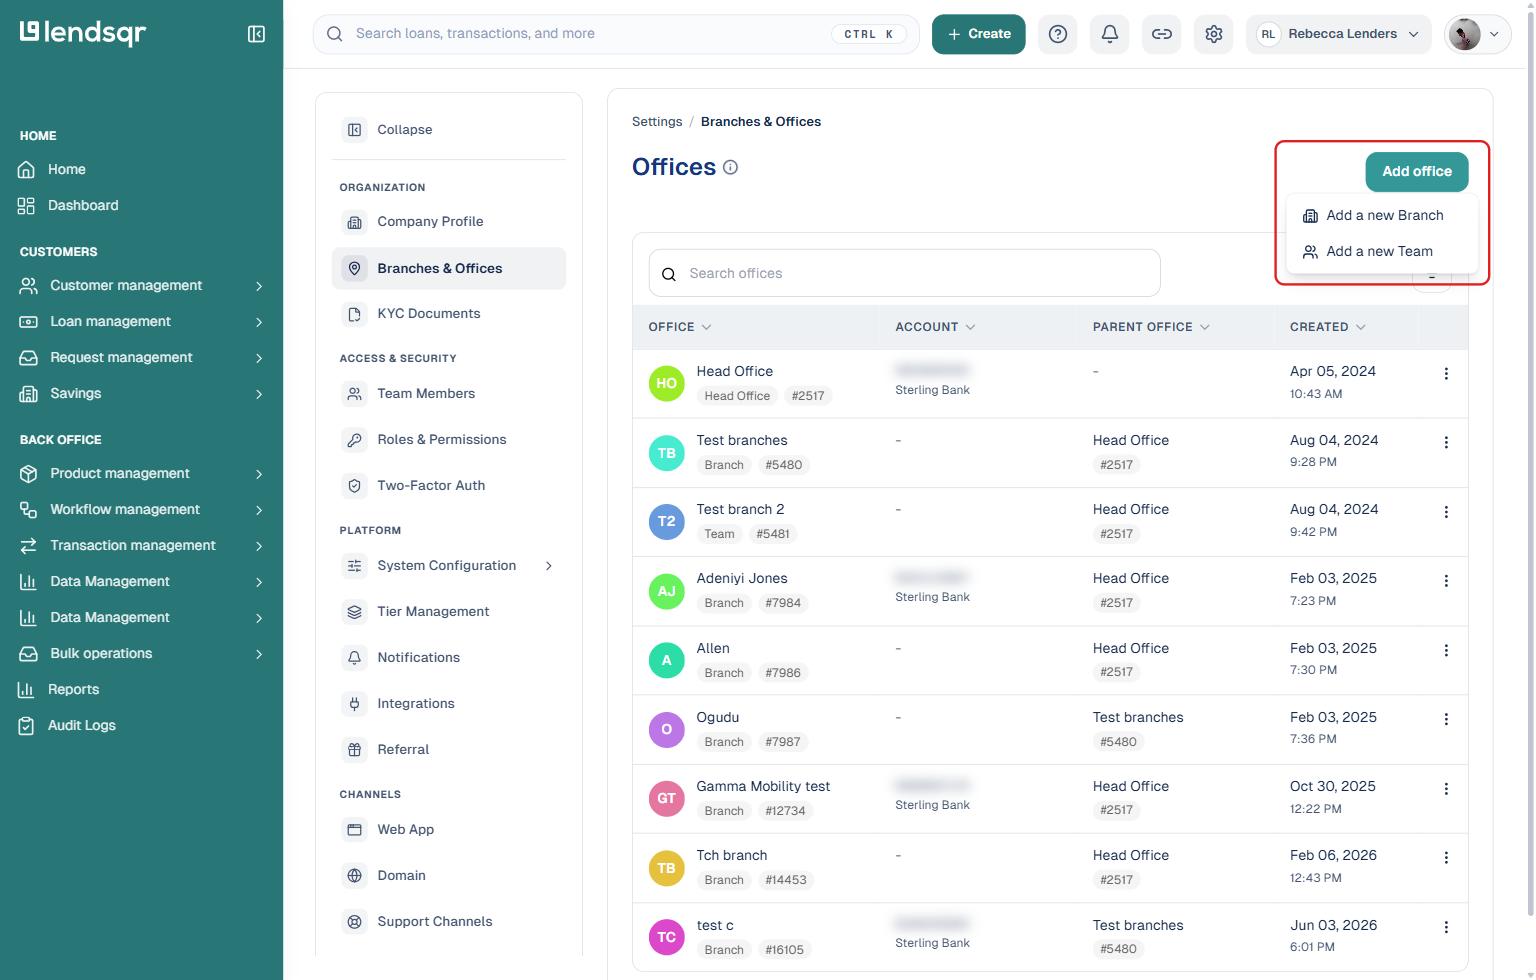
Step 3: Under “Organization“, select “Branches & Offices“. This takes you to the page where all existing offices, branches, and teams are listed, and where new ones can be created.
Step 4: Click “Add office” at the top right of the page. A small menu appears asking you to choose what type of entity to create.
Step 5: Choose “Add a new Branch” or “Add a new Team“. Both options serve different purposes. A branch typically represents a physical or operational location, while a team represents a functional group of people working toward a shared goal, often within a branch.
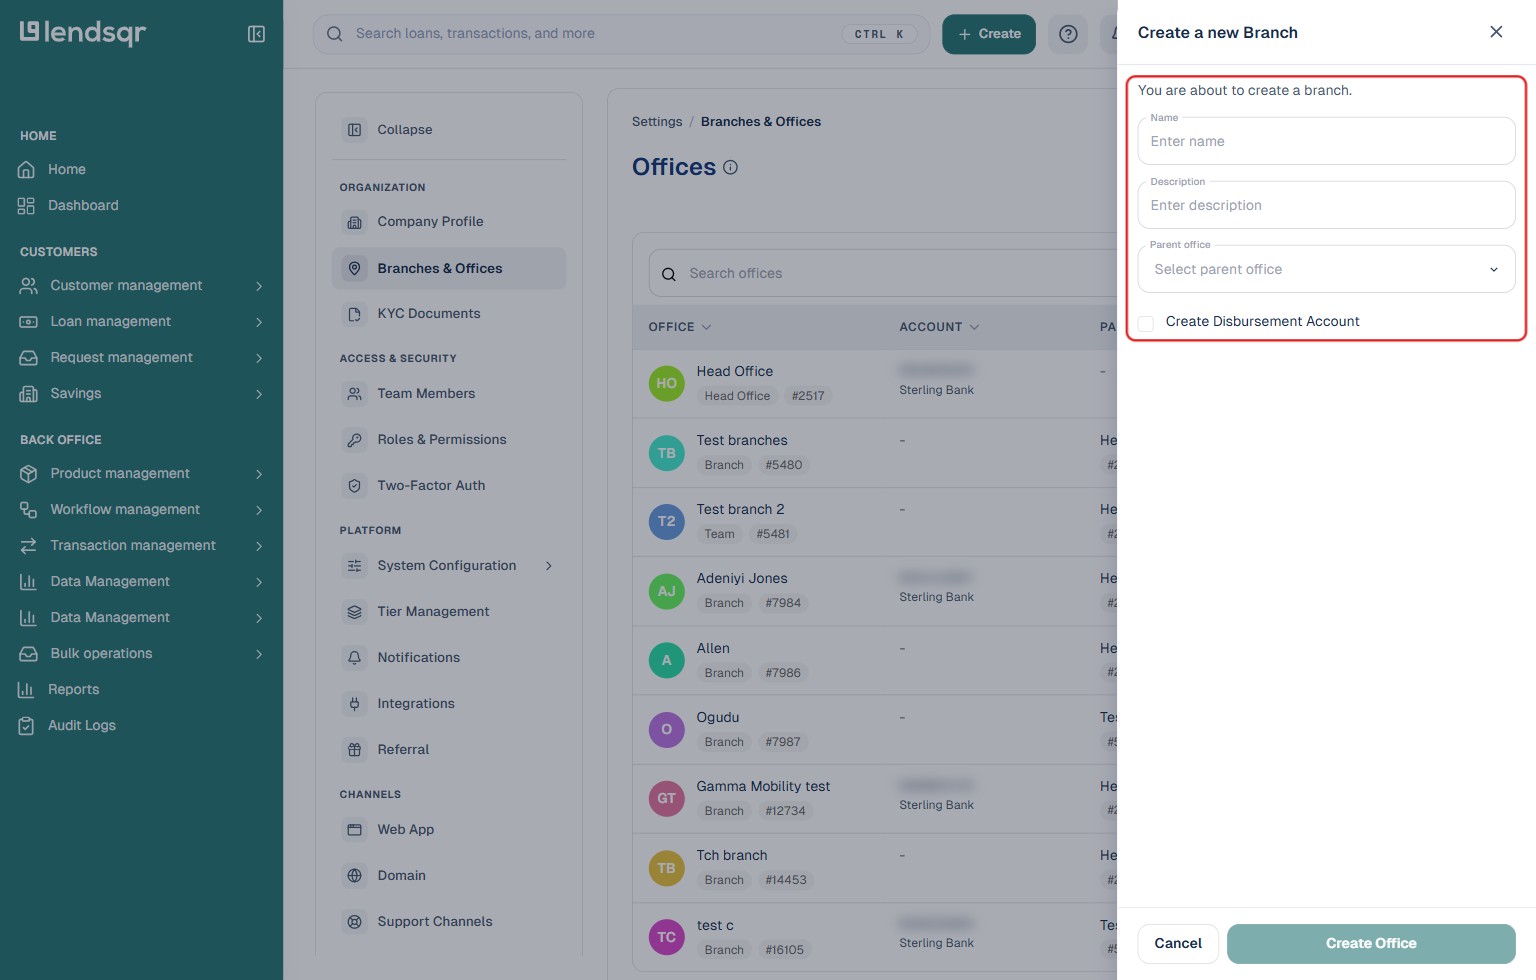
Step 6: Regardless of which option you selected, a panel opens on the right with the same fields to fill in:
Name: The official name of the office, branch, or team
Description: A brief explanation of what the branch or team does, or where it is located
Parent office: The office or branch that this new entry falls under. For example, a regional office might sit under the headquarters, while a field team might sit under a regional office
Create Disbursement Account: A checkbox — tick it if this branch or team should have its own dedicated disbursement account rather than using the parent office’s account. This is useful when different branches manage their own loan disbursements separately
Step 7: Once you have filled in all the required details, click “Create Office” at the bottom of the panel. The new office, branch, or team will be created and will appear in your list on the Offices page.
After the branch or team has been created, you can then add team members to it from the Team Members page. This allows you to assign specific staff to the appropriate branch or team based on their role or location.
Once an office, branch, or team has been created, you may need to update its details over time. Staff structures change, branches expand, and descriptions may need to be revised. Lendsqr makes it straightforward to edit any existing entry without disrupting the overall structure.
To edit the details of an existing office, branch, or team, follow these steps:
Step 1: Log in to your Lendsqr admin console.
Step 2: Click the Settings (gear) icon in the top navigation.
Step 3: Under “Organization“, select “Branches & Offices“. You will see a list of all the offices, branches, and teams that have been created.
Step 4: Find the office, branch, or team you want to update. Click the three-dot menu on the far right of its row and select “Edit“.
Step 5: Update the relevant fields — Name, Description, Parent office, and the Create Disbursement Account checkbox. These are the only editable fields; there’s no separate field for phone number or address.
Step 6: Once you have made the necessary changes, click “Update Office” to save. The changes take effect immediately and are reflected across the platform.
Keeping your organizational details accurate ensures that access levels, team assignments, and reporting structures remain aligned with how your institution actually operates. Regular reviews of your branch and team setup are a good practice, especially during periods of growth or restructuring.