Access your Back Office at your fingertips.
Download the app now on Google Play Store.
Scan the QR code
You can also scan QR code with your phone to download the app.
How to configure your loan product
Updated
On this page
What are loan products?
Imagine you run a small lending business that helps salary earners cover urgent expenses before payday. You can quickly create and activate a loan product, and once it’s live, eligible borrowers can log into your mobile or web app, apply for the loan, and get funds instantly. This section empowers you to build loan products that are not only easy to manage but also scalable, compliant, and user-friendly.
Understanding loan products
Think of loan products as the different types of loans you offer to your borrowers. Each one comes with its own rules: how much people can borrow, what interest rate they’ll pay, and how long they have to pay it back.
As a lender, you can create multiple loan products tailored to different segments of your target market, which borrowers can access through the web or mobile app. For example, you might create a “Salary Advance” loan that allows employees to borrow between $300 and $1,000 and pay back within one month at a 2% interest rate.
The flexibility of loan products means you can serve different customer needs with different offerings. You might have one product for emergency expenses with higher interest rates but faster approval, and another for larger purchases with lower rates but stricter eligibility criteria. This approach allows you to maximize your market reach while managing risk appropriately for each segment.
Why loan products matter for your lending business
Creating well-structured loan products gives you control over your lending operations. You decide the parameters that protect your business while meeting your customers’ needs. Instead of manually configuring each loan application, you set the rules once, and the system handles applications automatically based on those rules.
This systematic approach saves time, reduces errors, and ensures consistency. Every borrower who applies for the same product gets evaluated against the same criteria, creating fairness and transparency in your lending process. It also makes it easier to track performance, since you can measure how each product performs independently.
Creating a loan product in Lendsqr is straightforward. The platform guides you through each configuration section on a single page, ensuring you don’t miss critical settings. Here’s how to set up your first loan product from start to finish.
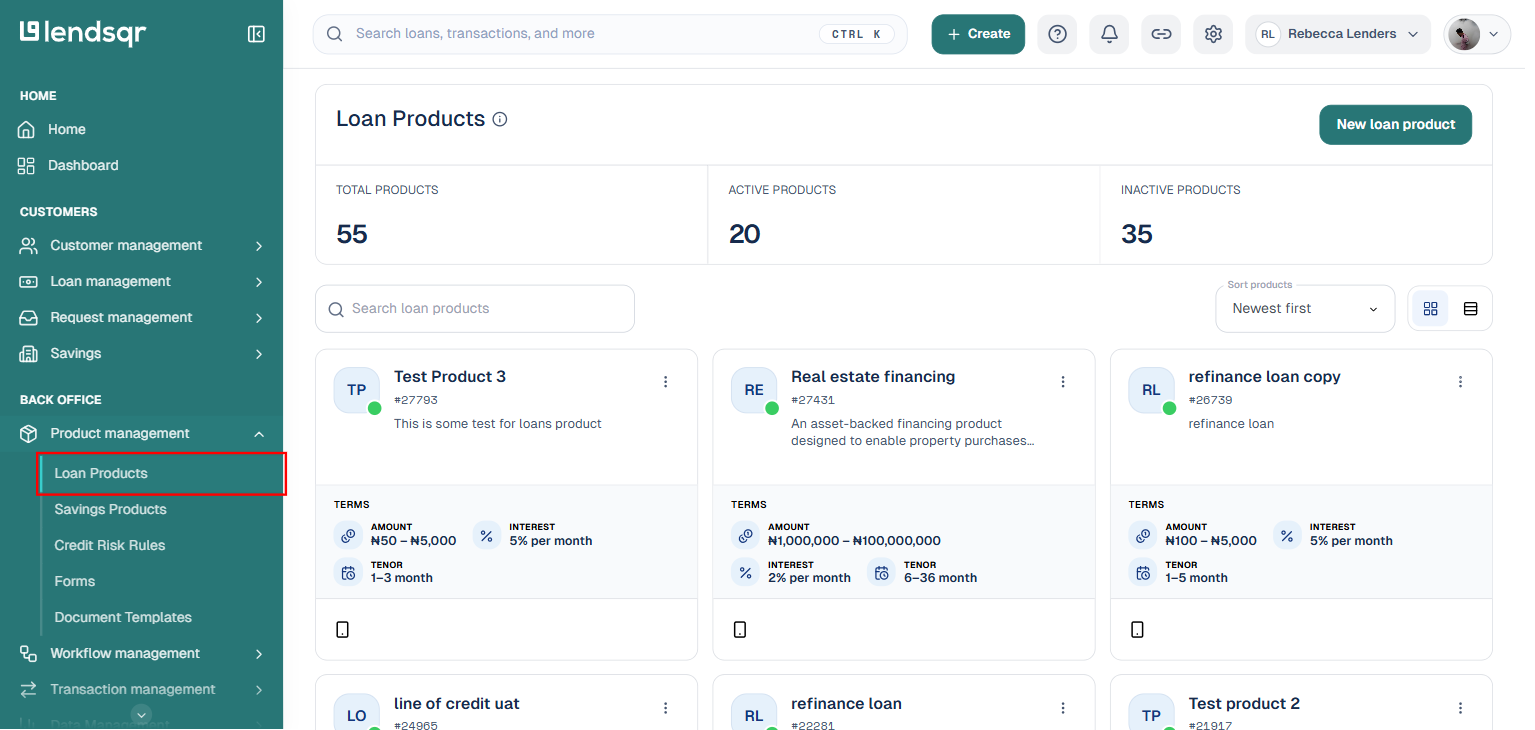
Step 1: Navigate to product management Log into your Lendsqr Admin Console. Once you’re logged in, look at the left sidebar where you’ll find the main navigation menu. Find and click “Product Management” in this sidebar. This section houses all the tools you need to create and manage your loan offerings.
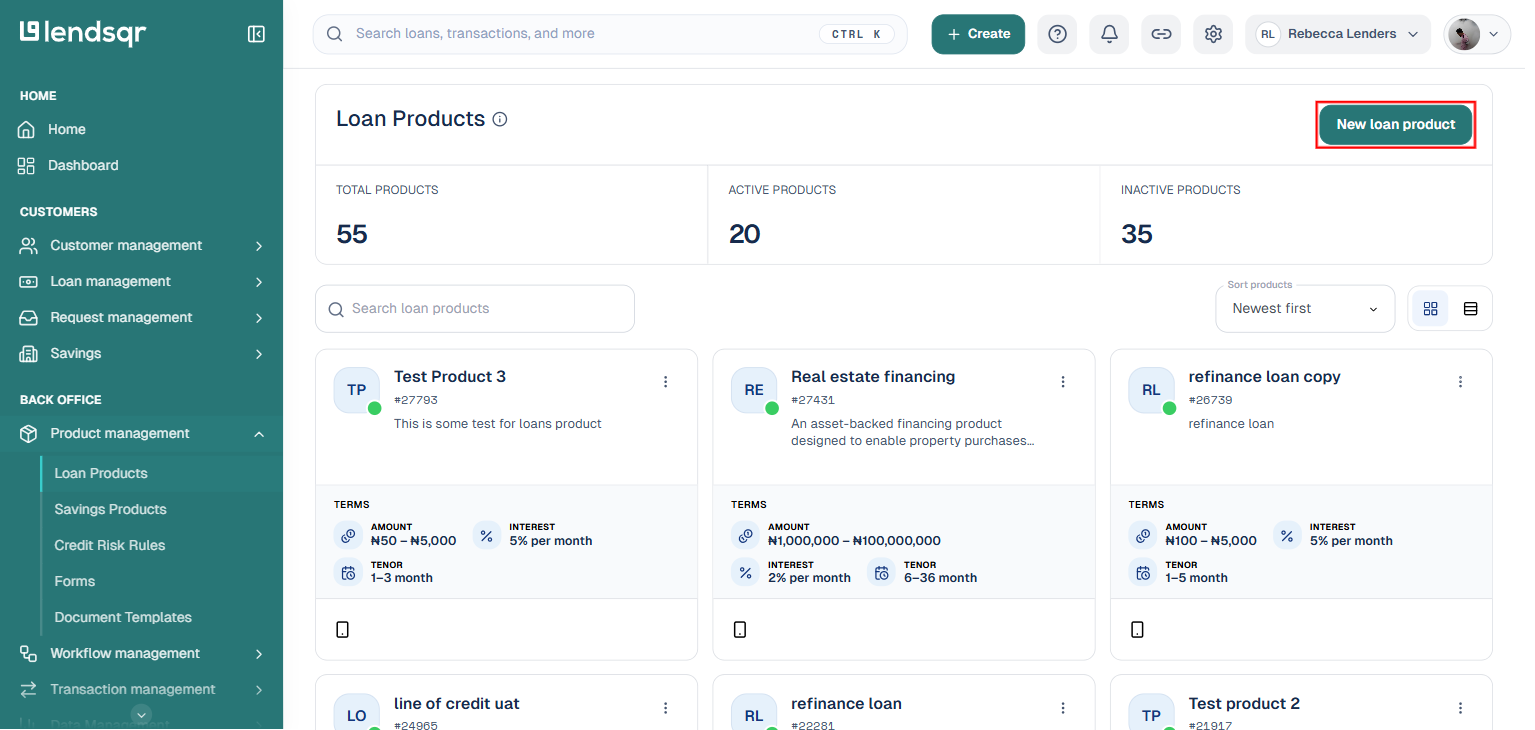
Step 2: Go to loan products Inside Product Management, click “Loan Products”. This takes you to the loan products dashboard where you can view all existing products, see their status (active or inactive), and access the creation tools.
Step 3: Create your loan product Click the “New loan product” button in the top right corner. This opens the “Create a loan product” page where you’ll define all the parameters for your new loan product. The page is organized into logical sections, making it easy to work through each setting methodically.
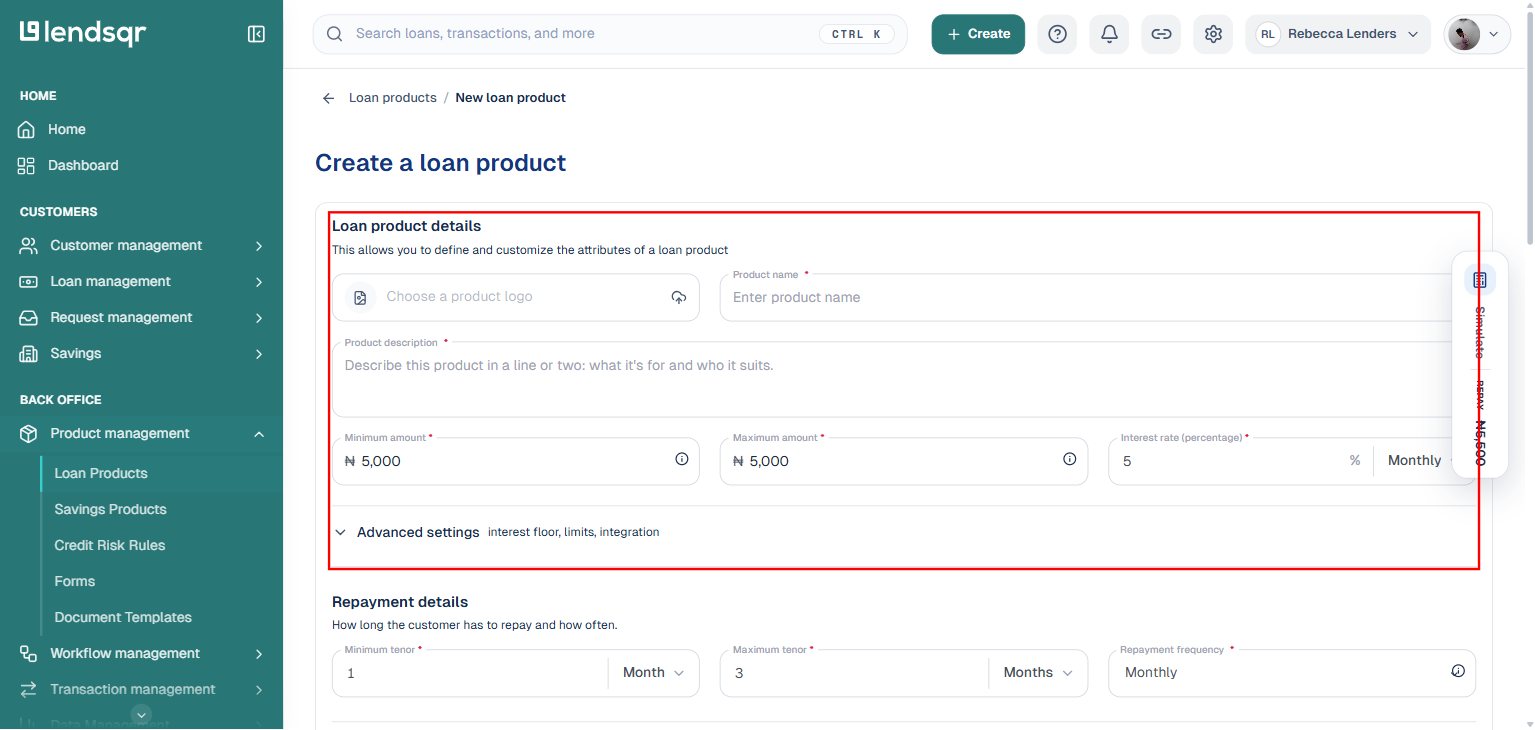
Step 4: Configure your loan product settings This is the most detailed step because you’ll be setting up the core characteristics of your loan product. Take your time here to ensure everything aligns with your business strategy. The page is organized into these sections:
Loan product details: Start with the fundamentals. Optionally upload a product logo, then enter your product name (this is what borrowers will see when browsing available loans) and product description. Set the minimum and maximum loan amount that borrowers can request, and the interest rate together with its period (for instance, monthly). An “Advanced settings” toggle in this section exposes further options such as interest floor, limits, and integration settings.
Repayment details: This section defines the repayment period. Set the minimum and maximum tenor, and choose whether borrowers can repay within days, weeks, or months, along with the repayment frequency. A “Simulate repay” summary in this section shows a live example repayment total as you adjust these fields.
Equity contribution: Optionally require borrowers to make a customer contribution alongside the loan by checking “This product requires an equity contribution” and configuring its bounds.
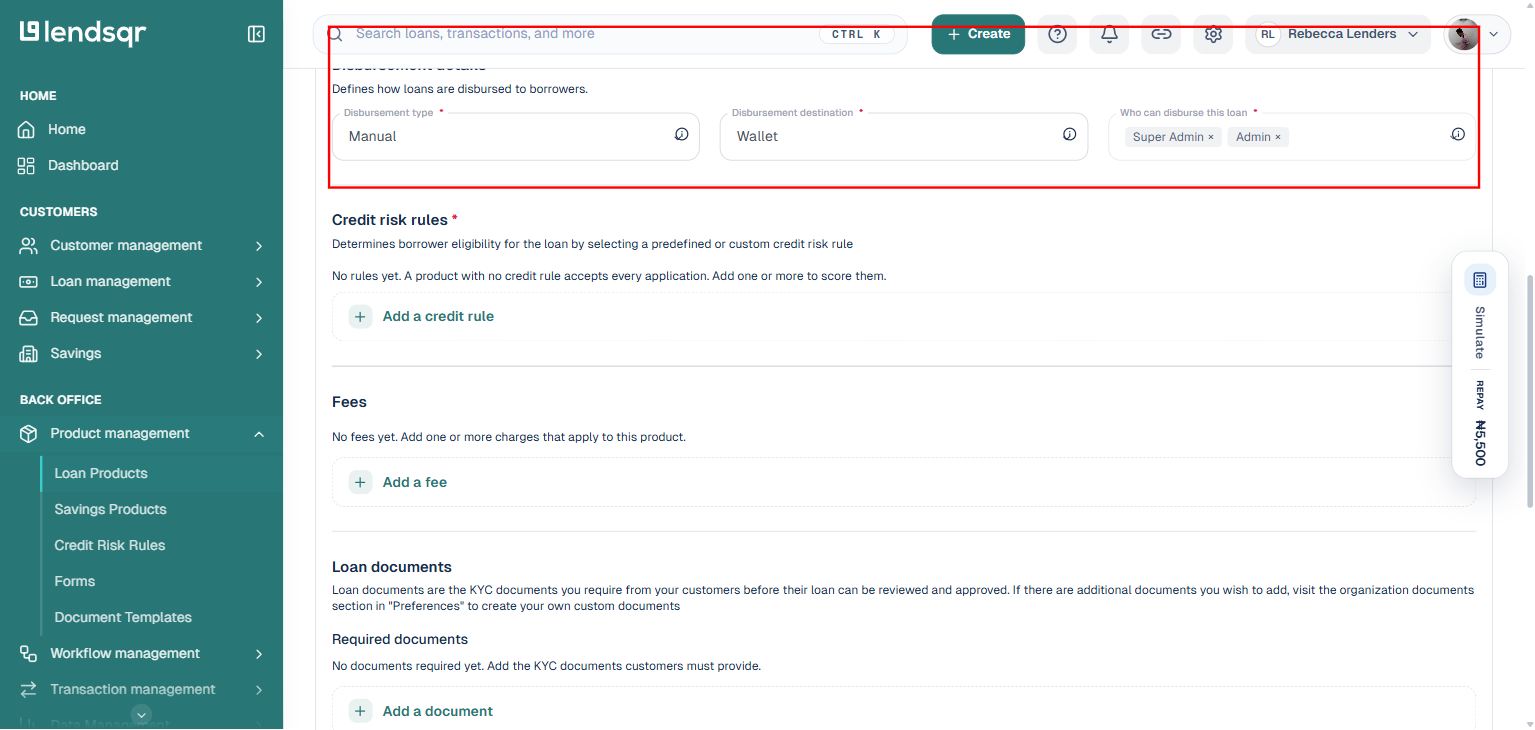
Disbursement details: Choose the disbursement type, manual or automatic, and the disbursement destination (for example, wallet or bank account). You also choose which roles are allowed to disburse this product, for example Super Admin and Admin.
Credit risk rules: Attach a predefined or custom credit risk rule to determine borrower eligibility. A product with no credit risk rule attached accepts every application, so add one or more rules if you want applications scored before approval.
Fees: Add any fees associated with the loan, such as processing fees or late payment penalties, by attaching them from your organization’s fee library or creating a new one. Be transparent about these costs so borrowers understand the total cost of borrowing.
Loan documents: Specify the KYC documents customers must provide before their loan can be reviewed and approved, and select a loan offer letter borrowers accept before disbursement. If you need additional custom documents, create them from the organization documents section in Preferences first.
KYC and verification: Toggle which identity checks a borrower must pass before the loan is approved: a verified official email, government ID verification before approval, and whether a guarantor is required.
Approval workflow: Optionally require sign-off from your team before this product disburses, by attaching an approval workflow.
Step 5: Save your configuration Click “Save” at the bottom of the page. This action creates your loan product and stores all your configurations. However, it’s important to understand that saving the product doesn’t make it live yet. New loan products are created as Inactive, giving you an opportunity to review everything before making it available.
Step 6: Activate your loan product This is the crucial final step because creating a product doesn’t automatically make it live. Activation is a separate, deliberate action that gives you control over when borrowers can start seeing and applying for the product.
To activate your loan product: Go back to Product Management → Loan Products. You’ll see your newly created product in the list with an “Inactive” badge. Click the “Filter by Inactive Products” stat to find it quickly if you have many products.
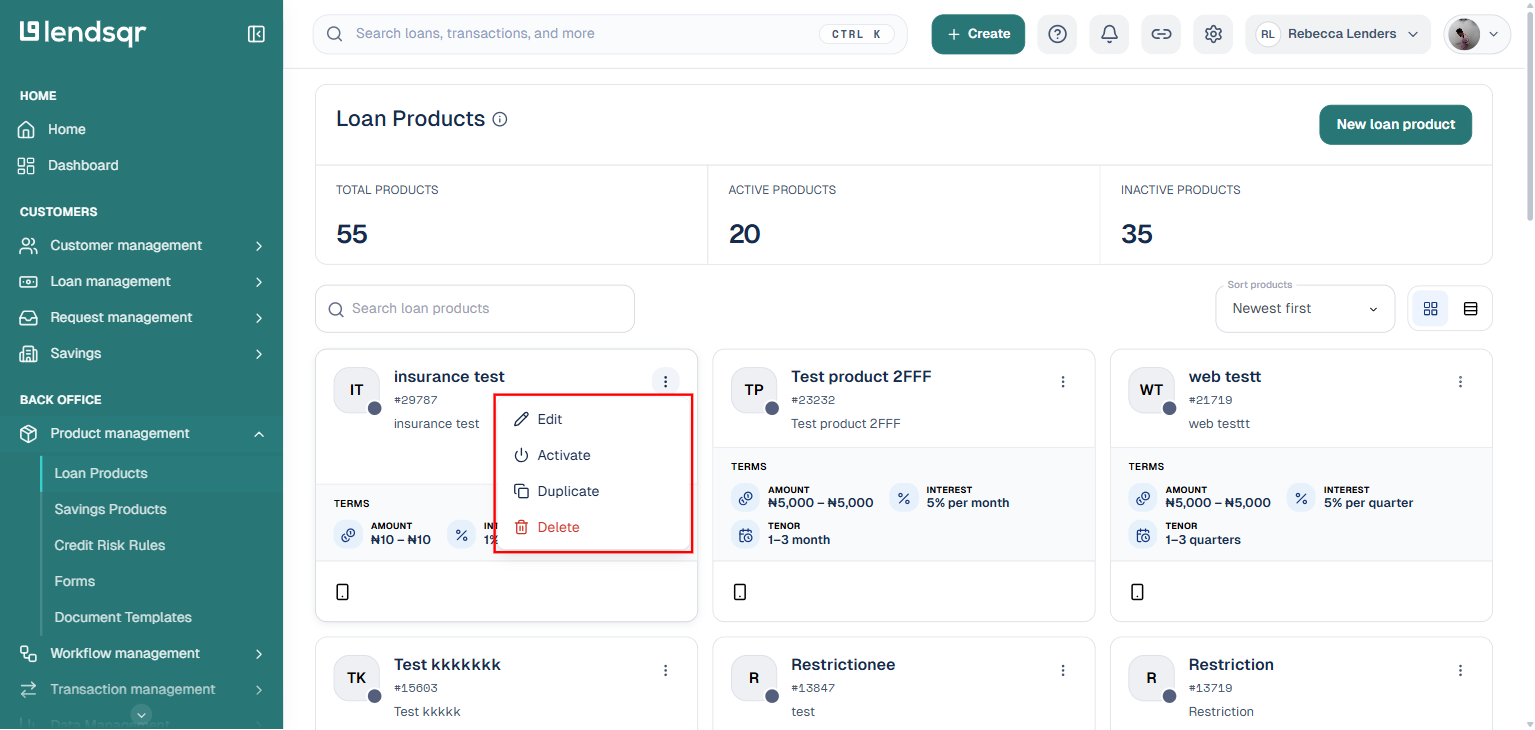
Click the “Product actions” button on the product’s card (or, from a product’s own details page, its “More actions” button) and select “Activate” from the menu. This final action makes your loan product live.
This two-step process (create, then activate) is designed to protect you. You can configure everything, double-check with your team, test the settings, and only activate when you’re completely ready. Once activated, the loan product immediately appears on your customer-facing web app. Eligible borrowers can start applying right away.
Managing your loan products after setup
Your work doesn’t end once a loan product is activated. Lendsqr gives you ongoing flexibility to adapt your products as your business evolves or market conditions change. The same “Product actions” menu on each product’s card gives you access to Edit, Activate/Deactivate, Duplicate, and Delete for that product.
Editing existing products You can edit any setting like interest rates, loan amounts, tenor options, or fees at any time by choosing “Edit” from the product’s Product actions menu. Simply make your changes and save. It’s important to note that changes only affect new applications, not existing loans. Borrowers who already have active loans continue under the original terms they agreed to.
Hiding products temporarily You can temporarily hide products from borrowers without deleting them entirely by choosing “Deactivate” from the product’s Product actions menu. This is useful when you need to pause lending for a specific product due to liquidity constraints, risk concerns, or seasonal adjustments. The product remains in your system with all its configurations intact, but borrowers can’t see it or apply for it until you choose “Activate” again.
Duplicating products If you want to create a variant of an existing product, you don’t have to start from scratch. Choose “Duplicate” from the product’s Product actions menu, then modify specific settings on the copy to create new variants quickly. For example, if you have a successful 30-day payday loan, you can duplicate it and adjust the tenor to create a 60-day version with different interest rates.
Sample loan product configurations
To help you understand how loan products work in practice, here’s a detailed example:
Payday loan for salary earners Name: Payday loan for salary earners Amount: ₦10,000 to ₦200,000 Tenor: 30 days Interest: 5% flat rate Repayment: Single payment on salary date Disbursement: Automatic
This configuration creates a product designed for employed individuals who need short-term cash before their next paycheck. The loan amounts are flexible enough to cover various emergency expenses, from small bills (₦10,000) to more significant needs (₦200,000). The 30-day tenor aligns with most monthly salary cycles, and the single payment structure means borrowers repay everything at once when they receive their salary. The automatic disbursement ensures borrowers get funds instantly upon approval, which is critical for emergency situations.
Understanding disbursement options
Manual disbursement Manual disbursement requires a team member to review and approve each loan before funds are sent. This approach gives you maximum control over every transaction. You can verify borrower information, assess special circumstances, and make judgment calls that automated systems might miss. However, manual disbursement requires more staff resources and creates delays between approval and fund transfer.
Automatic disbursement Automatic disbursement releases funds instantly upon system approval. Once a borrower meets all the eligibility criteria and passes your automated checks, the funds transfer immediately to their account. This approach is faster, scales better as your lending volume grows, and creates a better borrower experience. Choose automatic for speed and scale, especially if you have robust eligibility rules and risk assessment tools in place.
Direct bank and third-party account disbursement You can disburse loans directly to a user’s bank account or third-party as required. Simply go to your loan product create or edit page, and under the disbursement details section, you’ll find a “Disbursement destination” option where you can choose your disbursement destination. This flexibility ensures borrowers receive funds in the most convenient way for their needs.
#1 What is the difference between straight line and reducing balance repayment model
Straight line charges interest on the full original loan amount throughout the repayment period. If you borrow $100,000 at 5% monthly for $ months, you pay $5,000 interest every month (total $15,000).
Reducing balance charges interest only on what’s left unpaid. Same $100,000 loan: Month 1 you pay $5,000 interest (on $100,000), Month 2 you pay $3,500 interest (on $70,000 remaining), Month 3 you pay $2,000 interest (on $40,000 remaining). Total interest: $10,500.
The reducing balance method results in lower total interest costs for borrowers, which can make your loan products more competitive and attractive.
#2 What is a grace period?
A grace period is the number of days after the due date when a borrower can still pay without being charged a penalty fee. It provides a buffer for borrowers who might experience minor delays in making their payment.
#3 How long can the grace period be?
You can set any grace period length or remove it entirely. Most lenders use 3-7 days. For example, if a loan is due July 1st with a 5-day grace period, the borrower can pay until July 6th without penalty. On July 7th, late fees start applying. Simply edit the fee settings within your Loan Product. To learn more about fees, check here.
#4 Can my borrowers apply for loans outside Nigeria?
Yes, Lendsqr allows you to control which countries your borrowers can apply from. To configure geographic restrictions or enable applications from specific countries, please reach out to the support team at [email protected].
#5 What is the difference between the methods of disbursement?
Manual disbursement requires a team member to review and approve each loan before funds are sent, while automatic disbursement releases funds instantly upon system approval. Choose manual for greater control or automatic for speed and scale.
#6 Can I disburse loans to user’s bank account directly?
Yes, you can disburse loans directly to a user’s bank account. Simply go to your Loan Product create / edit page, and under the Disbursement details section, you are given a Disbursement destination option, where you can choose your disbursement destination.
Getting started with your first loan product
Now that you understand how loan products work and how to configure them, you’re ready to create your first offering. Start with a simple product that addresses a clear need in your target market. As you gain experience and gather borrower feedback, you can refine your existing products and create new ones to expand your lending portfolio.
Remember that loan products are flexible and can be adjusted as you learn what works best for your business and your borrowers. The key is to start with clear objectives, configure your settings carefully, and monitor performance closely after activation.