Access your Back Office at your fingertips.
Download the app now on Google Play Store.
Scan the QR code
You can also scan QR code with your phone to download the app.
How to onboard customers in bulk with Lendsqr
Updated
On this page
Introduction
Bulk customer onboarding allows lenders to create multiple customer profiles at once by uploading a single structured file. Instead of entering each customer manually, you prepare an .xlsx file containing customer data and upload it to the platform in one action. This reduces onboarding time significantly and ensures that customer data is captured in a consistent format across the entire organization.
For lenders managing large volumes of customers, manual onboarding is inefficient and prone to errors such as missing fields, inconsistent formatting, and duplicate entries. Bulk onboarding addresses this by standardizing the intake process and enabling batch processing of customer records in a controlled and auditable way.
This feature is particularly useful for lenders migrating from offline systems, onboarding customers through agents or partner networks, digitizing cooperative or group lending structures, and preparing customer data ahead of new product launches. It also ensures that customer records are properly structured for downstream processes such as decisioning, scoring, loan disbursement, and repayment tracking.
Common use cases
Bulk onboarding is typically used in scenarios where speed, scale, and consistency are required.
Microfinance institutions often use it to digitize legacy customer records that previously existed in paper or offline systems. Agent banking networks use it to upload customer data collected in the field after onboarding sessions. Cooperatives and thrift organizations use it to onboard members in batches rather than individually. Fintechs launching new loan products use it to pre-load customers into the system before going live. It is also commonly used during system migration when switching from an existing loan management platform to Lendsqr.
In all these cases, the goal is to reduce operational effort while ensuring that customer data is structured correctly and ready for automated processing.
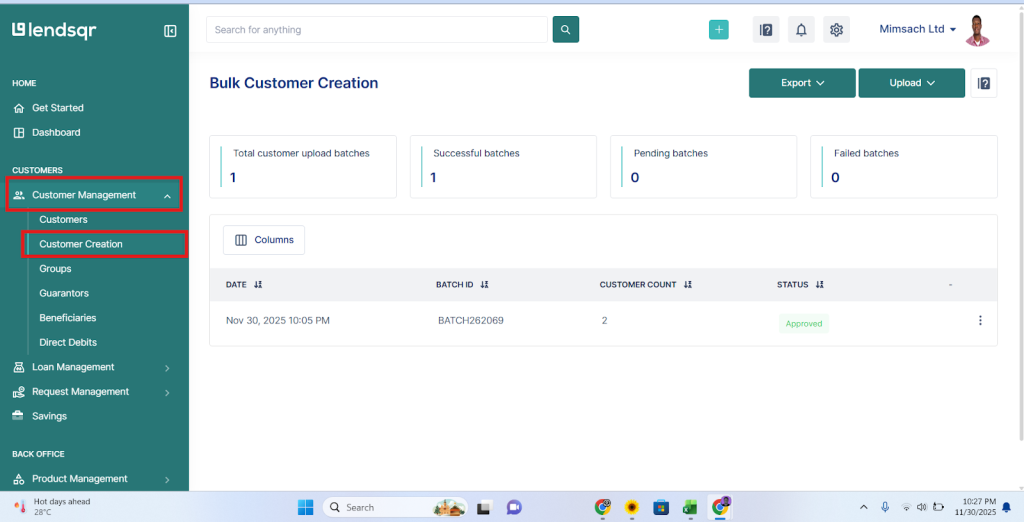
Log in to your Lendsqr admin console and navigate to the Customers tab under Customer Management. This section contains all customer-related operations, including creation, updates, and bulk upload functionality.
Click on Customer Creation to access the onboarding interface. This page is designed to support both single customer creation and bulk uploads, depending on your operational needs.
Step 2: Open the upload option
On the Customer Creation page, locate and click the Upload button. This opens a modal that provides two key options.
The first option is Download Sample, which provides a pre-formatted Excel template. This template contains all required fields structured in the correct format for system compatibility.
The second option is Upload Customers, which is used once your file has been completed and is ready for processing.
If this is your first time using the feature or you are unsure about formatting, always start by downloading the sample template to avoid errors.
Step 3: Download and populate the template
Download the .xlsx sample file and use it as the foundation for your upload. This ensures that column names, formatting rules, and system requirements are already correctly defined.
Populate the file with your customer data, ensuring that each row represents a unique customer and each column contains the correct data type.
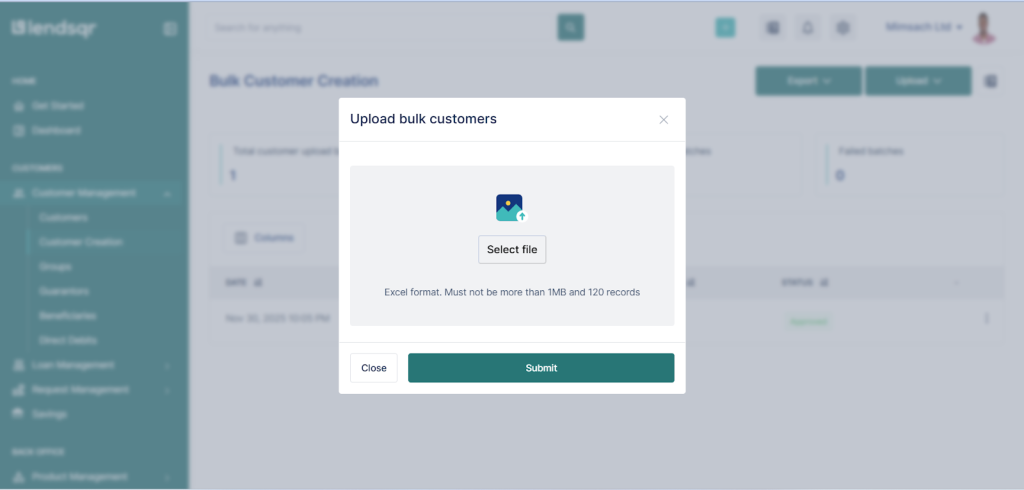
There are strict system limits that must be observed during preparation. Each upload can contain a maximum of 120 records, and the file size must not exceed 1MB. The file must also remain in .xlsx format, as other formats such as .csv or .xls are not supported.
While filling the template, ensure that all required fields are completed accurately. Missing or incorrectly formatted data can result in validation errors or partial upload failures.
Template format requirements
The upload template must follow a strict structure to ensure successful processing. Each field plays a specific role in customer creation and system integration.
The required fields include email, which is used for customer communication and account identification. Phone number, which must be in international format, is used for verification and communication. Date of birth must follow the yyyy/mm/dd format to ensure consistency across systems.
The BVN field is used for identity verification and must match official banking records. The BVN phone number should correspond to the phone number linked to the BVN to ensure identity consistency. Account number is required for financial transactions and repayment processing.
Bank code refers to the NIP code of the customer’s bank and must be valid to ensure successful payment routing. Branch ID is used internally to assign the customer to the correct operational branch or unit.
Incorrect formatting in any of these fields can lead to rejection of individual records or failure of the entire upload batch, depending on system configuration.
Template format (xlsx only)
Your upload file must be in xlsx format and must include the following fields:
Field name
Description
email
Customer’s email address.
phone_number
Customer’s phone number in international format (e.g., 234…).
date_of_birth
Customer’s date of birth in yyyy/mm/dd format.
bvn
Customer’s Bank Verification Number.
bvn_phone_number
Phone number registered with the customer’s BVN.
account_number
Customer’s bank account number.
bank_code
NIP bank code for the customer’s bank.
branch_id
Internal branch identifier (if applicable).
Step 4: Upload the completed file
Once the template has been fully populated and validated, return to the upload modal and click Upload Customers. Select the completed .xlsx file from your device and proceed.
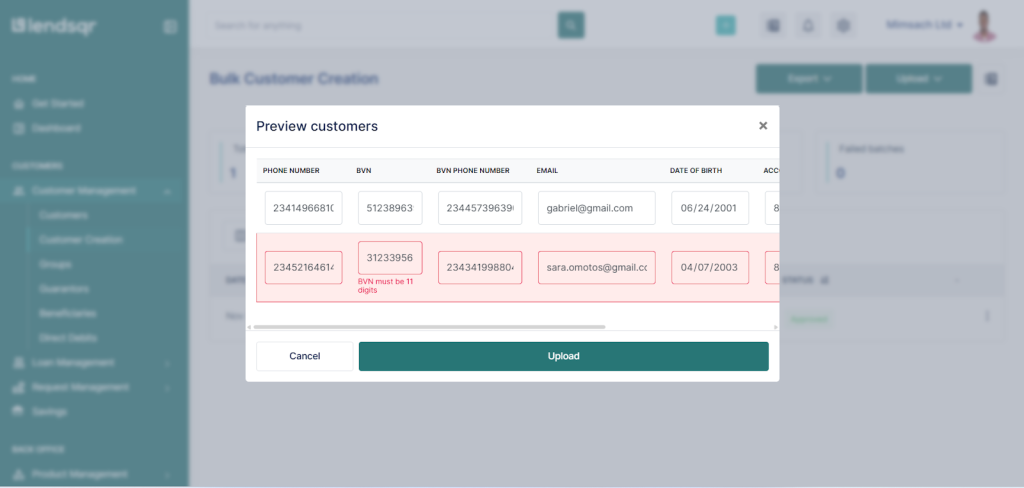
After upload, the system generates a preview screen showing all customer records contained in the file. This preview stage is critical because it allows you to validate data before final submission.
At this stage, you can review all entries, identify incorrect values, and correct errors directly within the preview interface if needed. Any field that fails validation is highlighted in red, making it easy to locate and fix issues before proceeding.
This step ensures that only clean and validated data is submitted into the system, reducing the risk of downstream errors in customer onboarding or loan processing.
Step 5: Submit your upload
Once all records have been reviewed and confirmed, click Submit to complete the upload process.
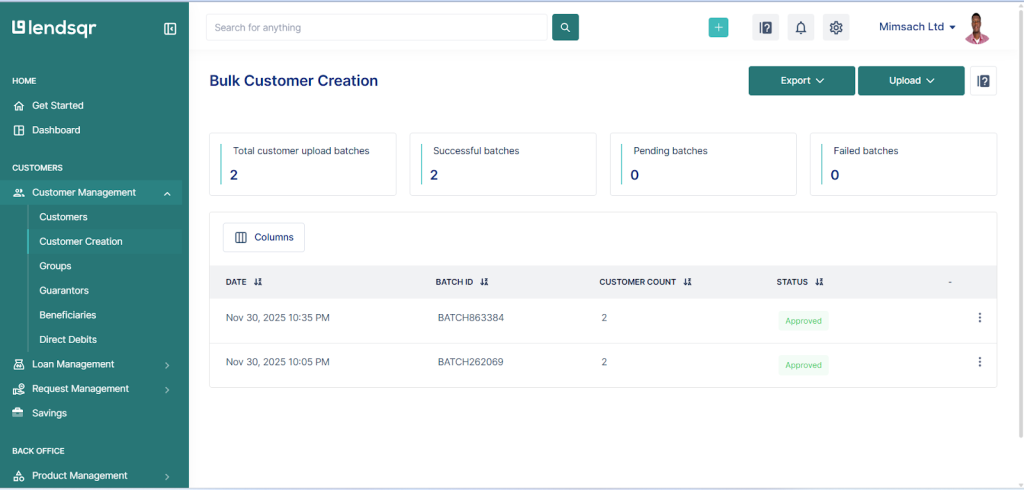
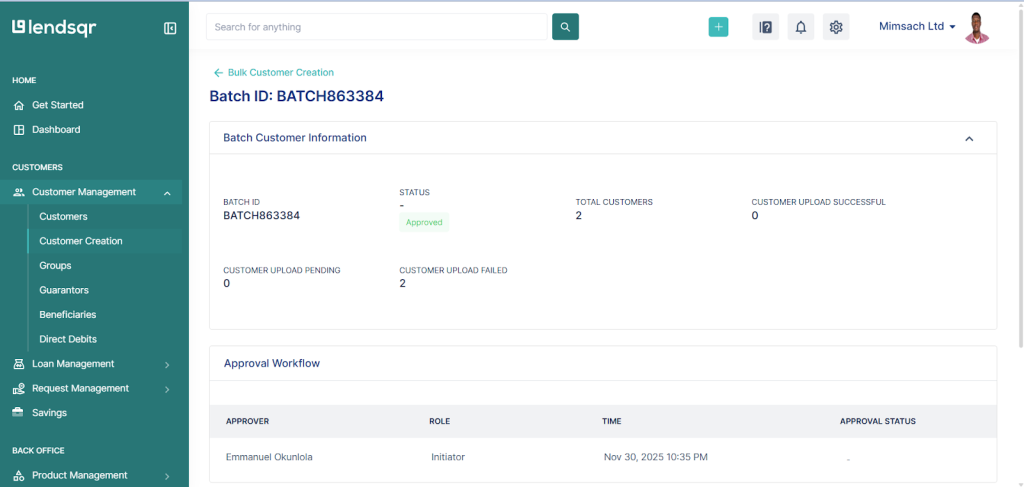
After submission, the system generates a batch summary containing key information such as upload date, batch ID, total number of customers processed, and overall status of the upload.
If your organization has an approval workflow enabled, the batch will be routed to an approver before customers are officially created. If no workflow is configured, the upload is automatically approved and processed immediately.
This ensures flexibility for organizations that require additional governance versus those that prefer direct processing.
Step 6: View batch details and processing results
To review uploaded data, navigate to the upload history section and locate the relevant batch using its batch ID or upload date.
Click the three-dot menu (⋮) next to the batch to access detailed information. This includes the full list of customers in the batch, their individual processing status, and any errors encountered during creation.
Each customer record will indicate whether it was successfully created or failed. For failed records, the system provides specific error reasons, allowing you to correct issues and re-upload only the affected entries instead of repeating the entire batch.
This level of granularity is important for operational efficiency and helps teams quickly resolve data issues without disrupting the entire onboarding process.
Tips for a successful upload
Always use the official sample template as your starting point. This ensures that formatting, column structure, and system requirements remain intact.
Do not modify column names, delete required fields, or change the order of columns, as this can cause validation failures during upload.
Ensure all identity fields such as BVN, phone numbers, and bank codes are accurate and verified before uploading. These fields are critical for downstream verification and transaction processing.
Keep each batch within the recommended limits to avoid performance issues or partial processing.
Perform internal validation before uploading to reduce errors during system processing.
Common errors and how to fix them
One common issue is uploading files in unsupported formats, such as .csv or .xls. The system only accepts .xlsx files, so ensure the file is saved correctly before uploading.
Another frequent issue is missing or renamed columns. If headers are modified, the system may not recognize the data structure. Always use the original template without alterations.
Incorrect BVN or bank codes can also cause record failures. These should be validated against official banking records before upload.
Exceeding the maximum number of records per upload can result in partial processing or rejection. In such cases, split the file into smaller batches and re-upload.
Formatting errors in dates or numeric fields can also trigger validation failures, so ensure consistency across all rows.
Best practices for bulk onboarding
Establish a standardized data collection process before onboarding customers. This reduces inconsistencies and improves data quality.
Validate customer data at the source before it is entered into the upload file. This includes identity checks, phone number verification, and confirmation of banking details.
Use batch uploads strategically rather than mixing unrelated customer groups in a single file. This improves traceability and simplifies troubleshooting.
Monitor upload history regularly to identify recurring data issues and improve upstream data quality.
Restrict bulk upload permissions to authorized users only to maintain control and prevent unauthorized customer creation.
Conclusion
Bulk customer onboarding in Lendsqr provides a scalable and efficient way to create large volumes of customer profiles while maintaining data consistency and operational control.
By following the correct process, using validated templates, and adhering to best practices, lenders can significantly reduce manual effort and improve onboarding accuracy.
When implemented properly, bulk onboarding becomes a foundational tool for scaling lending operations, improving data quality, and ensuring readiness for automated credit decisioning and disbursement workflows.