Access your Back Office at your fingertips.
Download the app now on Google Play Store.
Scan the QR code
You can also scan QR code with your phone to download the app.
How to download your user’s transaction receipt
Updated
On this page
Understanding transaction receipts in Lendsqr
A transaction receipt is a downloadable document, typically in PDF format, that summarizes a completed transaction. This includes key details such as the transaction amount, date, status, reference number, and any associated metadata relevant to the transaction.
These receipts are often required in both operational and customer-facing scenarios. For example, a customer may request proof of payment after completing a transaction, or an internal team may need documentation for reconciliation purposes. In regulated environments, receipts may also be required for audit trails and compliance reporting.
Every transaction is tied to a user, but you don’t need to open that user’s profile to find its receipt. The admin console has a dedicated Transactions page, under Transaction management, that lists every transaction across all your customers in one place. You can search or filter that list down to the specific transaction you need, regardless of which customer it belongs to.
When you may need to download a receipt
There are several practical scenarios where downloading a transaction receipt becomes necessary.
One common scenario is customer support. If a user claims that a transaction was completed but cannot find proof, an administrator can quickly retrieve and share the receipt. This helps resolve issues efficiently and improves user trust.
Another scenario involves internal reconciliation. Finance or operations teams may need to match system records with external payment confirmations. Having access to transaction receipts simplifies this process and ensures that records are aligned.
Receipts are also important during audits. Whether internal or external, audits often require verifiable documentation of financial activities. Being able to download and provide transaction receipts ensures that your organization remains compliant and transparent.
Before you begin
Before attempting to download a transaction receipt, it is important to ensure that you have the necessary access and information.
First, confirm that you have the appropriate permissions within the admin console. Only authorized administrators can view user transactions and download receipts. If you do not have access, you may need to contact your system administrator.
Next, ensure that you can accurately identify the user associated with the transaction. This may involve having details such as the user’s name, email address, or unique identifier.
If you are looking for a specific transaction, it is also helpful to have additional details such as the transaction date, type, amount, or transaction ID. This will make it easier to locate the correct record once you access the Transactions page.
Taking a moment to prepare this information beforehand will make the process smoother and reduce the likelihood of errors.
Step-by-step guide
Follow the steps below to successfully download a transaction receipt from the admin console.
Step 1: Log in to the admin console
Begin by logging in to your admin console using your credentials. Ensure that you are accessing the correct environment and that your session is active.
Step 2: Navigate to the Transactions page
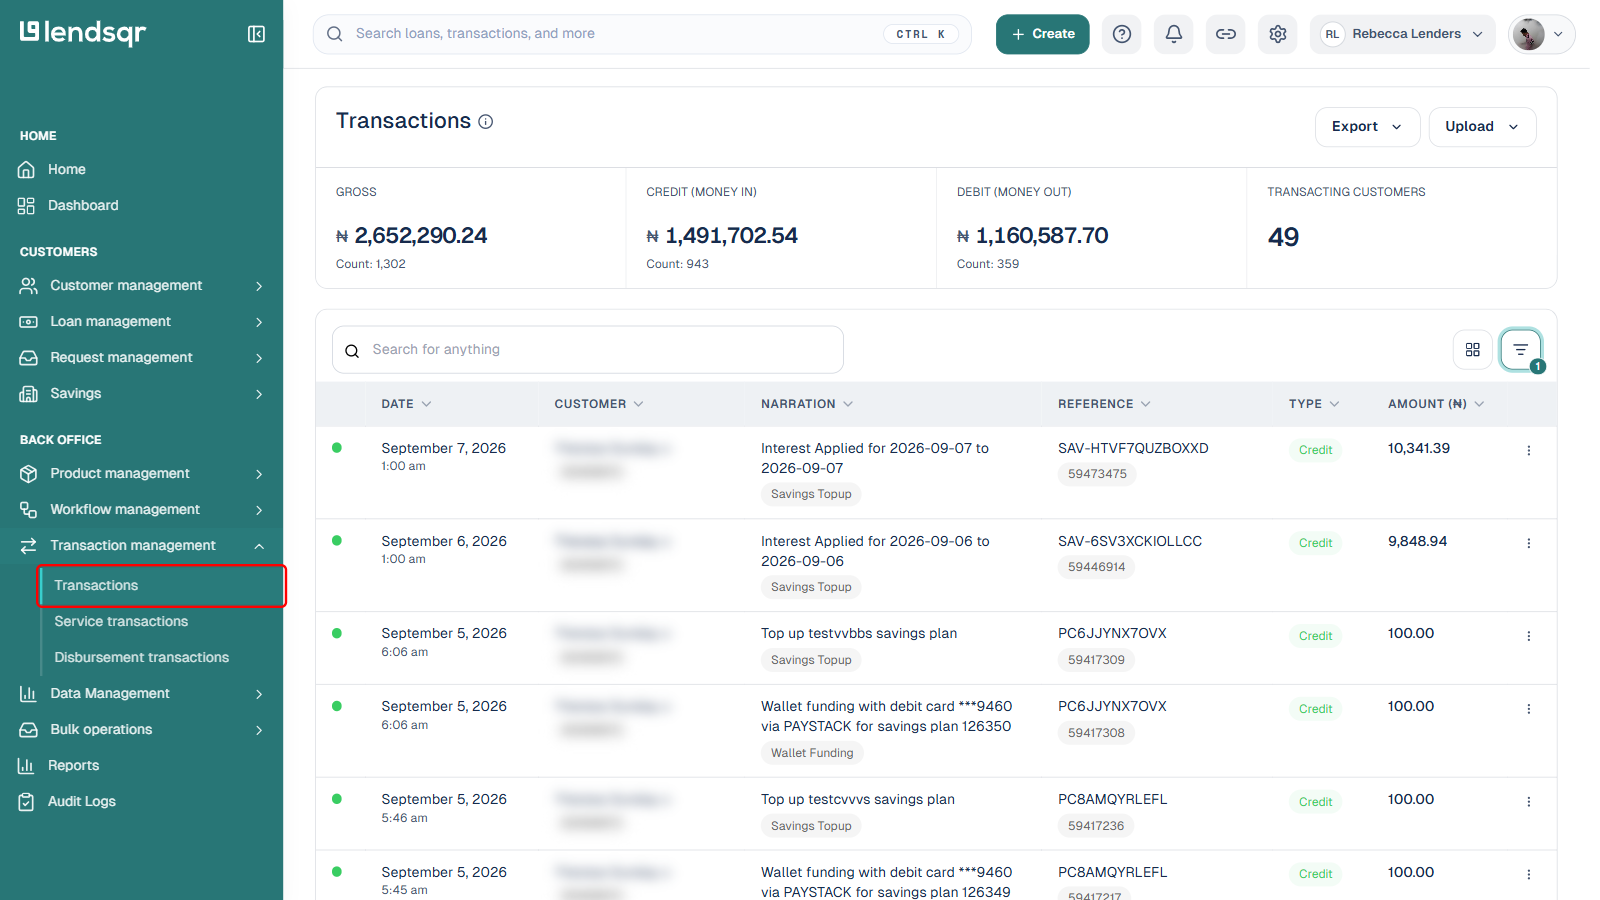
In the left navigation, expand Transaction management and click Transactions. This opens a single list of every transaction recorded across all your customers, not a per-customer view, so there is no need to open a user’s profile first.
The page also shows summary figures at the top (gross volume, money in, money out, and transacting customers) to give you context before you start narrowing the list down.
Step 3: Locate the specific transaction
With hundreds or thousands of transactions on this page, you will need to narrow the list down to find the one you want.
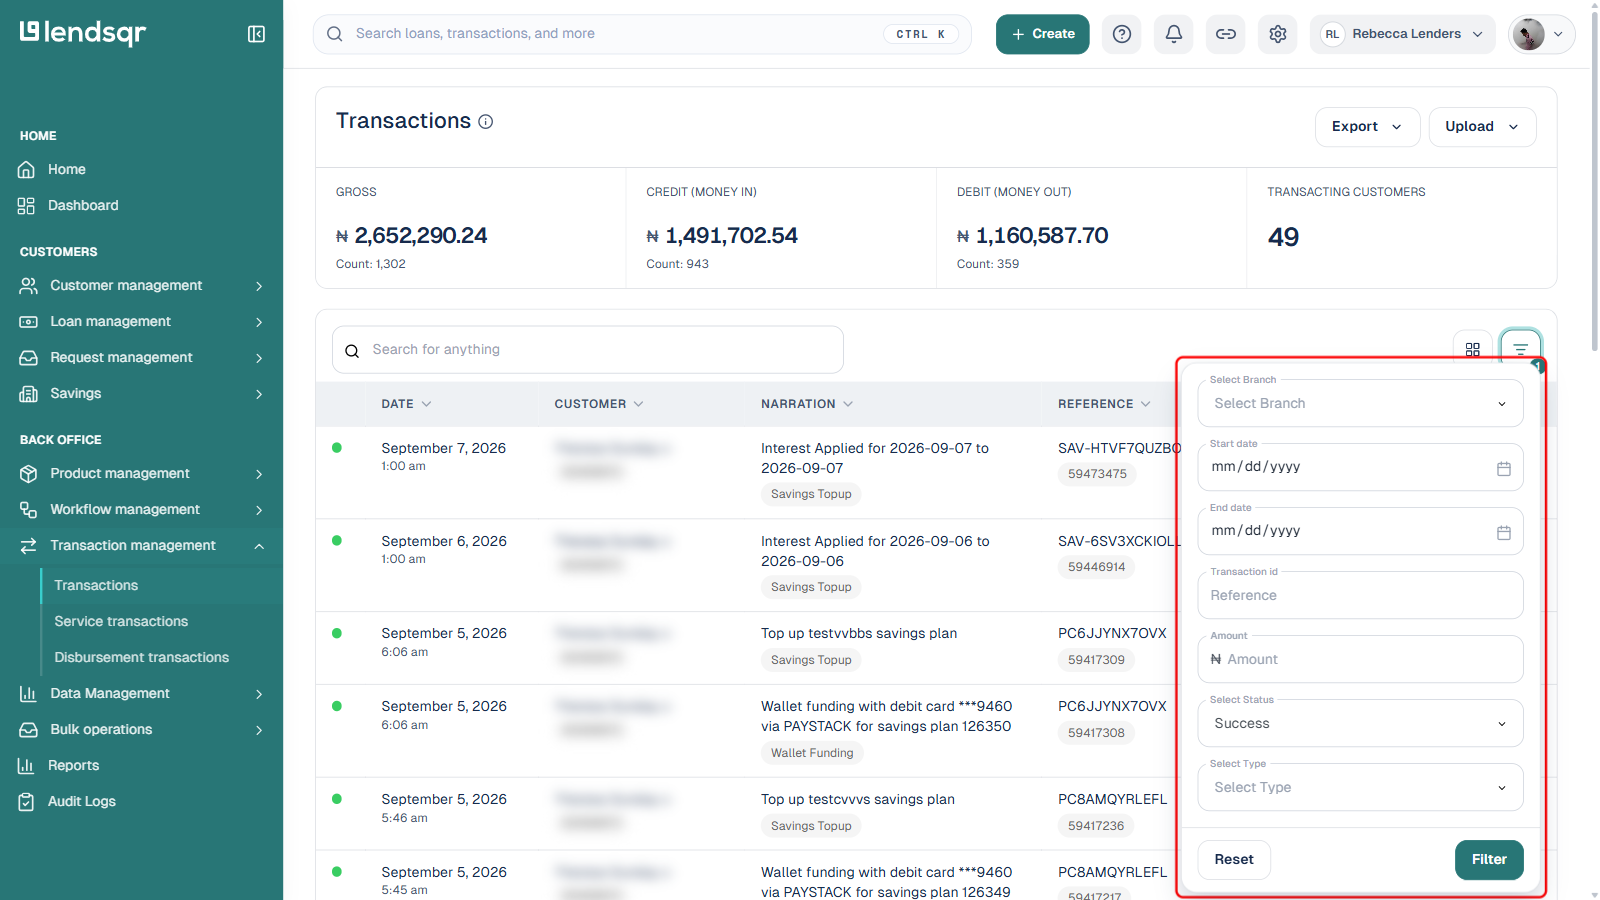
Use the Search for anything box to search by customer name, reference, or narration. For more precise results, click Filter to open a panel with Branch, Start date, End date, Transaction id, Amount, Status, and Type fields, then click Filter in that panel to apply them.
Once you locate a transaction that matches your criteria, take a moment to verify its details in the row (customer, narration, reference, type, and amount) before proceeding.
Step 4: Open the transaction details page
Click anywhere on the transaction’s row (or its actions menu) to open the transaction details page.
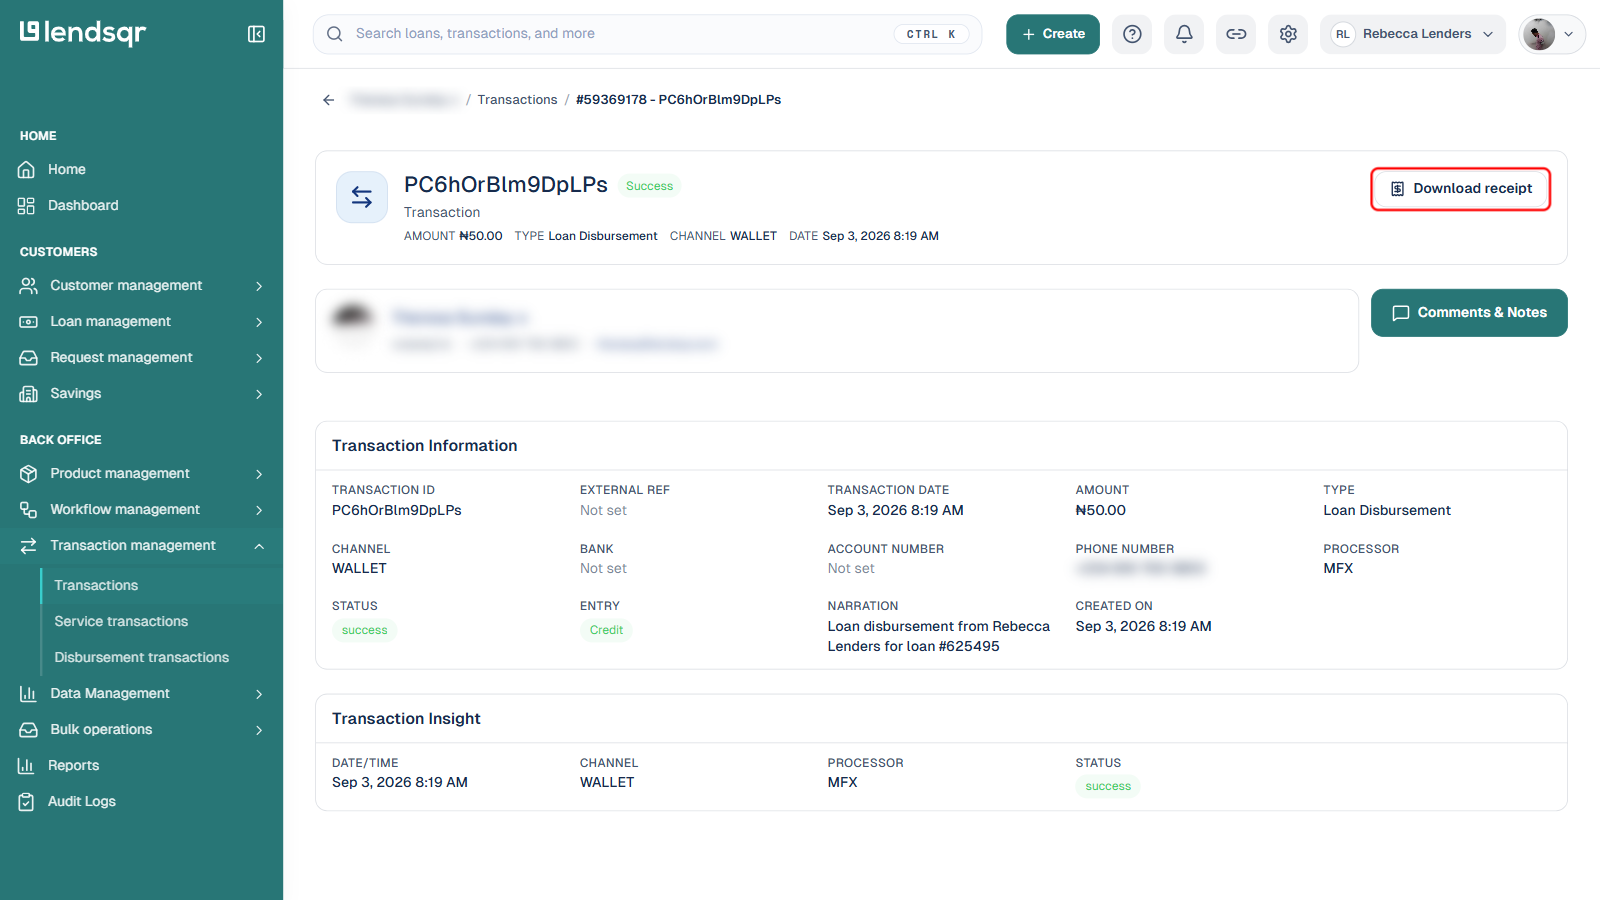
This page provides a comprehensive breakdown of the transaction, including the customer it belongs to, the amount, status, timestamps, reference number, channel, processor, and narration. Reviewing these details confirms that you are looking at the transaction you intend to download a receipt for.
The Download receipt button sits in the top-right of this page.
Step 5: Download the transaction receipt
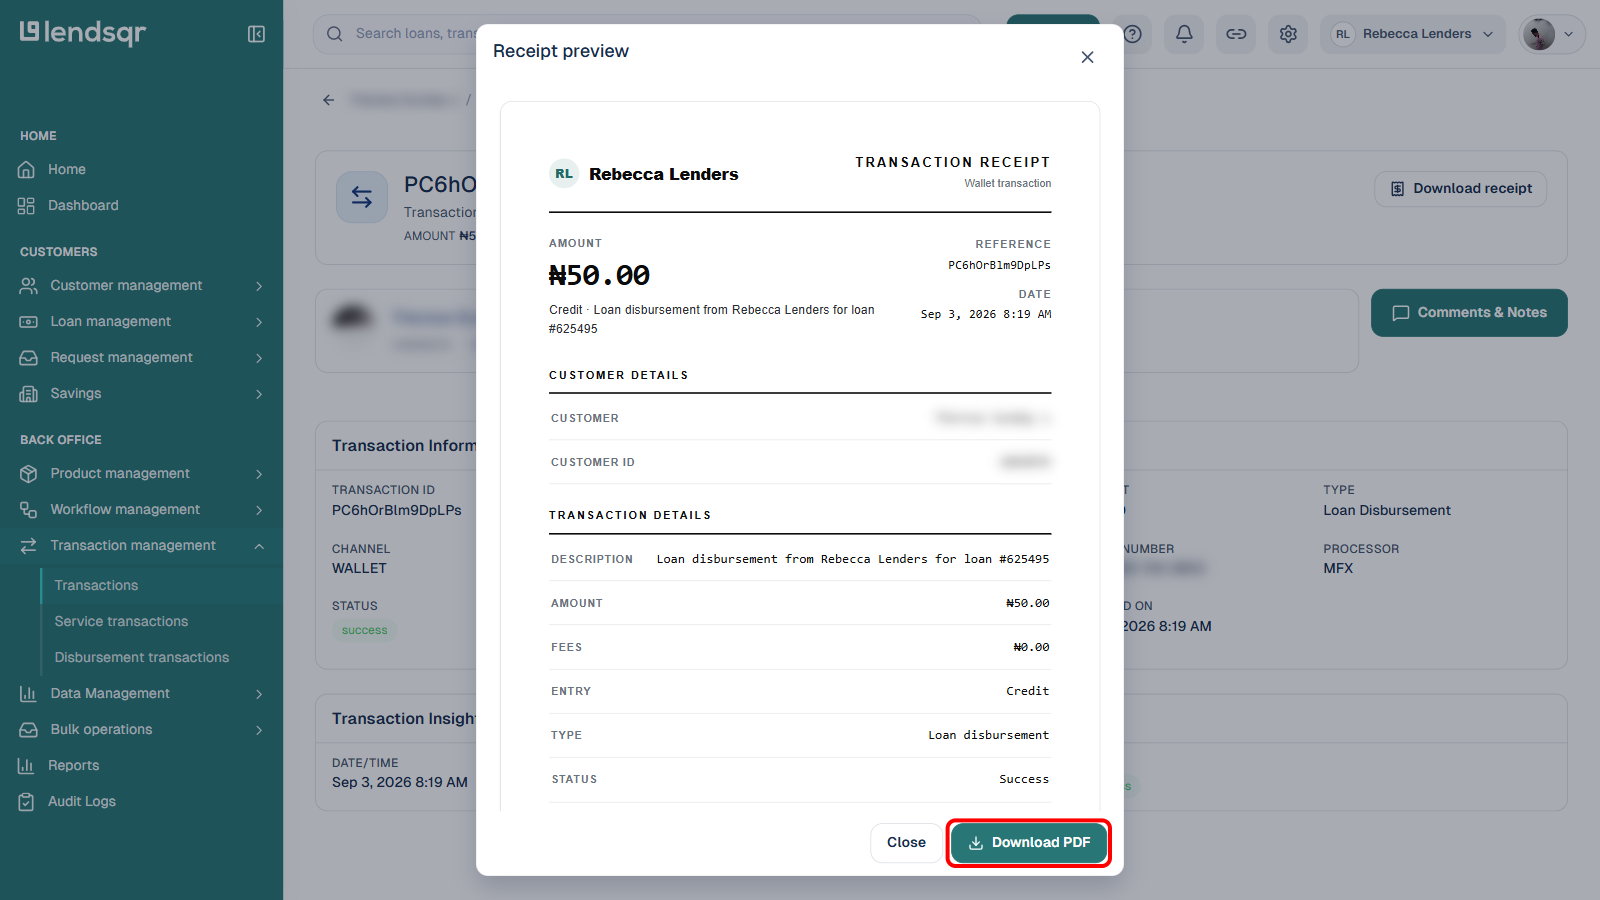
Click Download receipt. This does not download a file immediately, it opens a Receipt preview modal showing exactly how the receipt will look: your organisation’s name, the amount, reference, date, the customer’s name and ID, and a full transaction details breakdown.
Review the preview, then click Download PDF at the bottom of the modal to save the receipt to your device.
After downloading the file, open it to confirm that it contains the expected information and that it is not corrupted. This step ensures that the document is ready for use, whether for internal purposes or for sharing with a user.
Best practices for downloading transaction receipts
To ensure efficiency and accuracy when downloading transaction receipts, it is important to follow a few practical guidelines.
Always double-check the transaction details before downloading the receipt. This helps prevent errors, especially in situations where multiple transactions may appear similar.
Maintain a consistent file naming convention when saving receipts. For example, including the transaction ID and date in the file name can make it easier to organize and retrieve documents later.
Store downloaded receipts in a secure location. Since these documents may contain sensitive financial information, access should be restricted to authorized personnel only.
If receipts are frequently requested, consider documenting a standard operating procedure within your team. This ensures that all administrators follow the same process and maintain consistency in how transactions are handled.
Common issues and how to avoid them
While the process of downloading a transaction receipt is generally straightforward, certain issues may arise if proper care is not taken.
One common issue is selecting the wrong transaction. This often happens when filters are not used effectively or when multiple transactions share similar attributes. To avoid this, always verify transaction details before proceeding.
Another issue is incomplete or failed downloads. This can occur due to network interruptions or browser-related problems. If this happens, simply retry the download and ensure that your internet connection is stable.
Access-related issues may also occur if your account does not have the required permissions. In such cases, contact your system administrator to request the necessary access.
Being aware of these potential challenges helps you address them quickly and maintain a smooth workflow.
Conclusion
Downloading a transaction receipt from the admin console is an essential task that supports a wide range of operational and customer-facing activities. From resolving user inquiries to supporting financial audits, transaction receipts provide a reliable record of system activity.
By following the step-by-step process outlined in this guide, administrators can efficiently locate user transactions, verify their details, and download accurate receipts. Taking the time to validate each step ensures that the correct information is captured and shared.
With proper attention to detail and adherence to best practices, this process becomes a seamless part of managing transactions within the Lendsqr platform.