Access your Back Office at your fingertips.
Download the app now on Google Play Store.
Scan the QR code
You can also scan QR code with your phone to download the app.
How to sign up for Lendsqr: A step-by-step guide for lenders
Updated
On this page
Starting a lending business today no longer requires building complex technology from scratch, hiring a large tech team, or waiting months for setup. Traditional lending often depends on manual processes, spreadsheets, and disconnected tools. These approaches can be slow, error-prone, and difficult to scale.
Lendsqr is a cloud-based loan management software designed for fintechs, microfinance institutions (MFIs), salary lenders, and independent lenders. It provides a complete digital lending infrastructure through an intuitive admin console (back office). This includes loan origination, automated credit decisions, borrower onboarding, disbursements, repayments, and reporting, all in one place.
Signing up is your first step to accessing these tools. Once verified, you can configure loan products, share a branded borrower web app, manage credit risk, and start disbursing loans without writing code.
Real-world scenario:
Imagine you run an HR department that wants to offer salary advances to employees, or you are a small fintech targeting underserved borrowers in Nigeria. With Lendsqr, you sign up, set up a simple payroll-linked loan product, onboard employees via a web link, automate approvals using your own rules, disburse funds directly to bank accounts, and track repayments, all from one dashboard. No more manual tracking or compliance headaches.
This guide walks you through the sign-up process from start to finish, explains why each requirement matters for secure and compliant lending, and shows what happens next.
The entire process takes about 5 to 10 minutes, and Lendsqr offers a free plan to help you get started quickly.
Why these sign-up requirements matter
Lendsqr powers real financial transactions, so it must verify that every lender is legitimate, licensed (where required), and accountable. This protects borrowers from unlicensed operators, reduces your liability, and ensures smooth operations such as fund disbursement and repayment collection.
Regulatory compliance in lending is essential. Lendsqr operates in over a hundred countries, so the sign-up form’s country selector adapts what’s asked of you. This is also what determines your account’s default currency and locale later on.
What do I need to sign up to Lendsqr?
Have the following ready before you begin:
Full name: Use the name on your government-issued ID or business registration.
Mobile number: This will be used for account recovery and important alerts, and you’ll need to verify it separately after signing up (see the note at the end of the steps below). Use a number you check regularly.
Email address: A business email such as [email protected] is strongly recommended over a personal one. This becomes your primary login and the address that receives the confirmation link you’ll need to activate your account.
Business name and a short description (at least 15 words) of the lending business you want to set up.
Whether you already hold a lending license, and if not, whether you’re currently working on getting one. You can sign up and explore the platform either way, but a valid license is needed before you can go live with real loan disbursements. If you’re still processing one, you can use this time to set up your products and decision criteria so you’re ready to launch the moment it comes through.
Note: Business documents such as your certificate of incorporation, lending license, and logo are not part of the sign-up form itself. You upload these afterward from inside the admin console, once your account has been created.
Step-by-step sign-up
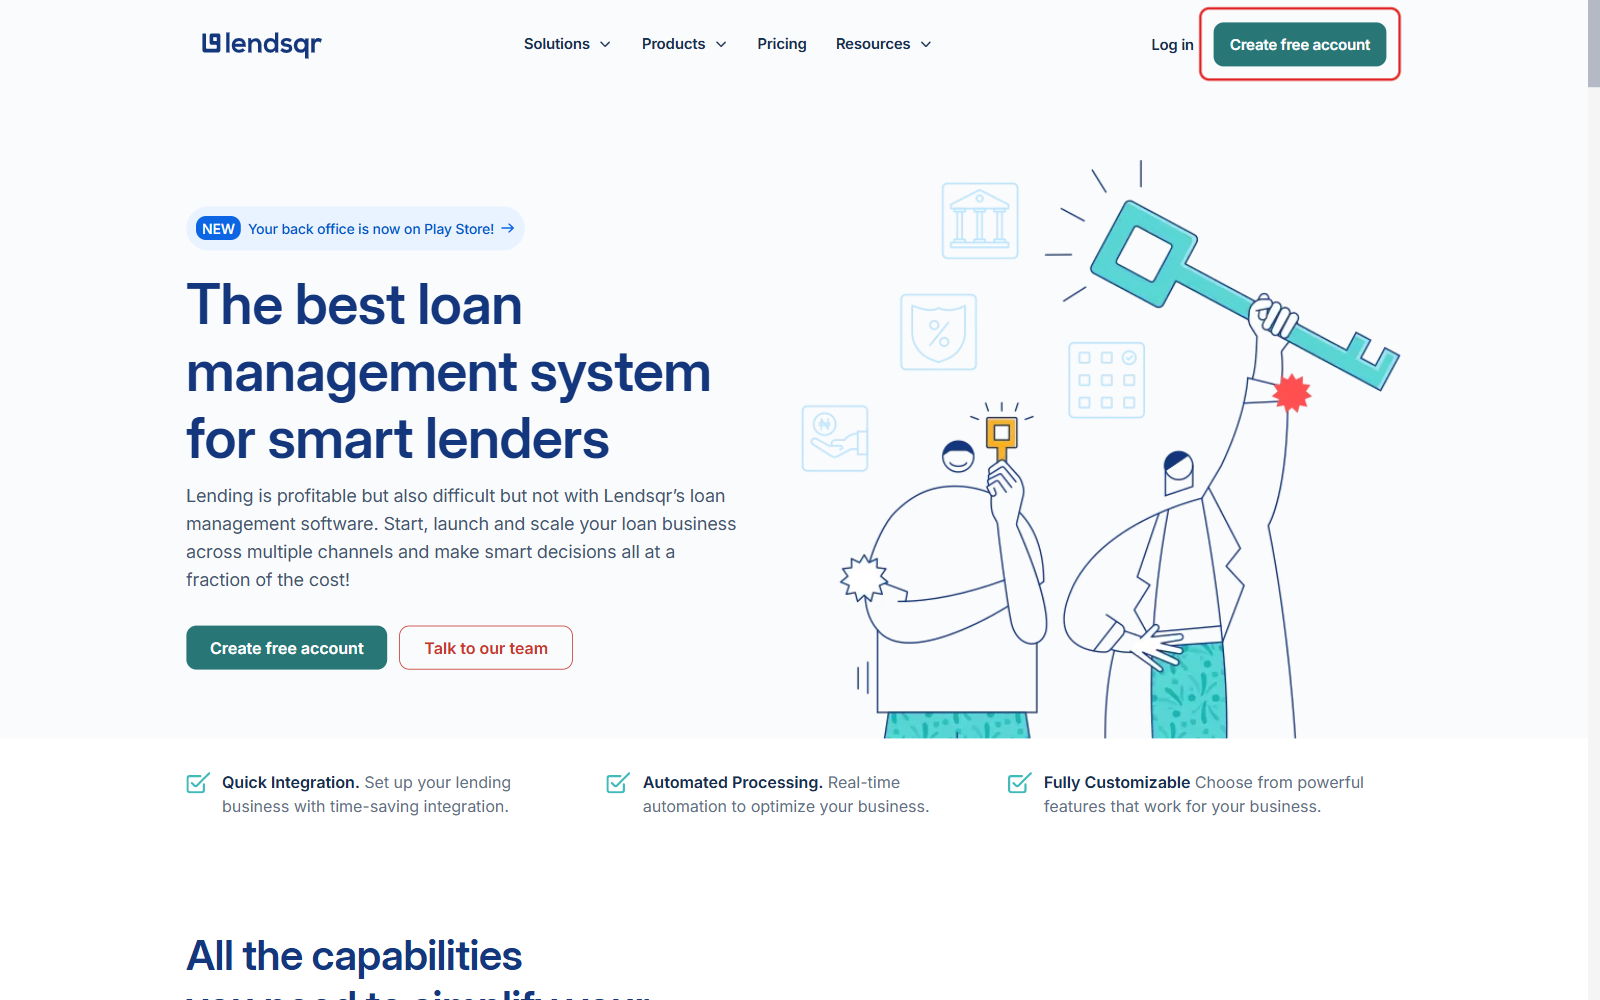
Step 1: Visit the Lendsqr website and click “Create free account”
Go to lendsqr.com and click the “Create free account” button at the top right corner of the homepage.
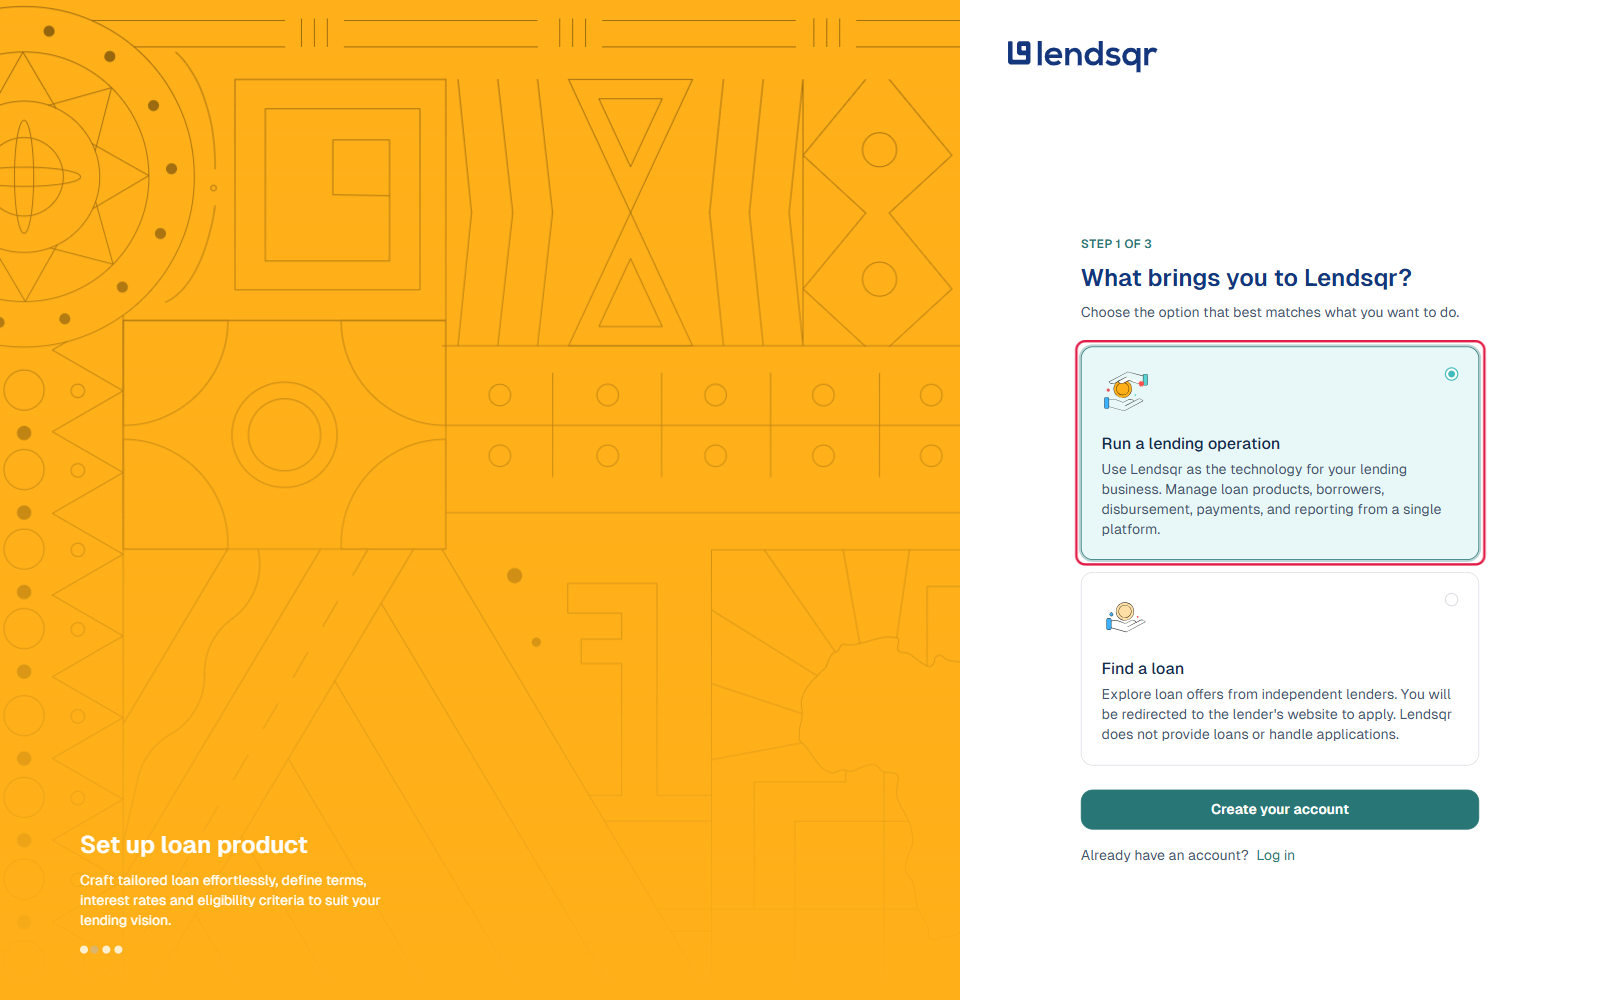
Step 2: What brings you to Lendsqr?
This is “Step 1 of 3” of the wizard. Choose “Run a lending operation” if you’re setting up your own lending business on Lendsqr, or “Find a loan” if you’re a borrower looking to explore loan offers from independent lenders (this redirects you to that lender’s own site, since Lendsqr itself doesn’t provide loans or handle applications). Then click “Create your account“.
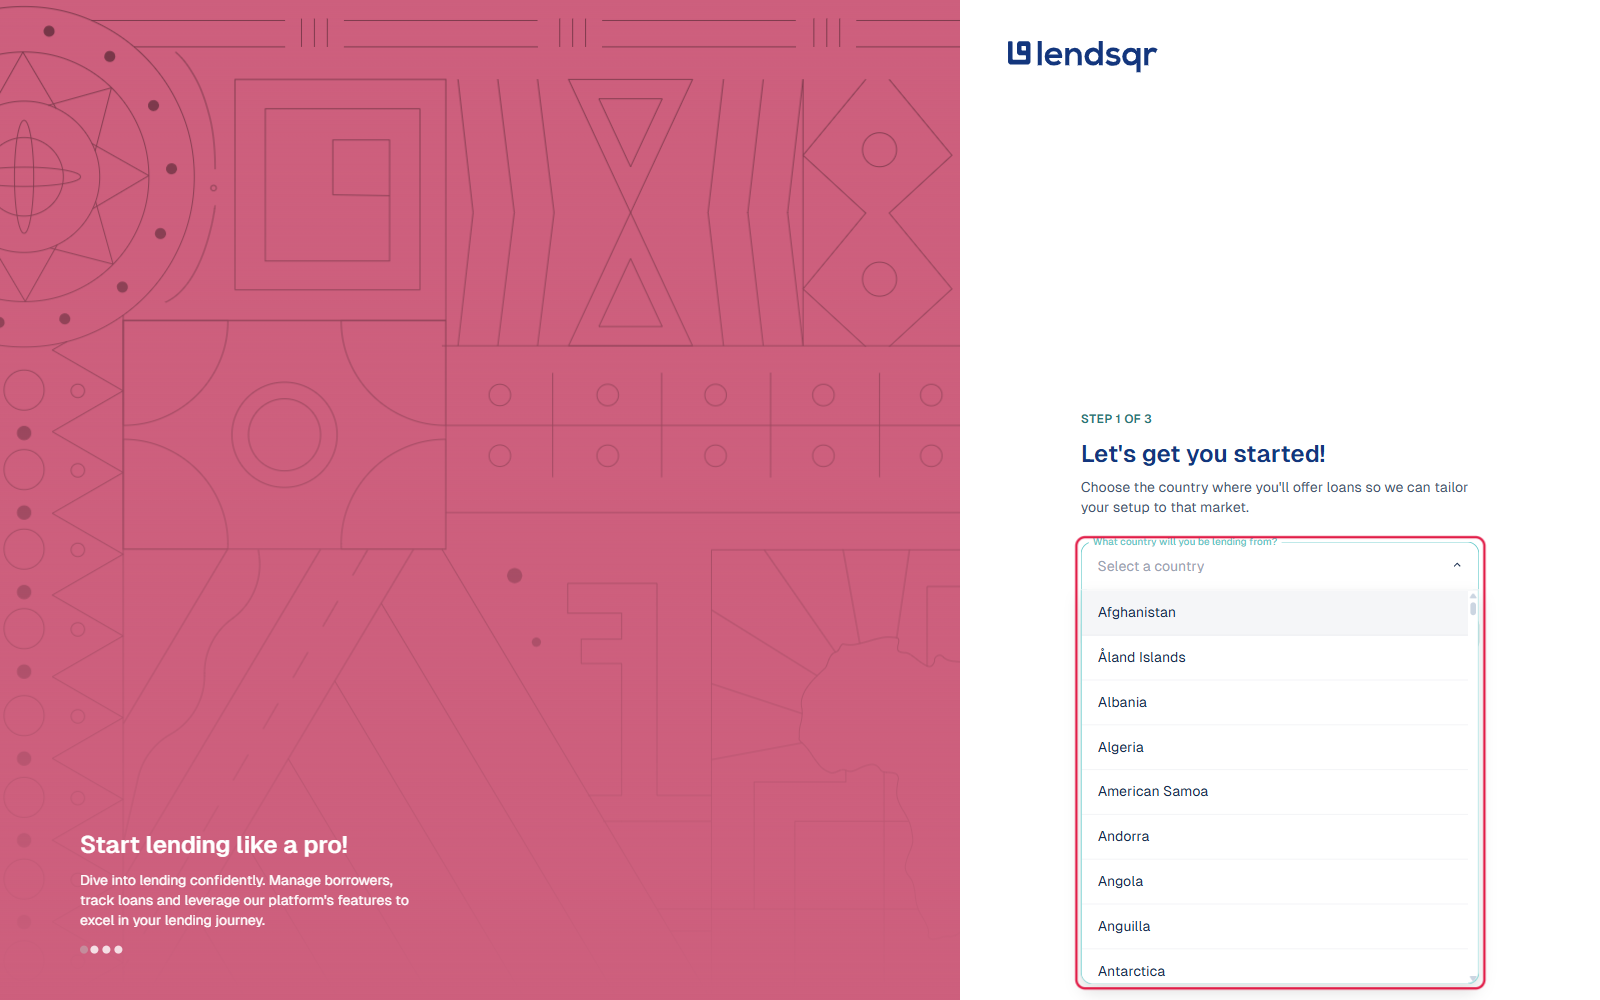
Step 3: Select your country
Still within “Step 1 of 3,” choose the country you’ll be lending from. The rest of the sign-up form only appears once a country is selected, since Lendsqr tailors what it asks for (and your account’s default currency and locale) to that market.
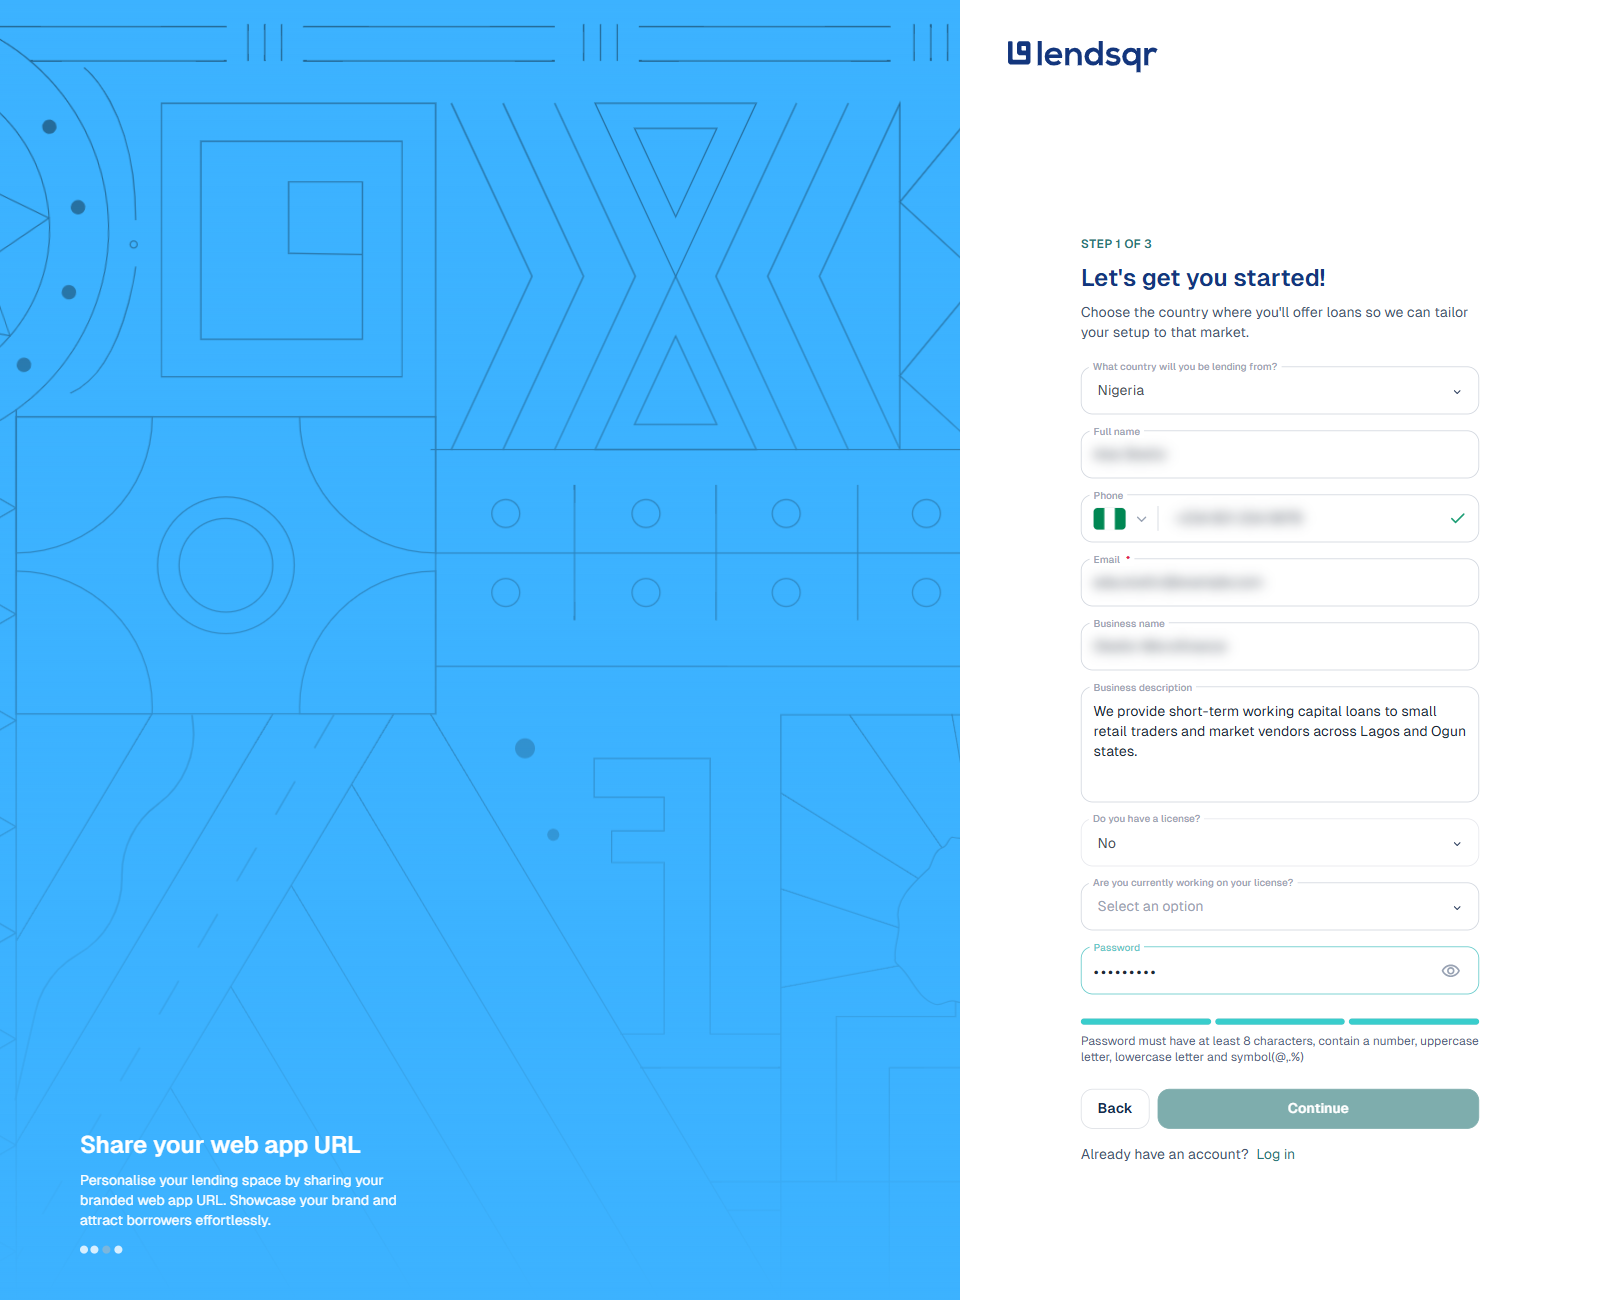
Step 4: Fill in the sign-up form
With a country selected, the rest of the form appears below it: your name, phone number, email, business name, a short description of the lending business, whether you have a license (and, if not, whether you’re working on one), and a password. Double-check that your name and business name match your official documents exactly, since mismatches can delay verification later. Click “Continue” once every field is filled in.
Step 5: Fill in your basic information
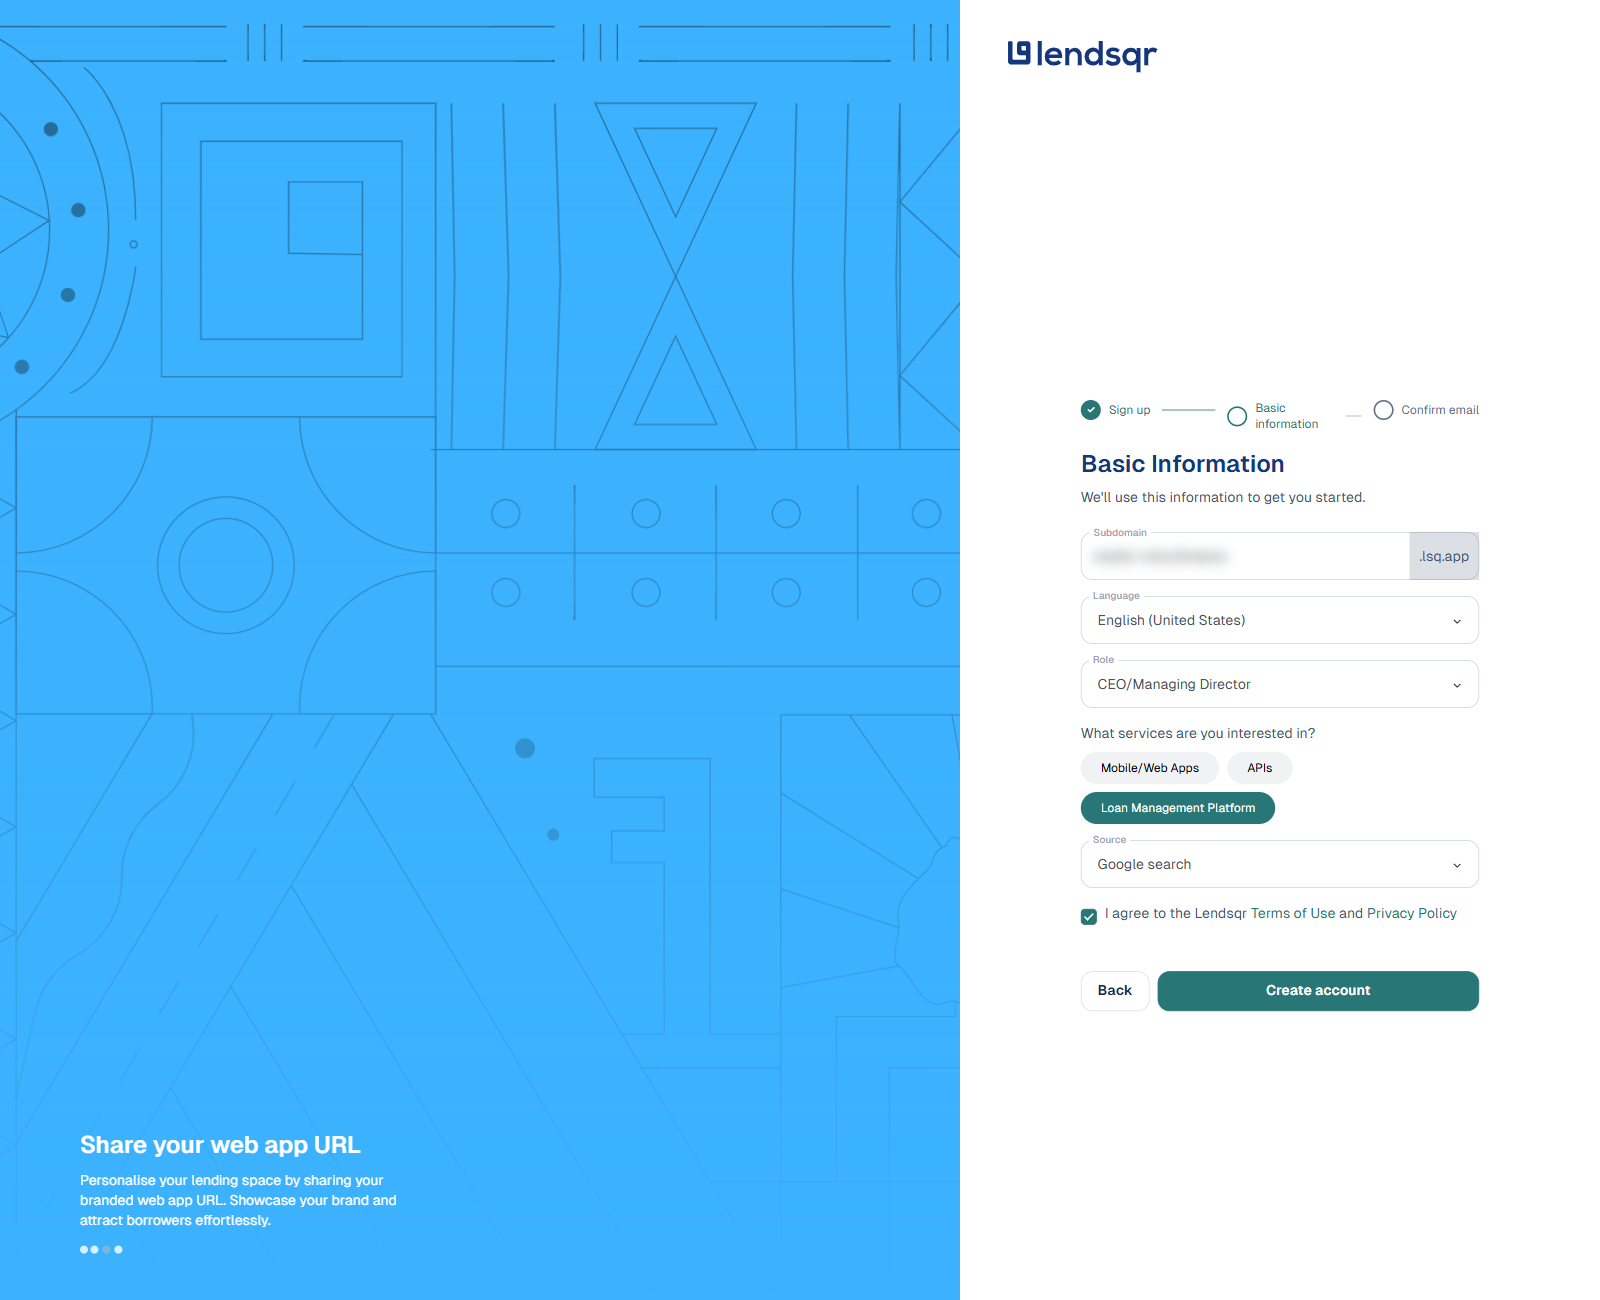
The progress indicator at the top now shows “Sign up” complete and moves you to “Basic information.” Lendsqr auto-generates a Subdomain from your business name. This becomes your customer-facing web app URL (for example, yourbusiness.lsq.app), and you can edit it here before your account is created. Also select your Language, your Role at the business, which services you’re interested in (Mobile/Web Apps, APIs, Loan Management Platform), and how you heard about Lendsqr. Check the box to agree to the Terms of Use and Privacy Policy, then click “Create account” (this button stays disabled until the terms checkbox is ticked).
Step 6: Confirm your email address
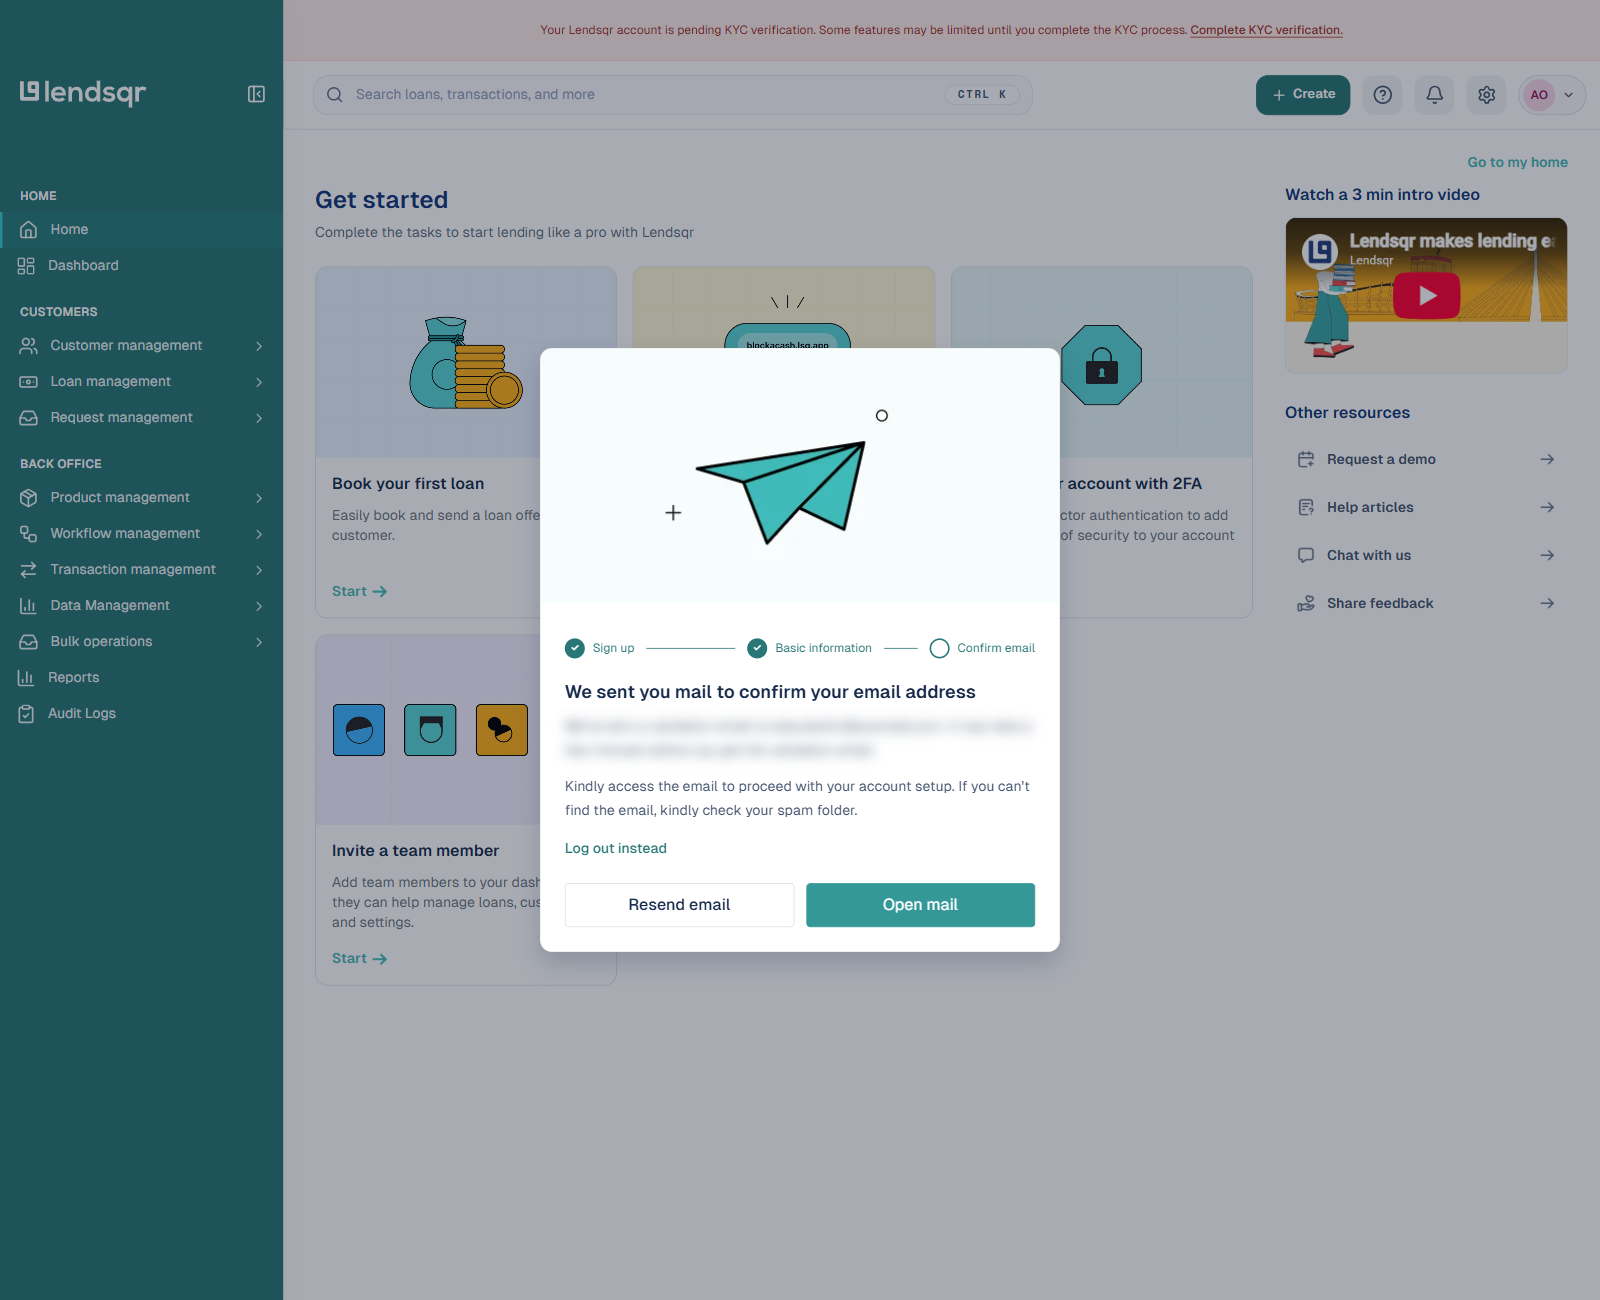
Your account is created at this point, dropping you straight into the admin console’s home screen with a “Confirm email” dialog on top of it, telling you a validation email has been sent to the address you provided. It may take a few minutes to arrive. Check your spam or junk folder if you don’t see it, or use the “Resend email” button.
Step 7: Click the link to activate your account
Open the email and click the validation link. This confirms your email address and takes you straight into your admin console’s “Get started” checklist, which walks you through booking your first loan, sharing your web app link, enabling two-factor authentication, and inviting a team member. You’ll also see a banner reminding you that your account is pending KYC verification, which you can pick up later once you’re ready to go live with real disbursements.
Step 8: Verify your phone number
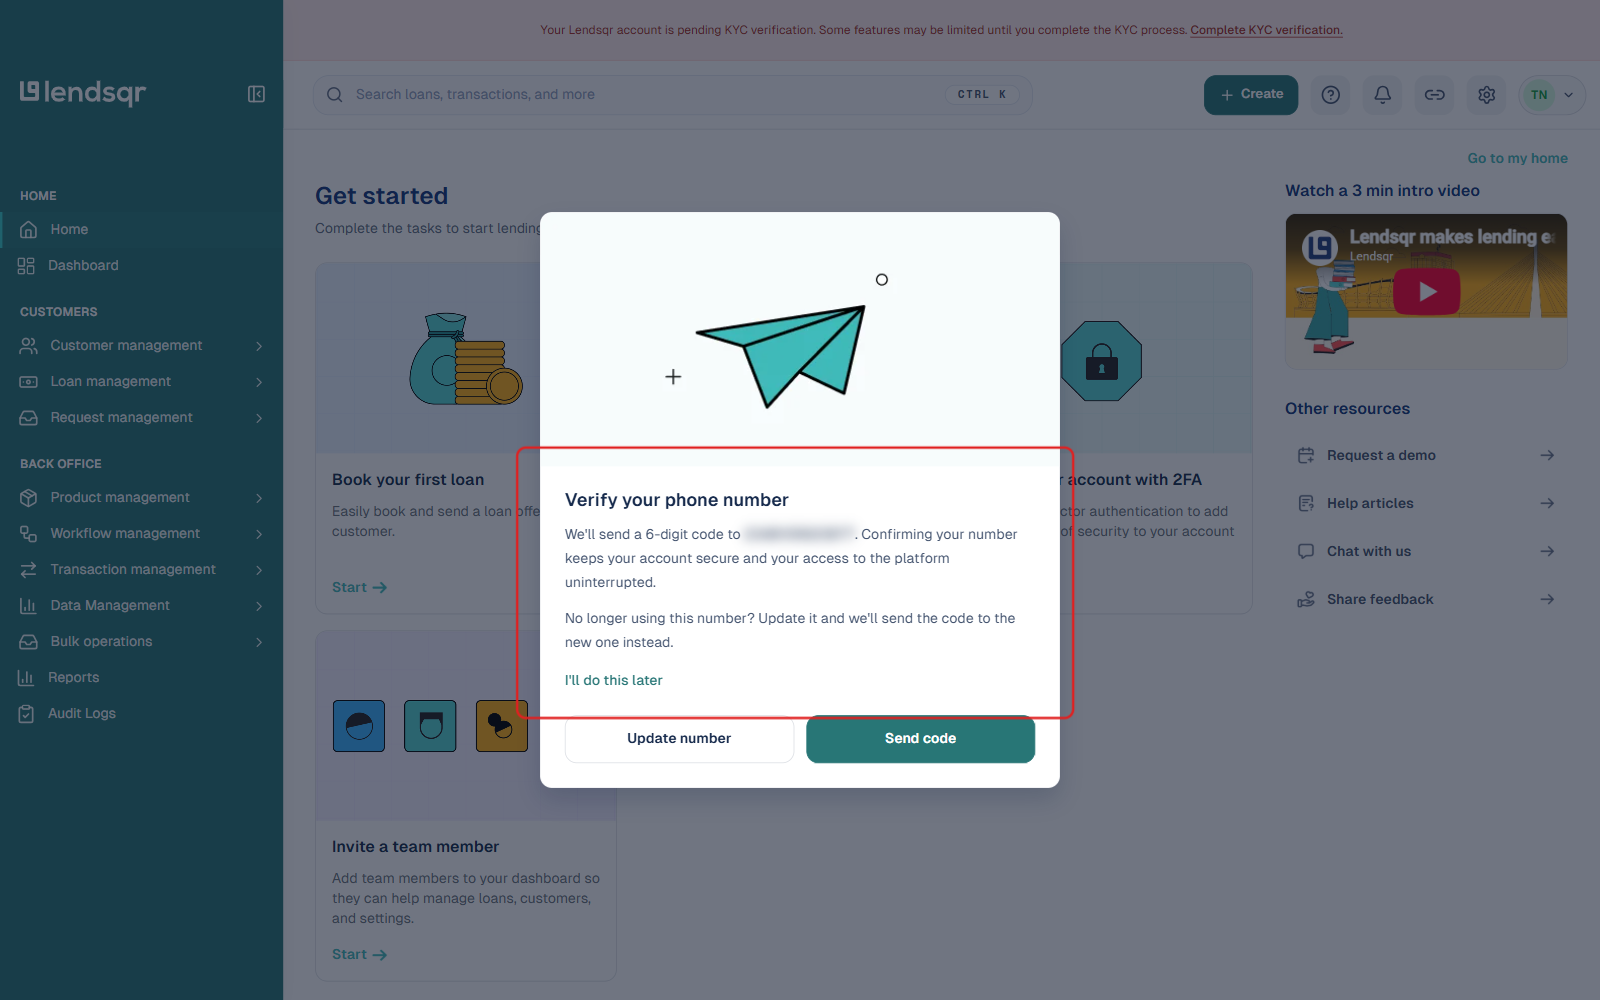
Confirming your email doesn’t automatically verify your phone number, since that’s a separate check. Until you complete it, logging in on a fresh session prompts you with a “Verify your phone number” dialog offering to send a 6-digit code to the number on file. If that number is no longer correct, use “Update number” to send the code elsewhere instead. You can dismiss the prompt with “I’ll do this later,” but it reappears on every fresh login until you complete it, so it’s worth doing this early rather than getting the prompt repeatedly. Complete it once and subsequent logins won’t ask again.
Common issues and what to do
If you run into any problems during sign-up, here are some quick fixes:
Issue
What to Do
Validation email not received
Check spam/junk; wait a few minutes, then use the “Resend email” button on the Confirm email screen.
Prompted to verify your phone on every login
This means phone verification is still outstanding. Complete it once from your account settings and the prompt stops appearing.
Password rejected
It must be at least 8 characters and include a number, an uppercase letter, a lowercase letter, and a symbol (e.g. @, ., %).
Business description rejected
It needs to be at least 15 words long.
Email already in use
Try logging in or use password reset; you may have an existing account.
Name mismatch with documents
Use your exact legal name. Contact support if needed once you’re in the console uploading KYC documents.
Wrong role selected
Reach out to Lendsqr support after sign-up to adjust.
What you can do after signing up: Discover Lendsqr’s capabilities
Sign-up is just the beginning. Once your account is active and verified, the admin console (Back Office) opens a full suite of tools for end-to-end lending:
Loan origination and product setup: Create and customize loan products with interest rates, repayment schedules, limits, and eligibility rules. Use the Oraculi decision engine for automated credit scoring based on your risk criteria.
Borrower onboarding: Share your branded web app or use channels like USSD. Onboard customers individually or in bulk, collect KYC, and manage documents.
Credit decisioning and approvals: Set up workflows, approval chains, and checks. Automate decisions while keeping manual overrides for complex cases.
Disbursement and repayments: Connect your bank accounts to disburse funds quickly and receive repayments through multiple digital channels (cards, mandates, etc.). Track everything in real time.
Portfolio management and reporting: Monitor active loans, savings (if offered), delinquencies, and performance metrics. Add team members with role-based permissions.
Customization and scaling: Customize offer letters, borrower portals, and configurable services. Integrate with payments and data providers for smoother operations.
Simple lending workflow enabled by Lendsqr
Sign up and verify your email and phone → Upload business/KYC documents → Set up loan products → Customize your borrower app → Onboard borrowers → Automate decisions and approvals → Disburse funds → Track and collect repayments → Analyze performance and grow.
Many lenders start with the free plan and scale as their portfolio grows. Features like bulk disbursement, audit logs, and compliance tools help reduce manual work, lower risk, and improve efficiency.
Next steps after activation
Verify your phone number so you’re not prompted for it on every login.
Upload your business and compliance documents from Settings > Organization.
Create your first loan product in the Back Office.