Access your Back Office at your fingertips.
Download the app now on Google Play Store.
Scan the QR code
You can also scan QR code with your phone to download the app.
Getting started with Lendsqr’s Buy Now, Pay Later (BNPL) feature
Updated
On this page
Introduction: What is BNPL and Why It Matters
Buy now, pay later on Lendsqr is not a separate product. It is the standard loan application flow, reconfigured through a settings sheet to look and feel like a checkout experience. A lender fills in that settings sheet on their loan product, which controls what each screen is called, which screens appear at all, and whether borrowers can pay immediately or borrow and repay over time. Turn the settings on and the standard loan machinery presents itself as a purchase flow. Turn them off and it is an ordinary loan application again. Nothing behind the scenes is duplicated or rebuilt.
This makes it practical for merchant partnerships: a partner can drop an invitation link into their own checkout, and the borrower experiences something that feels like paying for a purchase, while Lendsqr’s normal credit checks, offer letter, and repayment setup run underneath.
Introduction
Use case: A Nigerian fintech lender partners with an electronics retailer. When a customer picks an item at checkout, the retailer sends them a buy now, pay later link by SMS. The customer opens the link, completes identity verification, and submits a loan application, all without leaving what feels like a shopping experience. The lender sees the loan request arrive in their admin console for approval, just like any other request. The branding says “checkout”; the underlying machinery is unchanged.
This is what buy now, pay later on Lendsqr makes possible: a fully branded checkout experience built on the same loan infrastructure lenders already use.
Read more: How Lendsqr’s buy now, pay later works for merchants and lenders
How the borrower moves through the flow
The buy now, pay later flow is split into two parts: sign-up and the loan application. Understanding this sequence helps you know what to configure and what your borrowers will experience.
Part 1: Sign-up
The sign-up sequence depends on who the borrower is and what the lender has configured:
Choose a product or amount: shown only if the lender has configured loan offerings
Enter phone number: always shown
Then one of: log in as a returning borrower, complete a short identity form if passwordless sign-up is enabled, or create a full account as a new borrower
Selfie or liveness check: only if switched on in the settings
Add a bank account: only if switched on in the settings
Part 2: The application
Loan details → complete profile → next of kin → national identity number check → checklist → personal information → employment information → extra questions → confirm details → processing fee → equity contribution → loan offer → offer breakdown → view and sign offer letter → choose repayment method → submit → success
Steps appear only when the lender has configured them. Two things apply regardless of configuration: next of kin and guarantor steps are always skipped in buy now, pay later because they do not fit a checkout experience, and the progress sidebar in the borrower app always reflects the real configuration. Checking the sidebar before walking the full flow is the fastest way to verify whether a setting took effect.
Pay later versus pay now
If the lender enables both options, the borrower sees a choice on the loan details screen. If only one is enabled, there is no choice and it is applied automatically.
With pay later, the borrower completes the normal loan application, an offer is generated, and the loan request goes to the lender for approval. With pay now, the flow skips ahead to card selection, asks for a transaction pin and a one-time password, and takes a card payment directly. No loan is created.
This is the most important thing to understand about the pay now option: it is a purchase, not a loan. Nothing appears in the lender’s loan queue afterwards. If you are testing and wondering why no loan request showed up, check which option the borrower selected.
When to use buy now, pay later
Buy now, pay later is most useful when you want to extend credit directly at the point of sale. Common scenarios include:
Embedding financing into a merchant partner’s checkout so borrowers never feel like they are applying for a loan
Offering borrowers a choice between paying in full immediately or spreading payments over time
Serving specific purchase categories such as electronics, insurance renewals, school fees, or subscriptions
Reaching borrowers through a channel that feels like commerce rather than a traditional credit application
Understanding the configuration settings
All buy now, pay later behaviour is controlled from a single setting on the loan product’s Product settings tab, called BNPL Configurations. Opening it launches a builder called “Loan application experience” rather than a raw JSON editor, so every field below is a labelled toggle, text box, or dropdown, with a live preview of what the borrower sees next to it.
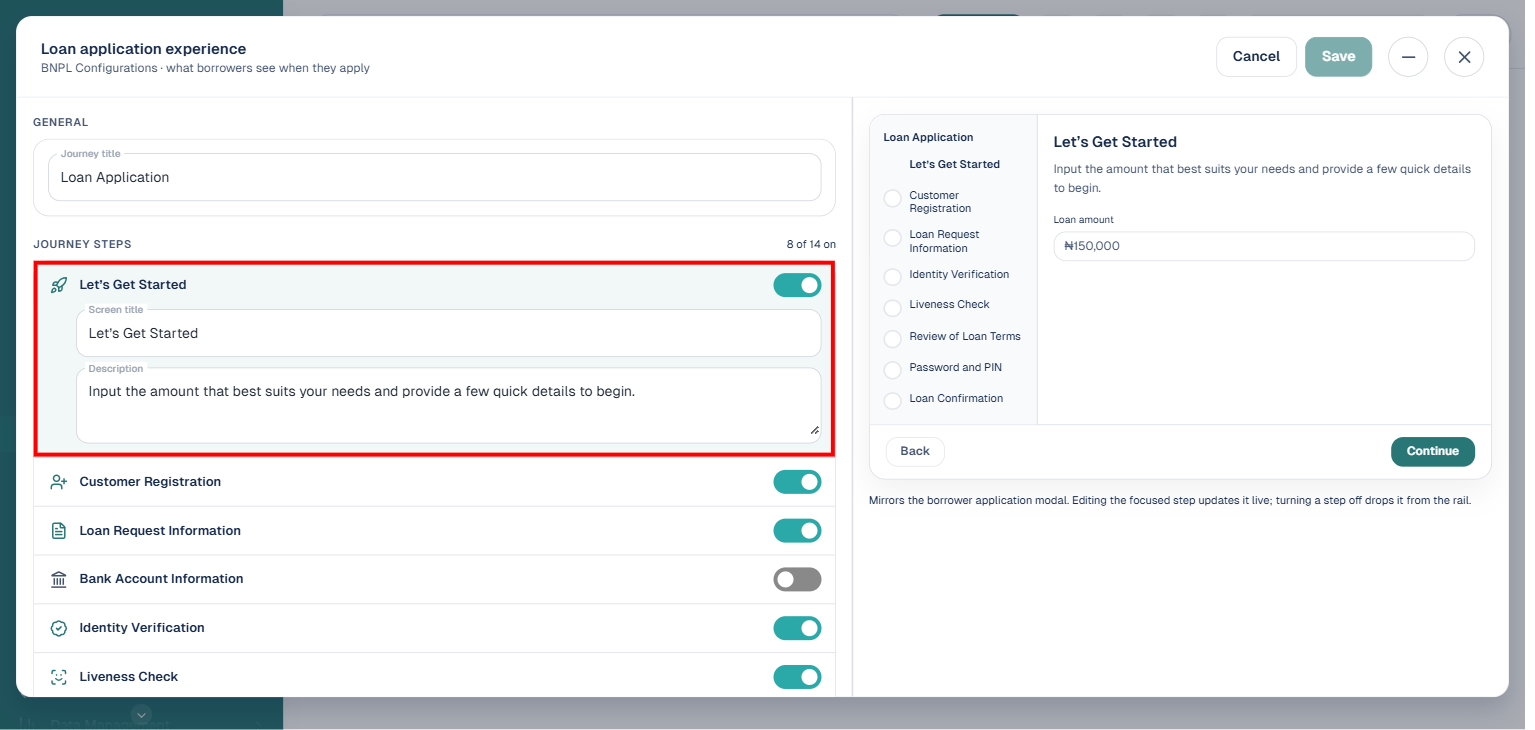
The builder has three parts:
General: a single “Journey title” text box, shown at the top of the borrower’s application.
Journey steps: a checklist of every screen that can appear in the flow. Each step has its own on/off toggle; clicking a step (rather than its toggle) opens it and reveals a Screen title and Description text box, both editable and both reflected instantly in the live preview on the right. There are 14 steps in total: Let’s Get Started, Customer Registration, Loan Request Information, Bank Account Information, Identity Verification, Liveness Check, Loan Summary, Review of Loan Terms, Offer letter, Payments, Payment Methods, Password and PIN, Loan Confirmation, and Initial Payment. Turning a step off drops it from the borrower’s journey rail entirely.
What borrowers see: two toggles, Interest Rate and Interest Amount, controlling whether either figure is shown to the borrower during the application.
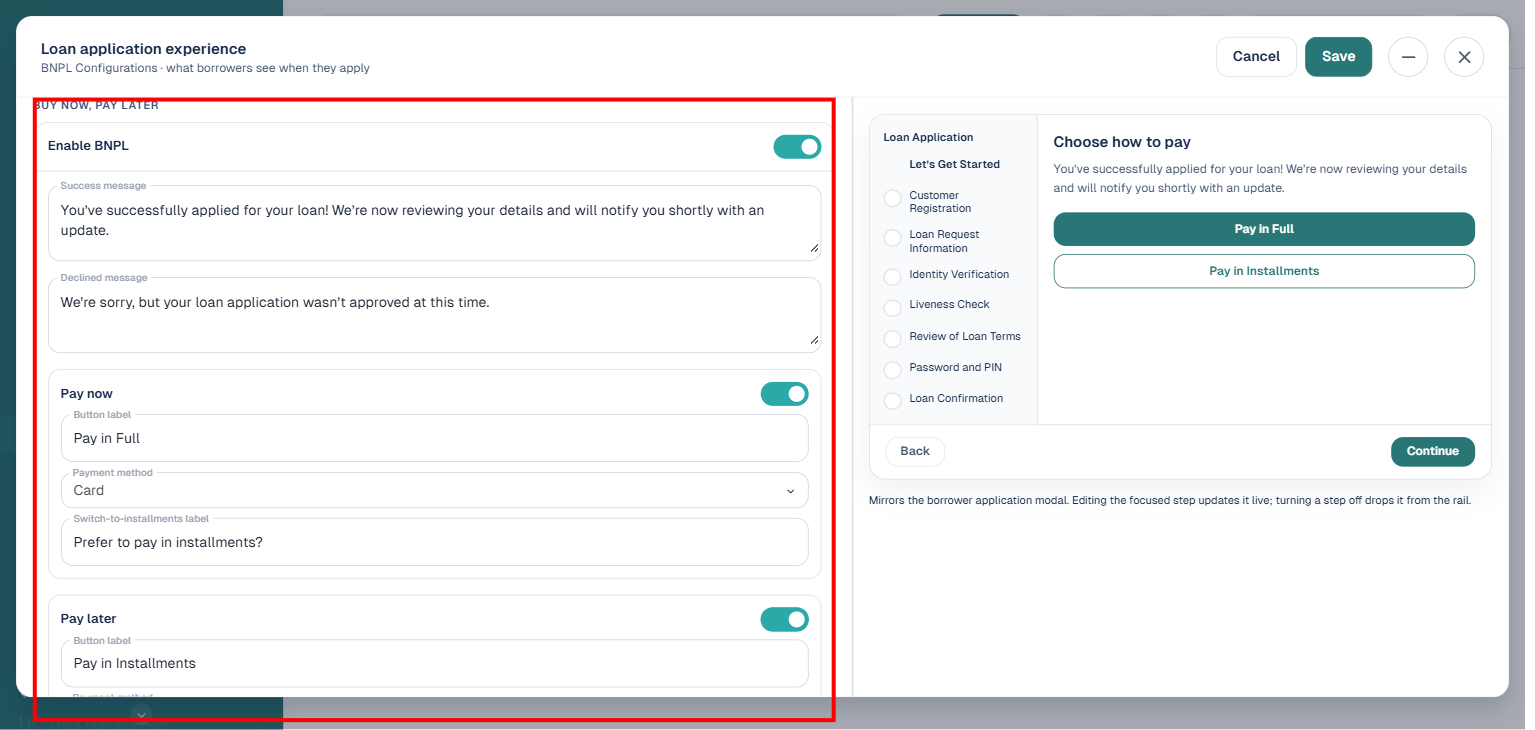
Below these, a dedicated Buy now, pay later section holds the settings specific to this feature:
Enable BNPL: the master switch. Turning it on reveals the rest of the fields below.
Success message and Declined message: the text shown to the borrower when their application is approved or declined.
Pay now: a toggle that, once on, reveals a Button label (what the pay-in-full button says), a Payment method dropdown, and a Switch-to-installments label (the text on the link that lets the borrower change their mind and pay later instead).
Pay later: the same shape as Pay now, mirrored: Button label, Payment method, and a Switch-to-pay-now label.
Turning Pay now and Pay later off is what puts the flow back into an ordinary loan application. Turning Enable BNPL off does the same, in one step.
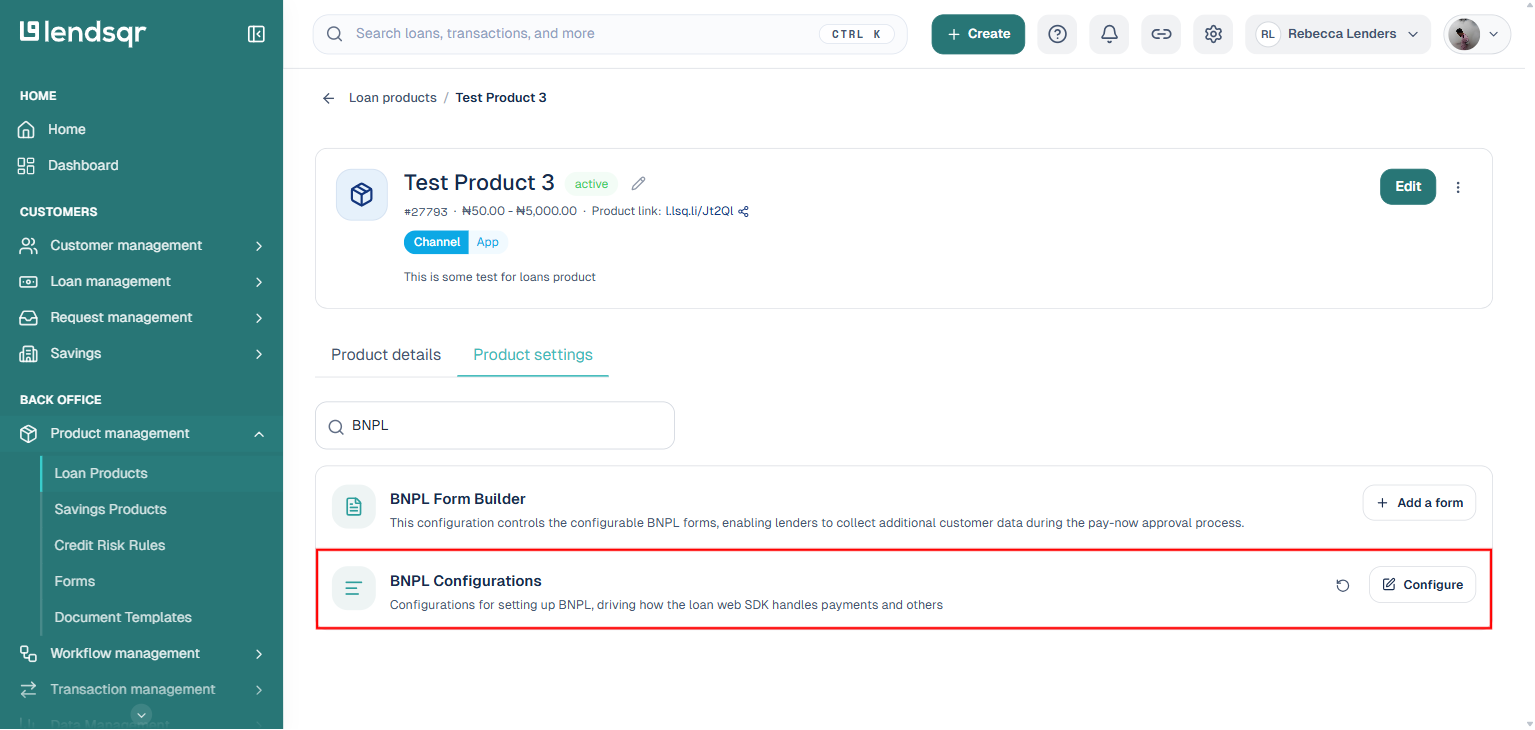
A separate setting, BNPL Form Builder, also appears when searching “BNPL” on the Product settings tab. It controls a configurable extra form used to collect additional customer data specifically during the pay-now approval process, and is edited independently of BNPL Configurations.
How to set up buy now, pay later on the admin console
1. Log in to the Admin Console
2. Navigate to Loan Products From the main menu go to Product Management → Loan Products.
3. Create a new loan product or open an existing one, then click on its Product settings tab.
4. Type “BNPL” into the “Search product settings” box to filter directly to the BNPL Configurations setting.
5. Click “Configure” on BNPL Configurations to open the Loan application experience builder.
6. Turn the journey steps you want on or off, and edit any step’s screen title or description by clicking it to expand it. The panel on the right always shows exactly what the borrower will see for the currently open step.
7. Scroll down to the Buy now, pay later section, switch on Enable BNPL, and fill in the Success and Declined messages. Then switch on Pay now, Pay later, or both, and set each one’s button label, payment method, and switch-to label. The preview panel updates live as you type, so you can check the button text and messaging before saving.
8. Click Save to apply the changes to the product.
On the Product details tab, if you want the offer letter step to appear in the borrower’s flow, you must also turn on “require loan offer” and attach an offer letter document. One without the other will not work. The app hides the offer letter step unless both conditions are met.
9. Send the invitation link
Navigate to Loans, then Loan invitations, and select Create. Choose an existing product, enter the recipient’s name and contact details, and choose how to send the link. The system generates a link and sends it. If a link has expired, a resend action is available.
After the borrower submits, go to the loan requests queue and approve or decline the request. This is also where you can see the success or decline messaging the borrower received, which is configurable in the settings above.
Enabling apply without onboarding
Also called passwordless sign-up, this option allows new borrowers to submit a loan application by filling in a short identity form instead of creating a password and transaction pin. All three of the following must be active. Any one missing and it will not work:
apply_without_onboarding set to enabled inside the bnpl-configurations product setting
The organisation-level setting apply-without-onboarding turned on separately. This is an organisation setting, not a product setting
An identity form configured for the organisation’s country
If the third condition is missing, a Nigerian lender’s borrowers will quietly fall back to the normal password and pin sign-up, which is easy to mistake for the feature not working at all. A non-Nigerian lender’s borrowers will see a “loan application unavailable” message instead. Both are correct behaviour; knowing which one you are seeing saves confusion during setup and testing.
Best Practices
Configure reasonable loan amounts and repayment tenors before going live to avoid mismatches in the borrower’s offer
Write labels and descriptions in plain, borrower-friendly language. Avoid lending jargon in fields the borrower will read directly
Test both pay now and pay later flows using a fresh browser profile before launching; the app saves draft applications, and a leftover draft from a previous test will drop you into the middle of a flow you did not start
If you close the tab mid-flow and reopen the invitation link, you should be offered your saved progress. Use this to verify that abandoned application resumption is working correctly
If a setting you changed does not appear to have taken effect, ask an engineer to check what the app is receiving for that invitation link; there is a single API call that shows exactly what the borrower’s app sees and resolves the question immediately