Access your Back Office at your fingertips.
Download the app now on Google Play Store.
Scan the QR code
You can also scan QR code with your phone to download the app.
How to edit a team member’s branch or office
Updated
On this page
Learn how to reassign team members to different branches or offices within the Lendsqr admin console. Ensure accurate reporting and access management in just a few clicks.
As your lending business scales, you may need to reassign staff to different locations to balance workloads or staff new branches. Lendsqr allows administrators to update a team member’s office assignment instantly, ensuring that their activities are tracked against the correct physical or logical location.
Understanding office and branch management in lending operations
As lending businesses grow, they often expand beyond a single location. This growth might involve opening new physical branches in different cities, creating regional offices that oversee multiple locations, establishing specialized service centers, or setting up virtual offices for remote teams.
Each expansion model creates operational complexity around team management. When staff members work across multiple locations, administrators need clear systems for tracking who works where, ensuring loan activities are attributed to the correct location for reporting purposes, managing access to location-specific resources, and maintaining accurate performance metrics by branch.
The ability to reassign team members between offices addresses several common business scenarios. Branch managers get promoted or transferred to new locations. Seasonal demand fluctuations might necessitate temporarily moving staff from slower branches to busier ones. New branch openings require experienced staff to transfer temporarily for training purposes. Remote workers might transition to physical office roles or vice versa as business needs evolve.
Without systematic reassignment management, lending operations face several problems. Reports showing loan origination by branch become inaccurate when staff locations are not updated. Team members might retain access to data tied to their old location even after moving. Performance tracking breaks down when activities are attributed to incorrect locations. Audit trails become unclear about which office was responsible for specific decisions.
How office assignments affect system behavior
Understanding what changes when you reassign a team member helps you plan reassignments carefully and avoid unintended consequences.
Office assignment primarily affects reporting and analytics. When you run reports showing loan origination by branch, disbursements by office, or collections performance by location, the system uses each team member’s current office assignment to categorize their activities.
Access permissions can also be tied to office assignments depending on how your organization has configured roles. Some lending operations grant team members access only to data and customers associated with their assigned office. Others allow broader access across all offices. The specific behavior depends on your permission structure, but reassigning someone to a new office might expand or restrict their data access.
Workflow routing sometimes considers office assignments. If your lending operation routes loan applications to specific approval queues based on the originating branch, a team member’s office assignment determines which queue their applications enter.
Audit logs and activity tracking record the office assignment active at the time each action occurred. This creates a historical record showing exactly where each team member was assigned when they performed specific actions.
Prerequisites and permissions
Before making changes, ensure the following conditions are met.
Permissions: You must have Super Admin or Admin privileges within the Pecunia Admin Console
Not all users of the Lendsqr admin console can reassign team members to different offices. This capability is restricted to users with Super Admin or Admin level permissions because it affects system configuration, data access, and reporting accuracy.
Super Admin is typically the highest permission level, granting unrestricted access to all configuration and management functions. Organizations usually assign Super Admin privileges to a small number of trusted individuals such as the CEO, CFO, Head of Operations, or IT leadership.
Admin privileges represent a slightly more restricted permission tier that still includes office reassignment capabilities. Organizations often grant Admin access to regional managers, branch network coordinators, or HR leadership who need to manage team assignments but do not require full system access.
If you attempt to reassign a team member without appropriate permissions, the system will either not display the update option or will show an error message when you attempt to save changes. To verify your current permission level, navigate to your user profile in the admin console settings.
Office creation: You must have created more than one office in your system settings
The office reassignment feature only functions when your Lendsqr instance has multiple offices configured. If only one office exists in the system, there is nowhere to reassign team members to, so the office dropdown either does not appear or shows only the single existing office.
Office creation typically occurs during initial system setup when you first configure Lendsqr. However, as your business grows and you open new branches, you will need to create additional offices over time. This office creation must happen before reassignments to those new offices become possible.
To verify that multiple offices exist in your system, navigate to the Settings section and look for Office Management or Branch Management. This section should display a list of all configured offices.
Follow these steps to update a team member’s office or branch assignment in the Lendsqr admin console.
Step 1: Navigate to Settings via the gear icon
Locate the gear icon at the top right of your dashboard. This icon represents system settings and configuration options. Click on the gear icon to open the settings menu. This action will either display a dropdown menu of settings categories or navigate you directly to a settings page depending on your interface configuration.
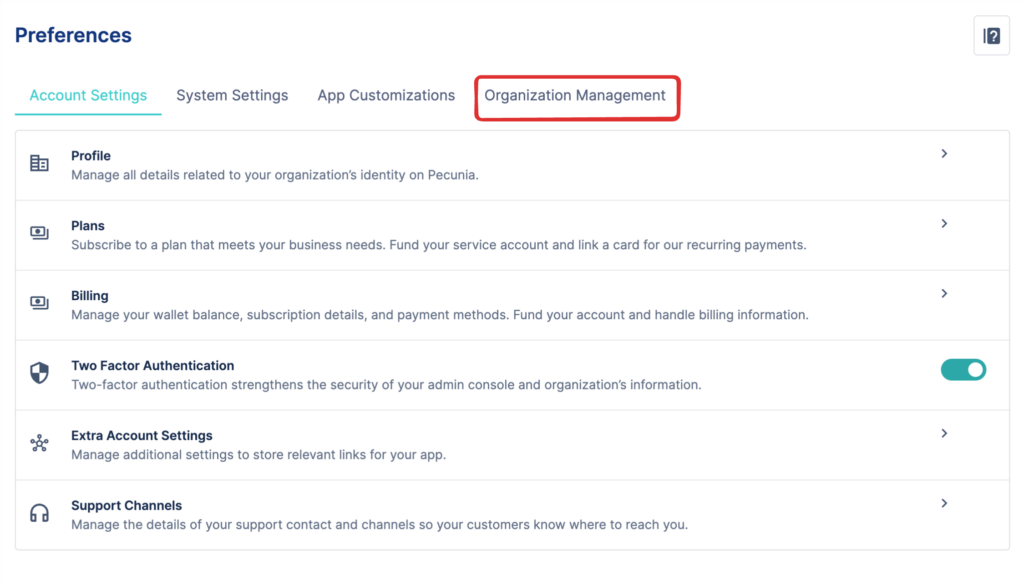
Step 2: Select the Organization Management tab
Within the settings interface, look for a tab or section labeled Organization Management. This section contains all configurations related to your organizational structure including offices, teams, departments, and user assignments. Click on Organization Management to access your company’s structural configurations.
The interface will display various organizational management functions. Locate the section specifically dealing with team members or admin users. This might be labeled Team Management, User Management, Admin Users, or a similar term.
Step 3: Search for and select the team member to reassign
The team management interface typically displays a list or table of all team members with admin console access. Use the search or filter functions to quickly locate the specific person you need to reassign. Search for the team member whose branch or office you wish to edit using their name, email address, employee ID, or other identifying information.
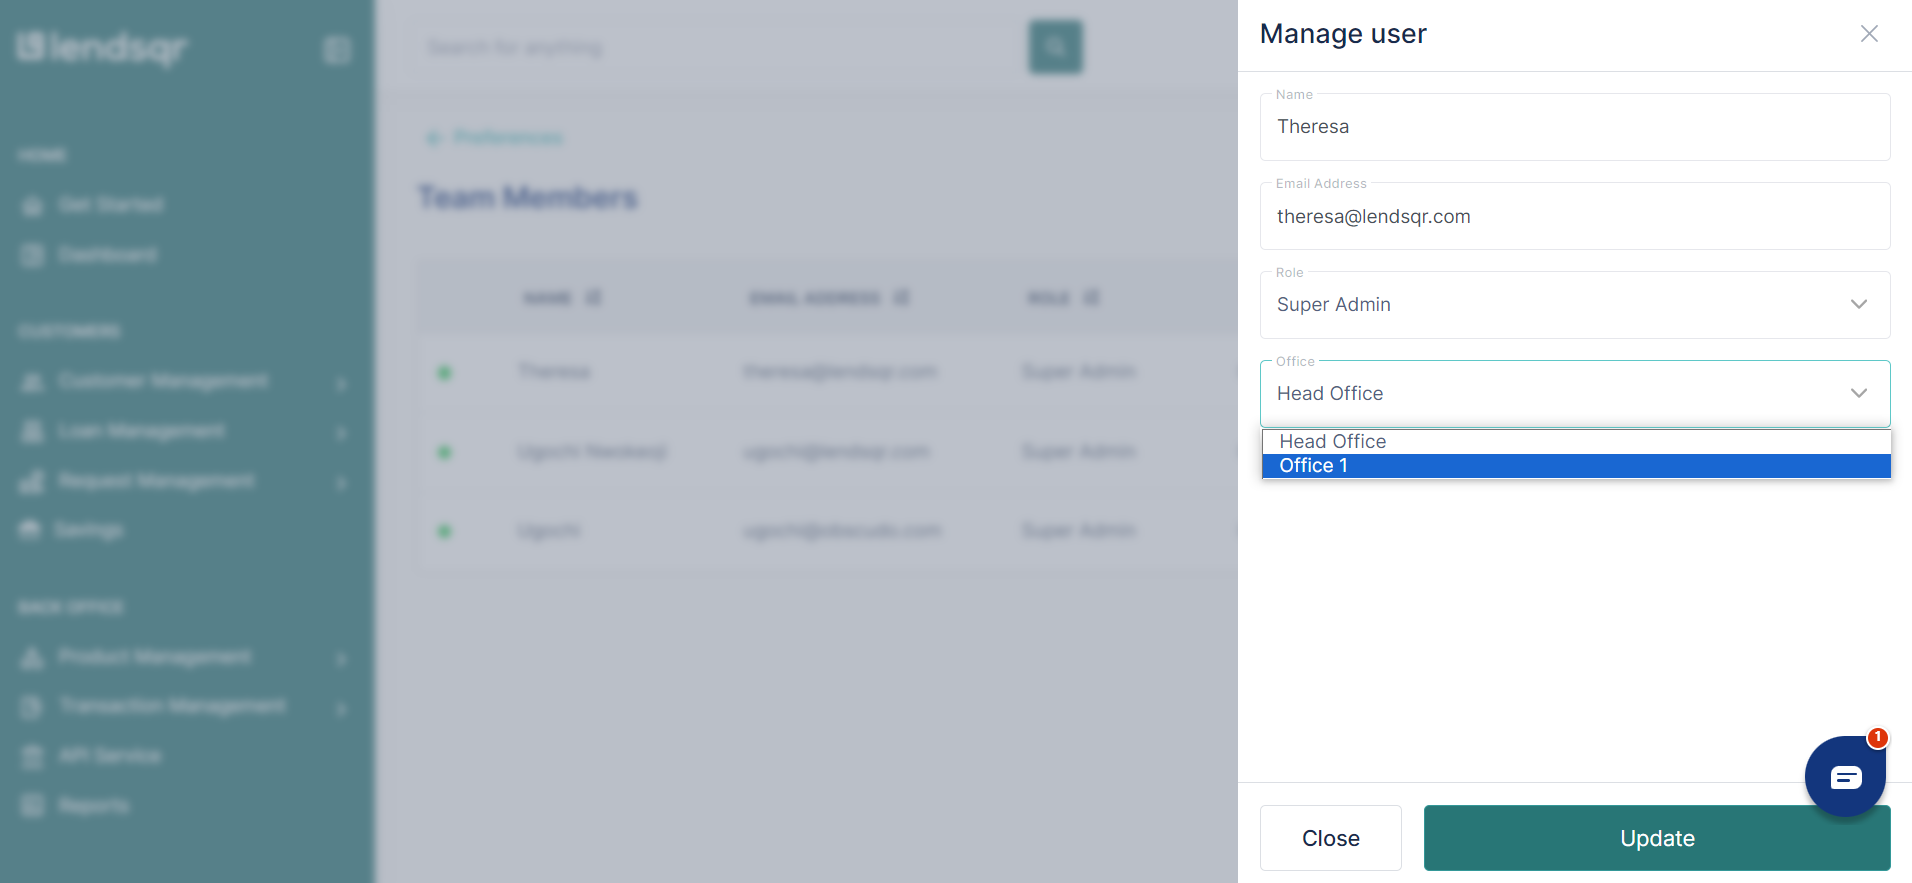
Once you have located the correct team member, look for action options associated with their entry. These typically appear as a three-dot menu icon positioned next to each team member’s row. Click the three dots beside the admin user’s name to open a dropdown menu. Select “Manage User” from the dropdown menu. This action opens the user management interface where you can modify the team member’s profile and settings.
Step 4: Update the office assignment and save changes
The Manage User modal or page will open, displaying the team member’s current information and editable fields. Look for a field or dropdown menu labeled Office, Branch, or Location. This field shows the team member’s current office assignment.
Use the office dropdown to change the office of the selected team member. The dropdown displays all active offices that have been created in your system. Select the new office you want to assign this team member to from the list.
Keep in mind that the dropdown only works when you have already created more than one office. If only one office appears or the dropdown is not interactive, you will need to create additional offices before proceeding.
After selecting the new office assignment, review the change to ensure you selected the correct destination office. Once confirmed, click the Save, Update, or Confirm button typically located at the bottom of the modal. The system will process the update and display a confirmation message.
After following the steps above, you can successfully edit a team member’s branch or office in the admin console. The update takes effect immediately, meaning the team member’s future activities will be tracked against the new office.
Best practices for managing office reassignments
To maintain data integrity and operational continuity when reassigning team members, follow these recommended practices.
Communicate reassignments to affected parties before making the system change. Inform the team member being reassigned, their current manager, their new manager, and other stakeholders. This ensures everyone understands the change and can prepare accordingly.
Coordinate timing with other organizational changes. If the office reassignment corresponds to a physical relocation or promotion, coordinate the timing of the system update with these events. Making the system change too early might create confusion if the team member has not actually moved yet.
Document the reason for reassignment. While the system tracks when reassignments occur and who made them, it does not automatically capture why they happened. Maintain separate documentation recording the business reason for each reassignment.
Review access permissions after reassignment. If your permission structure ties access rights to office assignments, verify that the reassigned team member has appropriate access after the change.
Update related systems and records. The Lendsqr admin console is likely not the only system that tracks team member locations. Update corresponding records in your HR system, payroll system, and any other platforms that reference office assignments.
If you encounter problems while attempting to reassign team members, these common issues and solutions may help.
Office not appearing in dropdown
Ensure the office has been created in your system. Navigate to the Office Management section in settings and verify the office exists in the list. Check whether the office is marked as inactive. Inactive offices do not appear in assignment dropdowns even though they exist in the system. If the office exists but is marked inactive, change its status to active if appropriate.
Verify your permission level allows you to see all offices. Some permission configurations restrict which offices different administrators can view. If you suspect permission restrictions are hiding offices, consult with your Head of Enterprise or IT administrator.
Access denied when attempting to update
If you cannot see the Update or Save button, or if clicking it produces an access denied error, verify with your Head of Enterprise that your admin role has the required Update Admin User permissions. Not all admin roles include the ability to modify team member assignments.
Request permission elevation if your role legitimately requires the ability to reassign team members. If this is a one-time need, ask someone with appropriate permissions to make the change on your behalf.
Changes not taking effect
Ensure you clicked the Save or Update button after selecting the new office. The change does not take effect until explicitly saved. Check for error messages that might have appeared briefly. Refresh your browser and check again, as sometimes interface caching makes it appear changes did not save when they actually did.
Office reassignment is a straightforward but important administrative function that keeps your team structure aligned with your operational reality. By understanding the prerequisites, following the proper steps, and adhering to best practices, you can manage team locations effectively while maintaining accurate reporting and appropriate access controls.