Access your Back Office at your fingertips.
Download the app now on Google Play Store.
Scan the QR code
You can also scan QR code with your phone to download the app.
How to upload transactions and manually fund your users’ wallets
Updated
On this page
Introduction
The transaction upload feature allows you to process multiple financial entries at once by uploading a structured Excel file. Instead of manually crediting each customer’s wallet or recording repayments one at a time, this feature enables you to handle bulk transactions efficiently and accurately.
This is particularly useful in scenarios where payments are made outside the system, such as direct bank transfers, agent collections, or offline repayment channels. Rather than manually reconciling each payment, you can upload all transactions in one batch, and the system will automatically credit user wallets and apply repayments where applicable.
The feature also supports operational use cases such as customer top-ups. In situations where a customer requests additional funds without initiating a new loan, you can upload a wallet funding entry and then adjust their loan schedule accordingly.
By using transaction uploads, lenders can reduce manual workload, minimise errors, and maintain consistent financial records across large volumes of transactions.
When to use transaction uploads
Transaction uploads are best used in scenarios where multiple transactions need to be recorded simultaneously.
This includes cases where customers repay loans via external bank transfers, when field agents collect payments offline, or when bulk wallet funding is required for operational reasons.
It is also useful when reconciling payments received outside the platform, ensuring that all customer balances are updated accurately and promptly.
When a transaction upload is completed, the system processes each row in the file as an individual transaction.
For wallet funding entries, the specified amount is credited to the user’s wallet balance. If the user has an active loan, the system automatically applies available wallet funds toward repayment based on the loan schedule.
This ensures that repayments are handled consistently without requiring manual intervention after the upload.
Required file structure
To successfully upload transactions, your Excel file must include specific fields. Each row represents a single transaction tied to a specific user.
The required fields are:
user_id, which is the unique identifier of the customer to be credited
amount, which is the value to be credited to the user’s wallet
narration, which is a description of the transaction used for internal reference, reporting, or audit purposes
Each field must be completed accurately to ensure successful processing.
Field
Description
user_id
The unique ID of the user to be credited
amount
The amount to be credited to the user’s wallet
narration
A description of the transaction, for reference or reporting purposes
Step-by-step guide to uploading transactions
Follow the steps below to upload transactions in bulk.
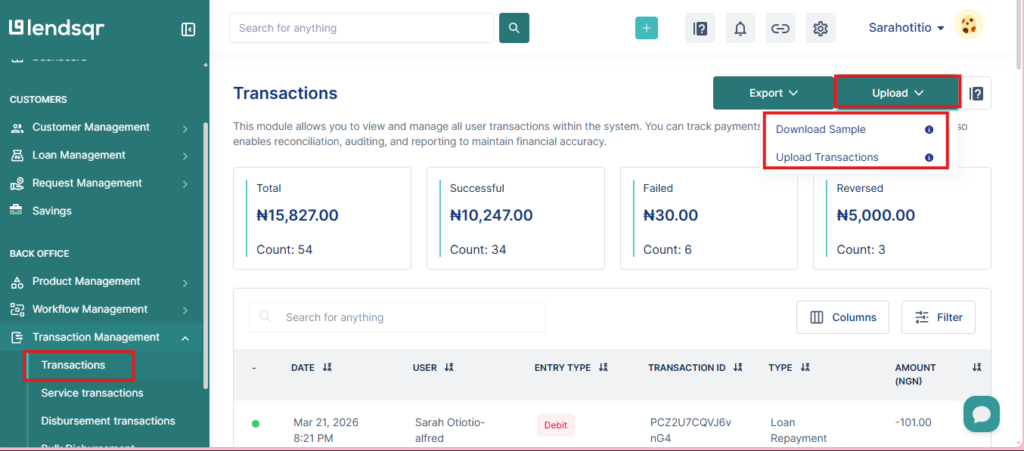
Step 1: Navigate to the transactions section
Log in to your Lendsqr Admin Console and go to the Transactions page under the Transaction Management tab.
This section contains all transaction-related activities, including uploads and transaction history.
Step 2: Open the upload option
Click on the Upload button to begin the process.
This action opens the upload interface, where you can download the template and submit your file.
Step 3: Download the sample template
Download the sample Excel template provided by the system.
This template contains the required structure and ensures that your file is formatted correctly for processing.
Always use this template as your starting point to avoid formatting issues.
Step 4: Populate the template
Fill in the required fields for each transaction.
Ensure that:
Each user_id corresponds to a valid user in the system
The amount is entered correctly and matches the intended transaction value
The narration clearly describes the purpose of the transaction
Carefully review all entries to avoid errors during upload.
Step 5: Upload the completed file
Return to the upload interface and select your completed Excel file.
Upload the file and proceed to the preview stage.
Step 6: Review the uploaded data
Before final submission, the system displays a preview of all uploaded transactions.
At this stage, you should:
Verify that all entries are correct
Check for formatting errors or missing data
Confirm that each transaction is assigned to the correct user
If any issues are identified, correct them before proceeding.
Step 7: Submit the upload
Once all entries have been reviewed and confirmed, submit the upload.
The system will process the transactions and apply them accordingly.
What happens after submission
After submission, the system automatically credits the specified amounts to each user’s wallet.
If a user has an active loan, the system uses the available wallet balance to repay it according to the repayment schedule.
This automated process eliminates the need to manually allocate repayments after funding.
All transactions are recorded and can be tracked within the transaction history for audit and reporting purposes.
The transaction upload feature supports only Excel files in .xlsx format.
Files in other formats such as .csv, .xls, or .pdf are not supported and will not be processed by the system. Always ensure that your file is saved in the correct .xlsx format before attempting an upload.
In addition to file type, the structure of the file must strictly follow the provided template. The required fields include:
user_id, which must match an existing user in the system
amount, which must be a valid numeric value representing the transaction amount
narration, which provides context for the transaction and supports reporting and audits
Do not rename, delete, or rearrange these columns, as doing so may cause validation errors during upload.
Common error messages and how to resolve them
During the upload process, the system may return errors if the file or its contents do not meet the required standards. Below are common errors and how to fix them.
Invalid file format This occurs when the uploaded file is not in .xlsx format. To fix this, open your file in Excel and save it as .xlsx before uploading again.
Missing required fields This error appears when one or more required columns such as user_id, amount, or narration are missing or empty. Ensure that all required fields are present and properly filled for every row.
Invalid user_id This happens when the user_id does not match any existing user in the system. Verify the user IDs against your customer records and correct any mismatches before re-uploading.
Invalid amount format This error occurs when the amount field contains non-numeric values, symbols, or incorrect formatting. Ensure that all amounts are entered as valid numbers without text or special characters.
Duplicate entries If the same transaction is uploaded multiple times, the system may flag duplicates. Review your dataset and remove repeated rows before submitting.
Upload exceeds system limits If the file is too large or contains too many records, the upload may fail. Split the file into smaller batches and upload them separately.
Access control and permissions
Transaction uploads are sensitive financial operations and are restricted to authorized users.
To perform a transaction upload, you must have the appropriate permissions assigned to your role within the system. These permissions typically cover the ability to upload, review, and submit transaction batches.
Before attempting an upload, confirm with your super admin or system administrator that you have the required access rights. If you do not have permission, the upload option may be unavailable or restricted.
This access control ensures that only authorized personnel can perform bulk financial actions, helping to maintain system integrity and prevent errors or misuse.
Common errors and how to fix them
One common issue is using an incorrect or invalid user_id. This will prevent the transaction from being applied. Always verify user IDs before uploading.
Another issue is incorrect file formatting. Ensure the file follows the exact structure of the sample template and is saved in the correct format.
Missing required fields, such as amount or narration, can also cause upload failures. Ensure all fields are completed.
Incorrect amounts may lead to reconciliation issues. Always cross-check transaction values before submission.
Best practices for transaction uploads
Always reconcile external payment records before uploading transactions.
Use clear and consistent narration to make reporting and audits easier.
Validate all user IDs and transaction amounts before submission to reduce errors.
Limit upload permissions to authorized personnel to maintain financial control.
Regularly review transaction logs to ensure all uploads are accurate and properly recorded.
Conclusion
The transaction upload feature is a powerful tool for managing bulk financial operations within Lendsqr.
By enabling lenders to process multiple repayments and wallet funding entries at once, it improves efficiency, reduces manual effort, and ensures accurate financial tracking.
When used correctly, it becomes an essential part of your operational workflow, especially when handling payments outside the platform or managing large transaction volumes.
Video walkthrough
For a visual demonstration of how to use the transaction upload feature, watch the video below: