
As a lender, you have the ability to choose which documents your borrowers must upload before they can take a loan. Controlling this at the organisation level means your entire team applies the same document standard consistently, without needing to configure it for each loan product or each borrower manually.
This matters for two reasons. First, it protects your lending operation: a borrower applying for a business loan may be required to upload bank statements, tax returns, or proof of business registration, documents that help you assess their financial health and legitimacy before committing any funds. Second, it speeds up your process: when a borrower uploads a valid government-issued ID and a recent utility bill in advance, your team can verify their identity and address without back-and-forth communication, keeping your approval timeline lean. On the Lendsqr admin console, document configuration gives you three capabilities: activating which documents appear on the borrower’s app, marking specific documents as required rather than optional, and creating entirely new document types to match your organisation’s needs. This article walks through each one.
Understanding the “activate” and “required” toggles
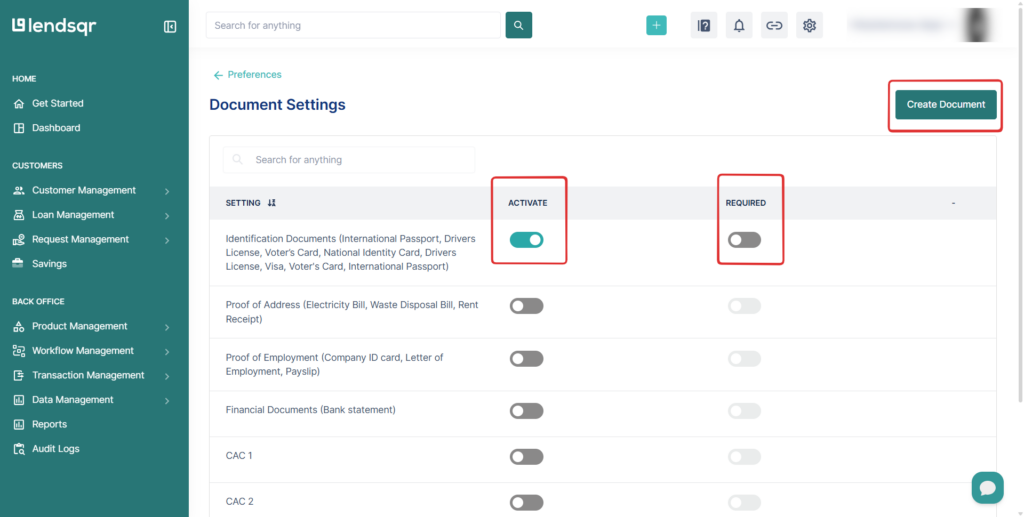
Every document on the Documents settings page has two toggle switches: Activate and Required. They control different things, and understanding the difference is important before you start configuring.
The “activate” toggle
When a document is activated, it appears in the Documents section of your borrower’s web/mobile app as an option they can submit. Deactivating a document removes it from view; borrowers will not see it and cannot submit it.
Think of the “activate” toggle as controlling visibility. If a document type is not relevant to your lending operation, you can deactivate it so it does not clutter your borrowers’ experience.
The “required” toggle
When a document is set to “required”, it is shown in the borrower’s Documents section with a “required” tag. The borrower must submit this document before they can complete a loan application.
When the required toggle is off but the document is still active, the document appears without any tag, borrowers can choose to submit it, but it is not a prerequisite for the loan.
Note: a document must be activated before it can be set as required. If you turn off the activate toggle, the required setting has no effect since the document is hidden from the borrower entirely.
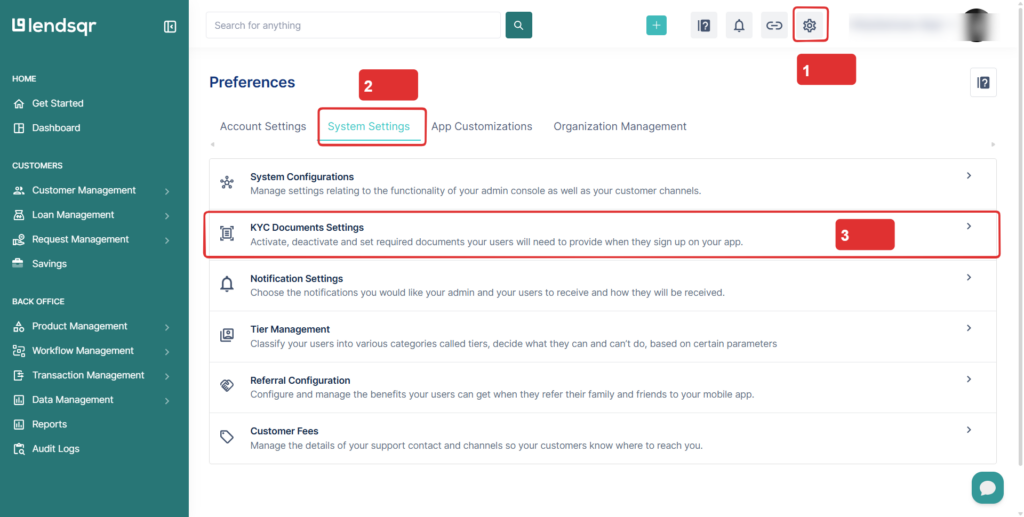
How to get to the Documents settings page
- Log in to the Lendsqr admin console
- Click the “Settings” icon in the top navigation area.
- Click on the “System Settings” tab
- From the options under this tab, select “KYC Documents Settings”
- Here you will see a list of default documents that can be activated and set to required.
How to activate or deactivate a document
- Navigate to the Documents settings page using the steps above.
- Locate the document type you want to configure in the list.
- Toggle the “Activate” switch on to make the document visible to borrowers, or off to hide it.
- The change takes effect immediately; no additional save action is required.
How to set a document as required
- On the Documents settings page, locate the document type you want to make mandatory.
- Ensure the “Activate” toggle is already turned on for that document.
- Toggle the “Required” switch on. The document will now appear with a “required” tag in the borrower’s app.
- To make it optional again, toggle Required off. The document remains visible but loses its required status.
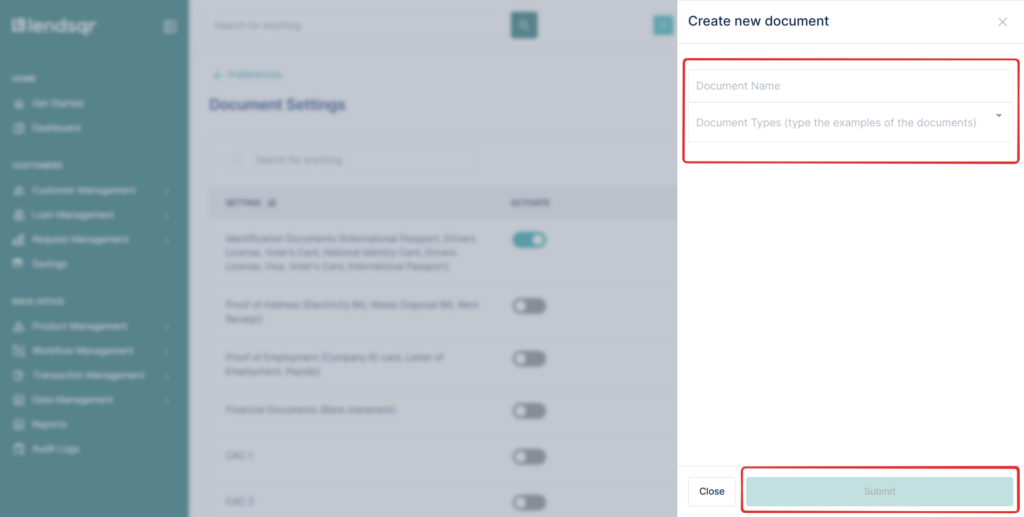
How to create a new document type
If your organisation needs a document type that does not already appear on the list, for example, a business registration certificate or a guarantor consent form, you can add it directly from the same page.
- On the Documents settings page, click the “Create Document” button.
- A modal will appear. Enter a Document name; this is what will be displayed to borrowers on the mobile app.
- Select a Document Type from the dropdown. The available types are: Identification Documents, Proof of address, Proof of employment, Financial documents, CAC 1, CAC 2, CAC 7, and Certificate of Incorporation.
- Click “Submit“ to add the document to your list.
- The new document will appear on the Documents settings page. You can then activate it and set it as required using the steps above.
Watch the video below explaining how to configure “required” documents for your users
Related docs: Approving or declining a customer’s document | Introduction to KYC | What are organisation documents?

 in Lendsqr for loan verification")
