Access your Back Office at your fingertips.
Download the app now on Google Play Store.
Scan the QR code
You can also scan QR code with your phone to download the app.
How to configure a restricted wallet on your loan products
Updated
On this page
What is a restricted wallet?
A restricted wallet enables you to manage how customers utilize the loan funds disbursed to their digital wallets. With this feature, you can manage actions like transfers, payments, bills, airtime purchases, and more. This ensures that loan funds are used as intended, offering a higher level of control and security for lenders.
Understanding the restricted wallet concept
The restricted wallet feature represents a significant advancement in digital lending control mechanisms. Traditional loan disbursements send funds directly to borrower accounts with no oversight over how those funds are used. Once money hits a borrower’s account, they have complete freedom to spend it however they choose, regardless of the stated loan purpose.
This lack of control creates several problems for lenders. Borrowers might take out a loan claiming they need it for business inventory but then use the funds for personal expenses or gambling. When the time comes to repay, the borrower no longer has the funds because they were not invested in income-generating activities as intended. The lender faces higher default risk simply because funds were diverted from their stated purpose.
Restricted wallets solve this problem by creating a controlled environment where loan funds can only be used in approved ways. When you disburse a loan to a restricted wallet, you maintain granular control over what the borrower can do with those funds. You can allow certain transaction types while blocking others, ensuring alignment between loan purpose and actual usage.
This control mechanism proves particularly valuable for specific-use loans. If you offer loans specifically for bill payments, you can restrict the wallet to allow only bill payment transactions. If you provide business inventory loans, you can enable transfers to approved vendors while blocking cash withdrawals and personal purchases.
The feature also enhances loan recovery rates. When borrowers can only use funds for productive purposes, they are more likely to generate the returns needed to repay the loan. A market trader who receives a business loan that can only be used for inventory purchases is more likely to invest properly and generate profits than one who receives unrestricted cash.
Understanding the technical implementation helps you configure restricted wallets effectively for your specific lending scenarios.
At the core of the restricted wallet system is a configuration payload that defines which transaction types are permitted and which are blocked. This payload uses a simple JSON structure where each transaction type has a corresponding setting that determines whether it is restricted.
In this configuration structure, each key represents a different transaction type that borrowers might attempt. The value assigned to each key determines whether that transaction type is restricted. When a setting is enabled or set to true, the corresponding action becomes restricted. This means users will be prevented from performing that specific activity within their app.
For example, if “transfer” is set to true, borrowers cannot make transfers from their restricted wallet. If “bills” is set to true, they cannot pay bills. This might seem counterintuitive at first, since “true” usually means something is enabled, but in this context, “true” means the restriction is enabled, which blocks the action.
Conversely, setting a value to false means that restriction is disabled, allowing the transaction type. If “payments” is set to false, borrowers can make payments from their restricted wallet. If “airtime” is set to false, they can purchase airtime.
This configuration system gives you precise control over wallet functionality. You can create highly restrictive wallets that only allow one or two transaction types, or you can create more permissive wallets that block just a few specific actions while allowing everything else.
Advanced configurations for conditional restrictions
Beyond simple enable or disable settings, the restricted wallet system supports conditional logic that applies restrictions based on the borrower’s current status. This advanced functionality creates more nuanced control policies.
For example, you might want to allow transfers normally but restrict them when a borrower has an outstanding loan balance. This encourages borrowers to repay before moving funds around. The configuration for this scenario looks like this:
In this advanced configuration, most settings remain simple true or false values. However, the transfer setting uses conditional logic expressed as an if statement. The logic checks whether the variable “loan.outstanding_balance” is greater than zero. If the outstanding balance is greater than zero, meaning the borrower still owes money, the transfer restriction is set to false, which means transfers are allowed. If the outstanding balance is zero or less, the restriction is set to true, blocking transfers.
This might seem backwards because you might expect to block transfers when there is an outstanding balance. However, remember that in this system, true means restricted or blocked. The conditional logic returns false when there is a balance, which means do not restrict or allow the action. When the balance reaches zero, it returns true, which restricts transfers.
You can create various conditional restrictions based on different variables including loan status, days past due, number of previous defaults, total amount borrowed, or custom fields specific to your lending operation. This flexibility enables sophisticated risk management strategies encoded directly into wallet behavior.
Setting up a restricted wallet on the admin console
Configuring the restricted wallet feature through the Lendsqr admin console establishes the default restriction policy that applies across your platform. Here is how to set it up step by step.
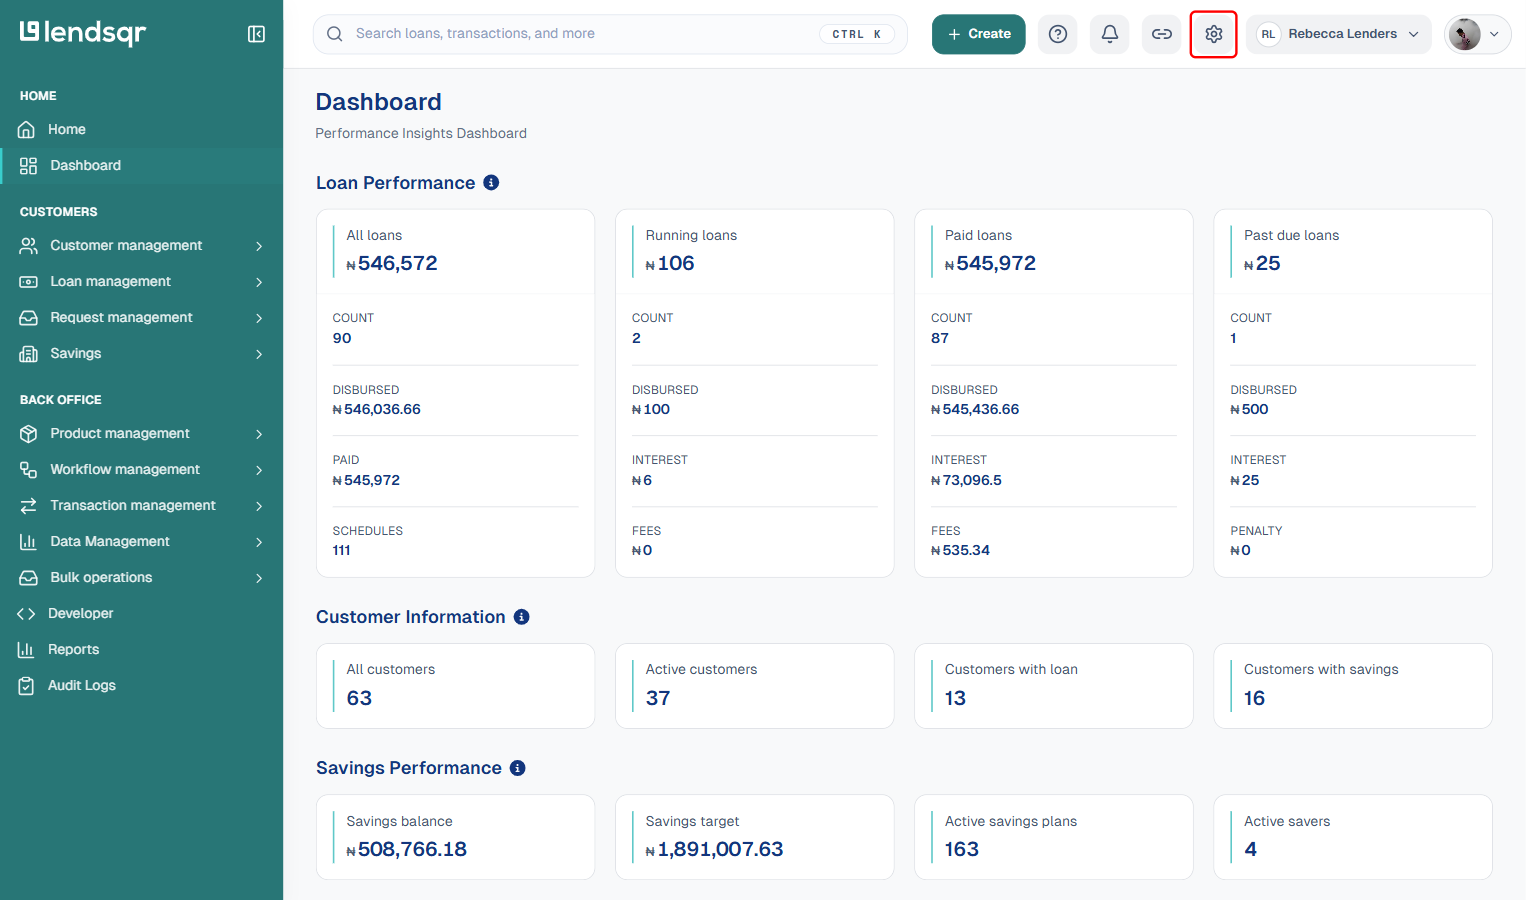
Step 1: Click on the “Settings” icon
Locate the “Settings” icon (a gear symbol) at the top right of your admin console screen and click it.
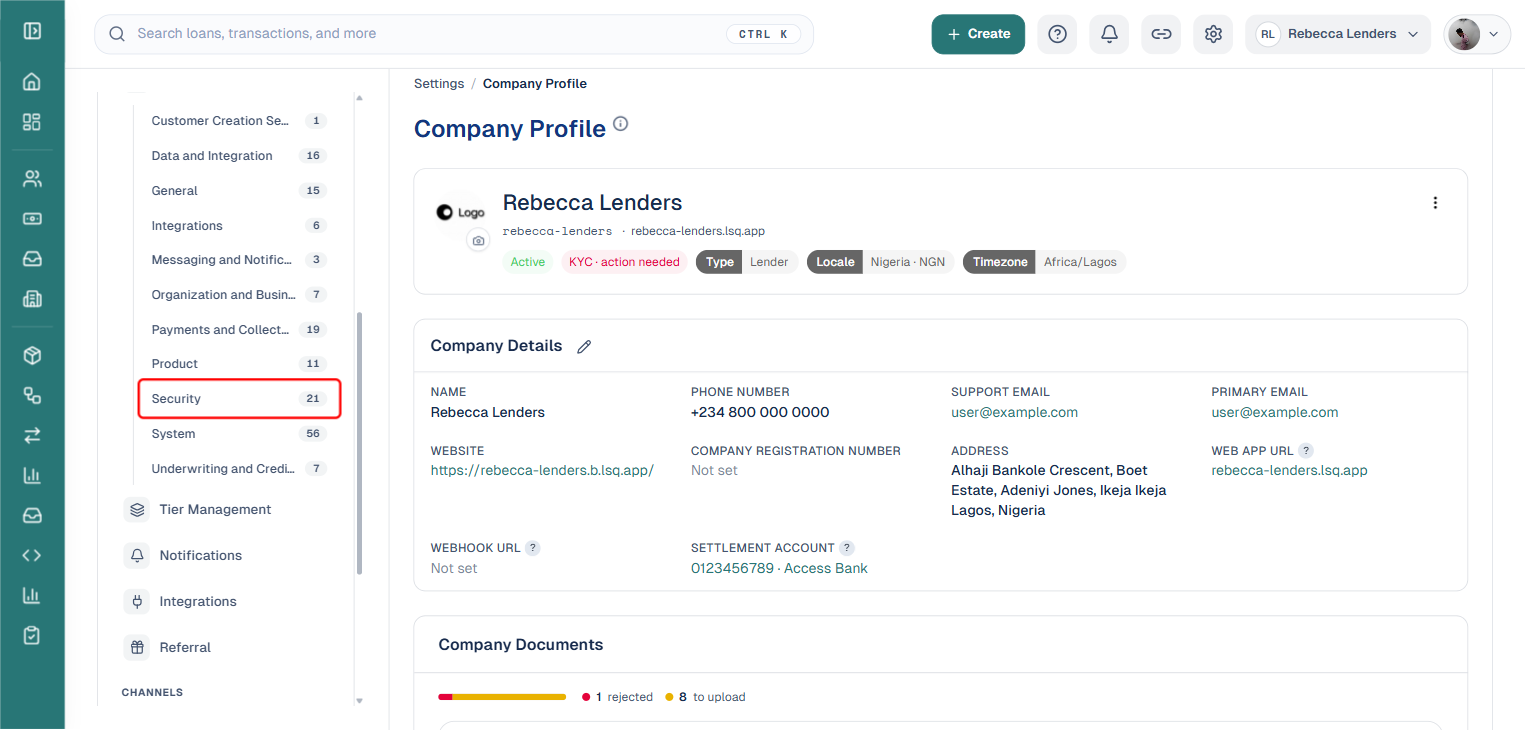
Step 2: Select “Security” under System Configuration
On the Settings page, expand System Configuration in the left panel, then select the Security category. This opens a searchable list of security-related settings.
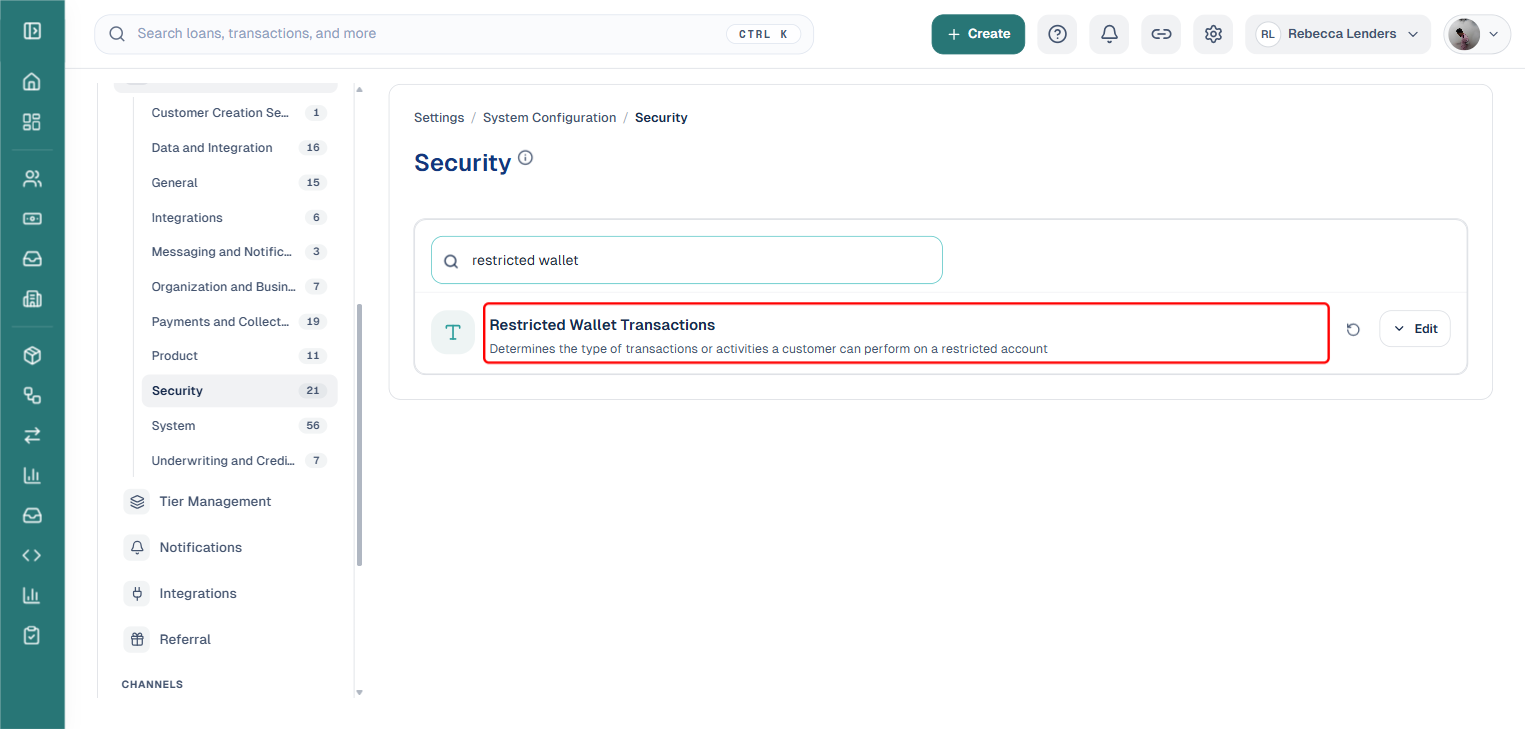
Step 3: Search for “Restricted Wallet Transactions”
Use the search box at the top of the Security settings page to find the setting named Restricted Wallet Transactions. It determines the type of transactions or activities a customer can perform on a restricted account. Click Edit on this setting row to expand it.
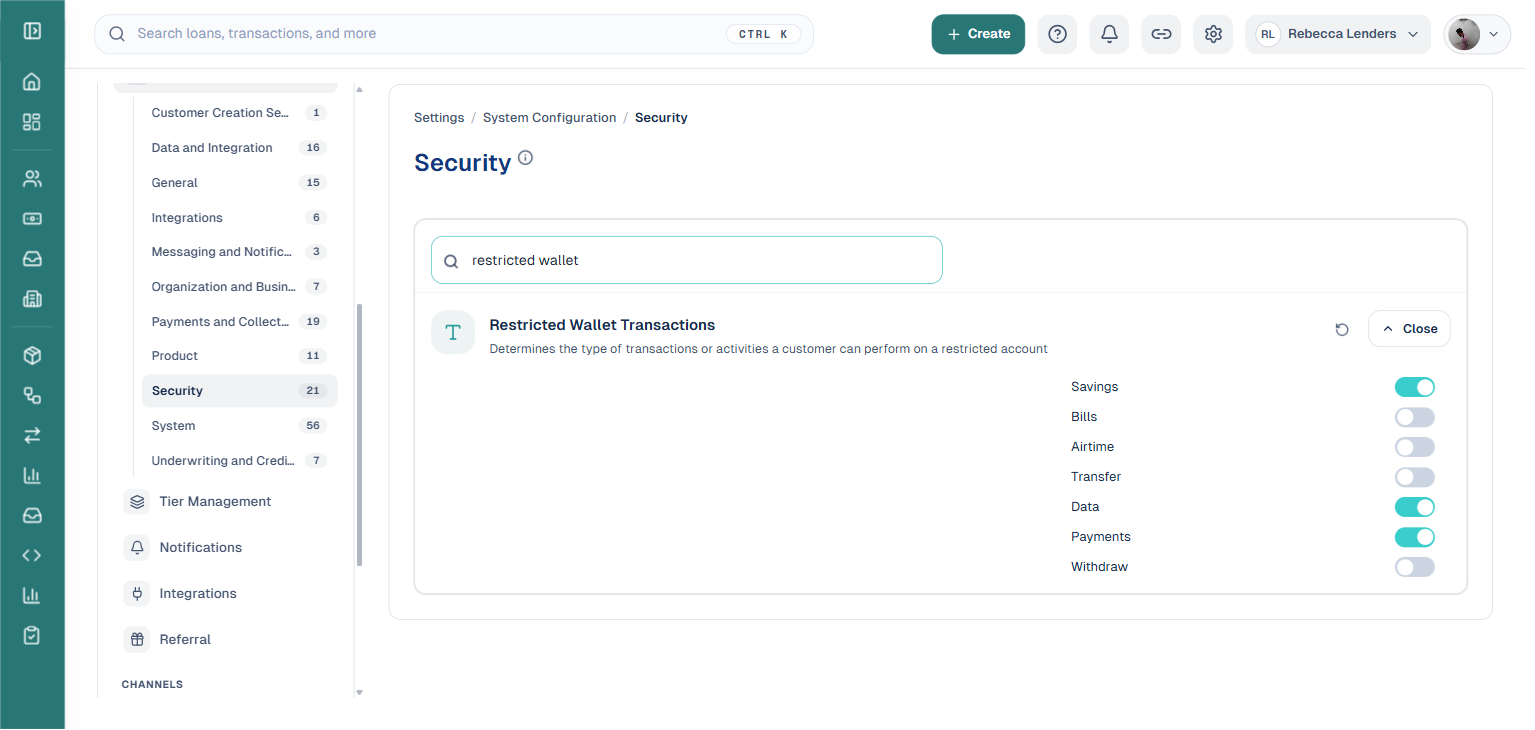
Step 4: Toggle the allowed transaction types
Editing this setting no longer requires writing raw JSON. Instead, the setting expands into a simple list of toggles, one for each transaction type a restricted-wallet customer might attempt: Savings, Bills, Airtime, Transfer, Data, Payments, and Withdraw. Switch on the transaction types you want to allow on a restricted wallet, and leave the rest off. Changes to each toggle save automatically; a small revert icon appears next to a toggle you have changed, letting you undo it back to the previous value.
Configuring a restricted wallet on specific loan products
While the system-wide restricted wallet configuration establishes defaults, you can also configure restricted wallet behavior for individual loan products. This allows different loan products to have different restriction policies based on their specific purposes.
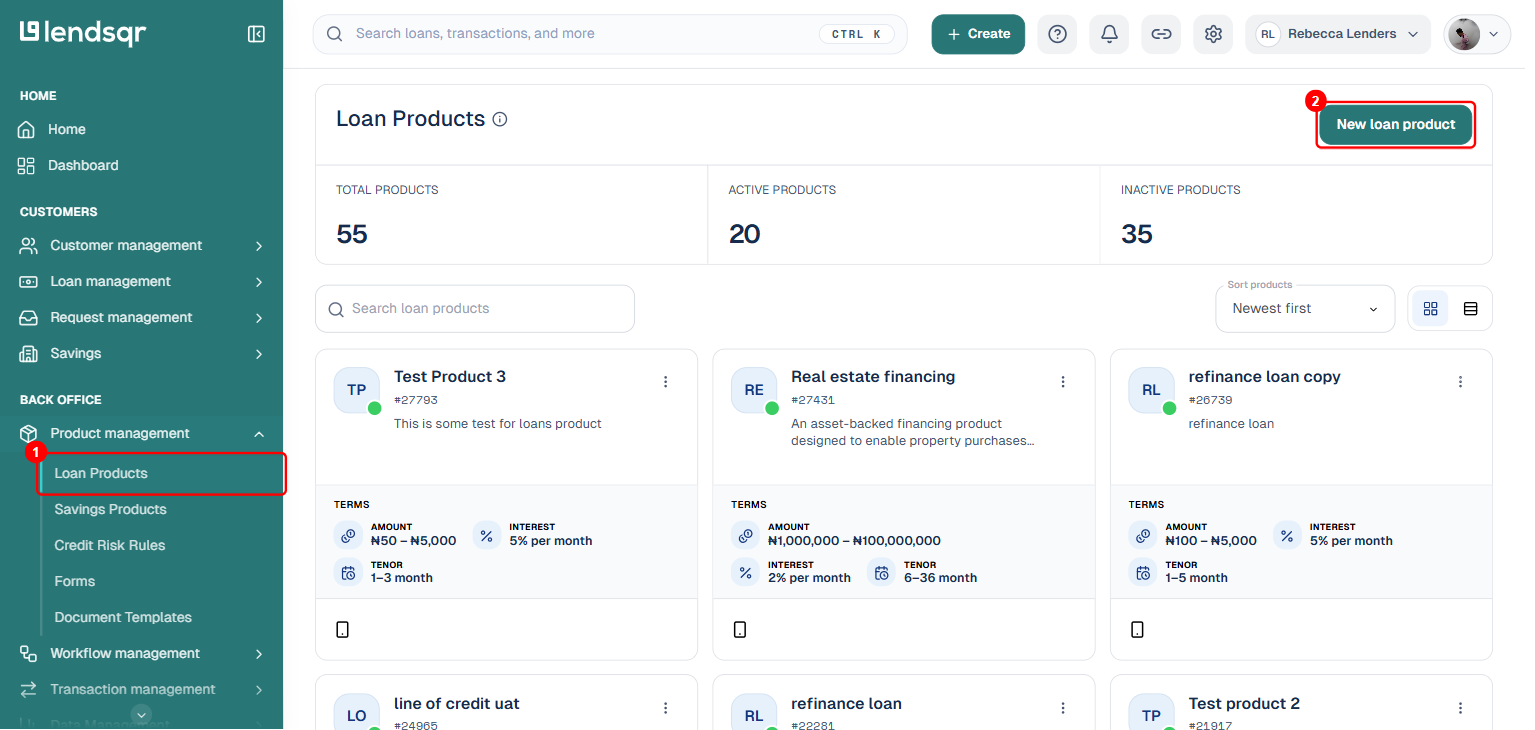
Step 1: Navigate to “Loan Products” under “Product Management”
From the left navigation, expand Product Management and select Loan Products. This displays a list of all loan products you have created.
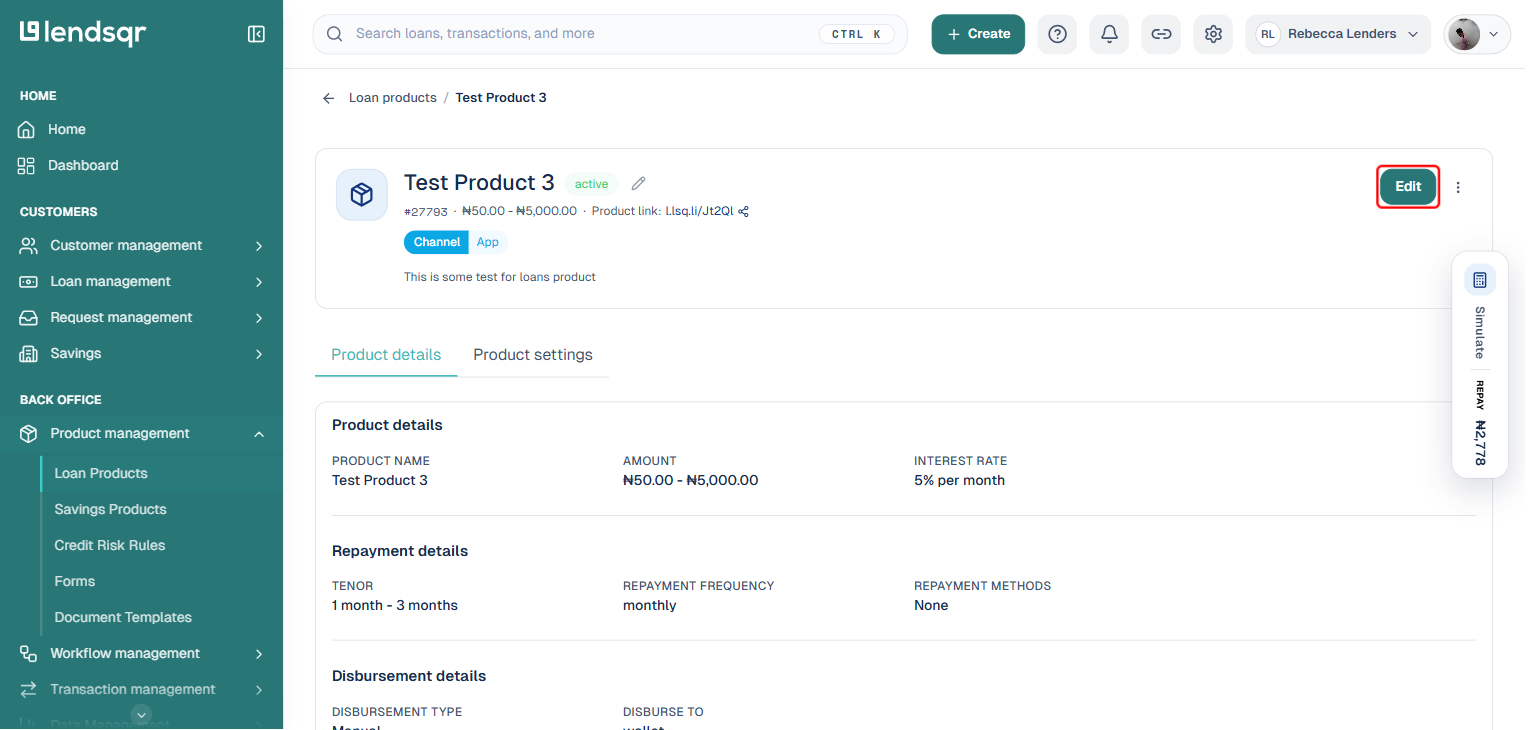
Step 2: Open the loan product you want to configure
Click the loan product you want to configure for restricted-wallet disbursement, then click the Edit button on its detail page. This opens the loan product edit screen.
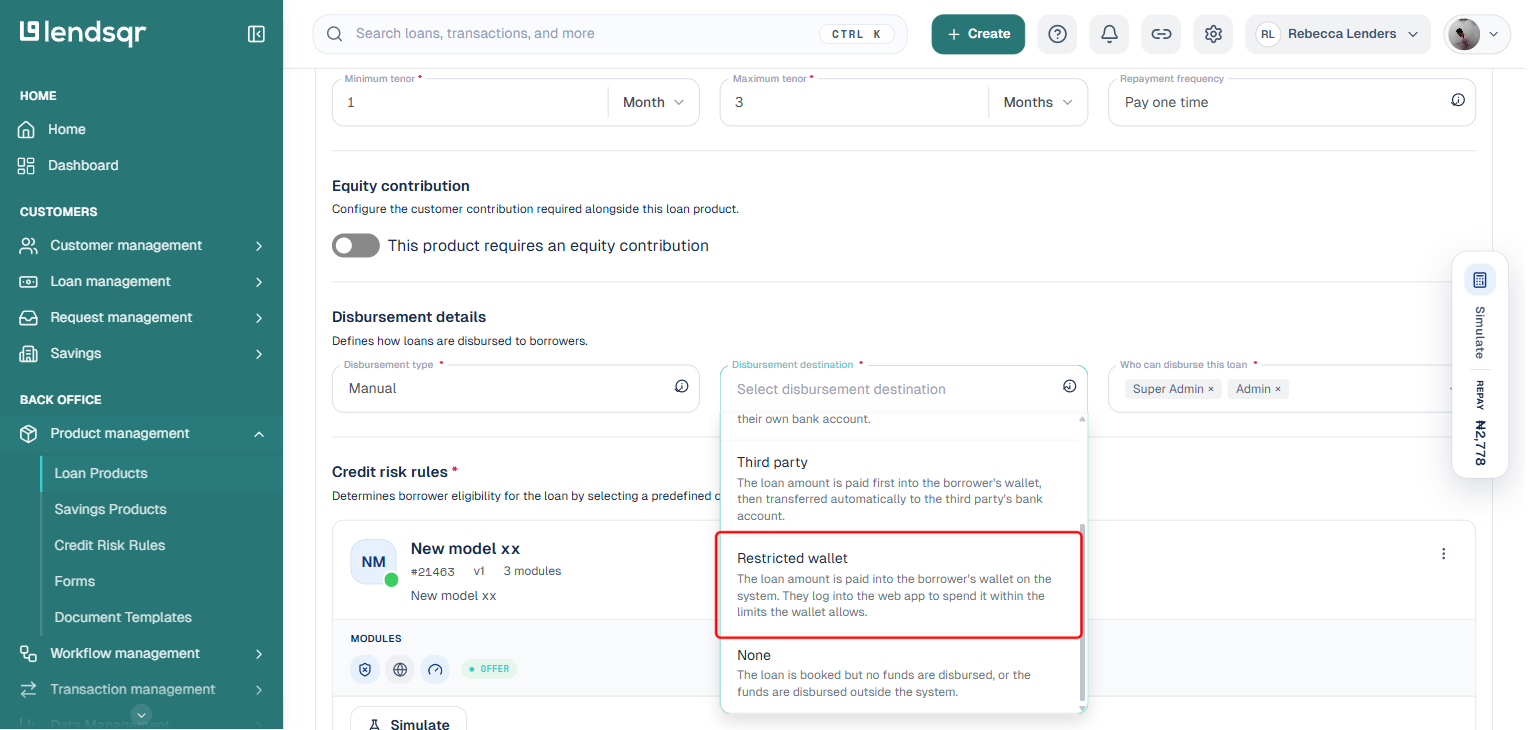
Step 3: Select “Restricted wallet” as the disbursement destination
On the edit screen, scroll to the Disbursement details section and open the Disbursement destination dropdown. The available options are Bank (paid directly to the borrower’s bank account), Wallet (paid to the borrower’s in-app wallet with no restrictions), Third party (paid to the borrower’s wallet then forwarded to a third party’s bank account), Restricted wallet (paid to the borrower’s wallet, spendable only within the limits configured in Step 4 above), and None (the loan is booked but funds are not disbursed through the system). Select Restricted wallet.
Step 4: Save changes to the loan product
Review the rest of the product’s settings to confirm they still match your intended design, then scroll to the bottom of the form and save your changes. The restricted-wallet disbursement setting takes effect immediately for all new loan applications submitted against this product going forward.
Best practices for implementing restricted wallets
Always communicate restriction policies clearly before borrowers accept loans Borrowers should understand exactly what they can and cannot do with the funds before committing to the loan.
Design restriction policies that match loan purposes. Alignment between restrictions and loan purpose reduces borrower frustration.
Start with moderate restrictions and adjust based on data. Overly restrictive wallets might drive borrowers to competitors even if your other terms are attractive.
Consider offering both restricted and unrestricted loan products at different price points. Those preferring flexibility can pay a premium for unrestricted access.
Implement clear error messages when restricted transactions are attempted.Poor error messaging creates confusion and support burden.
Provide a grace period or partial restriction relief as borrowers build repayment history. A borrower who has successfully repaid three loans might earn access to less restrictive wallets on future loans.