Access your Back Office at your fingertips.
Download the app now on Google Play Store.
Scan the QR code
You can also scan QR code with your phone to download the app.
Lendsqr Onboarding Specification: Complete Guide for Lenders
Updated
On this page
This is a reference guide to the onboarding system on the Lendsqr platform: how organizations (lenders) register, how individual borrowers or savers complete their setups, and how admin users can create accounts offline. Each flow below lists its required steps, fields, validation rules, and dependencies.
The onboarding system exists to ensure secure identity verification, regulatory compliance, and structured user activation across all lender organizations.
Onboarding Flows
The platform supports three onboarding flows:
Organization Onboarding: lenders, banks, and financial institutions creating and activating their organization on the platform. Covered in detail below; see How to sign up for Lendsqr for the same flow with screenshots.
User Onboarding (Borrower/Saver): individual users creating accounts on a lender’s own web app (for example, yourbusiness.lsq.app) and completing KYC verification.
Admin User Creation (Offline): organization administrators manually creating user accounts from the Back Office.
Organization Onboarding
Used when a new lending business signs up at app.lendsqr.com/signup. It has two numbered steps in the UI (“Step 1 of 3” covers steps 1-2 below), followed by a “Basic information” step and an email confirmation stage before the account is usable.
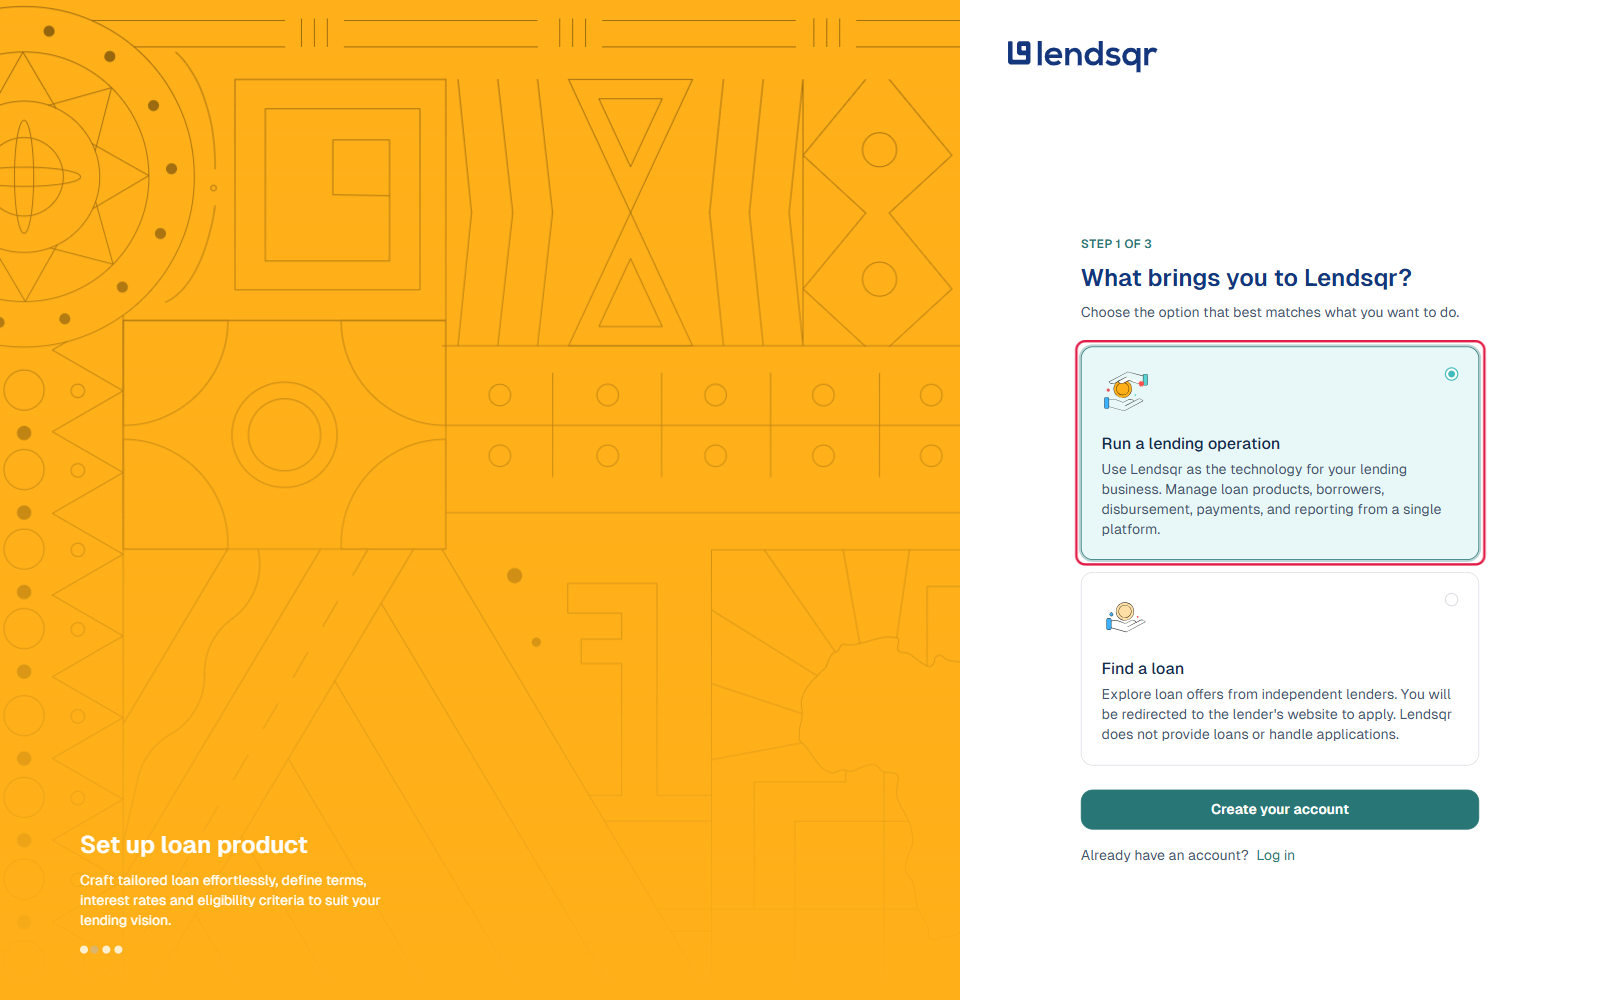
Step 1: Choose your intent
Separates lenders setting up their own operation from borrowers browsing for a loan.
Option
Behavior
Run a lending operation
Continues into the organization sign-up form below.
Find a loan
Redirects to a third-party lender’s own site. Lendsqr does not provide loans or handle applications through this option.
Step 2: Organization & admin details
Captures who is signing up and what the business does. Country must be answered first, since the rest of the form only renders once it’s chosen, and it sets the account’s default currency and locale.
Field
Required
Description
country
Yes
Determines locale, currency, and which of the fields below apply.
name
Yes
Admin’s full name.
phone_number
Yes
Admin’s phone number. Not verified via OTP at this stage; see Step 5.
email
Yes
Admin’s email address. Becomes the account’s login and receives the confirmation link.
business_name
Yes
Registered or trading business name.
business_description
Yes
Free-text description of the lending business, minimum 15 words.
has_license
Yes
Yes/No. If No, a follow-up “Are you currently working on your license?” question also appears.
password
Yes
Account password.
Validation: phone number must not already be registered to another profile; business description must be at least 15 words; password must be at least 8 characters and include a number, an uppercase letter, a lowercase letter, and a symbol (e.g. @, ., %).
Step 3: Basic Information
Finalizes the account’s platform-facing identity and marketing attribution before creation.
Field
Rules
subdomain
Auto-generated from business_name; editable. Becomes the customer-facing web app URL ({subdomain}.lsq.app).
language
Defaults to English (United States); selectable from a list.
role
The admin’s role at the business (e.g. CEO/Managing Director, Business Development/Finance Manager, Software developer/Product manager, HR Manager, Prospective candidate, Others).
The account already exists once Step 3 is submitted, but three things still need to happen. Step 4, email confirmation: “Confirm email” is the third stage of a progress indicator, after “Sign up” and “Basic information” (both marked complete). A validation email is sent, and the admin must click the link inside it to activate the account (“Resend email” is available if it doesn’t arrive within a few minutes). Step 5, phone verification: clicking the email link lands the admin in the “Get started” checklist, but the phone number from Step 2 is not verified as part of the sign-up wizard; every fresh login prompts for it again until it’s completed once from account settings. Step 6, KYC document upload: the account shows a “pending KYC verification” banner and is not asked for business documents during sign-up. A lender can keep exploring the platform before submitting them, but full capabilities (like live disbursements) require KYC to clear. Documents are uploaded from Settings > Company Profile > Company Documents:
Certificate of Incorporation
Lending License
ID Document
Utility Bill
FCCPC License
Additional Licenses
Board Resolution
Ultimate Beneficiary declaration
System State on Account Creation
Clicking “Create account” at the end of Step 3 (before email confirmation) provisions the account:
Creates the admin user with a Super Admin role
Provisions the web app subdomain chosen in Step 3
Sends the email confirmation link
Places the account on a starter plan (upgradeable later from Settings > Subscription)
User Onboarding (Borrower/Saver)
The process an everyday user goes through when signing up to borrow or save on a lender’s own web app (for example, yourbusiness.lsq.app/signup). It’s sequential: a user must provide valid data at each stage to progress, and cannot skip a step.
Stage 1: Phone number, password & referral
All captured together on a single screen:
Field
Required
phone_number
Yes
password
Yes
referral_code
No
Rules: password must be at least 8 characters and include a number, an uppercase letter, a lowercase letter, and a symbol, the same rule as the organization sign-up form. Terms and Conditions must be accepted before “Sign Up” becomes clickable.
Stage 2: Phone Verification
Field: a 6-digit code, delivered via SMS or WhatsApp to the number from Stage 1. A USSD fallback is offered on the same screen for users who can’t receive that message, and a “Resend code” option becomes available after a short countdown.
The remaining stages below (BVN verification, email capture, photo/liveness, bank linking, address, PIN, and any custom questionnaire) continue after phone verification succeeds. These were not re-verified against the live product in this pass; treat the field lists as a general guide and confirm exact wording against the live app before relying on it for integration work.
Stage 3: BVN Verification & email capture
BVN verification applies to Nigerian organizations. Fields: BVN, BVN phone number, date of birth, and email address. Verifies the BVN against the national registry and auto-populates identity data where it returns it; a lender can turn off BVN validation for their organization (see How to turn off BVN validation for your customers’ added accounts). The email address must be valid and unique per organization.
Fields: Account Number, Bank Name, plus street address, city, state, and (in Nigeria) Local Government Area. The bank account is verified via standard interbank lookup; where BVN verification ran in Stage 3, the name on the account is expected to match the name from the BVN registry. If the lender requires it, a direct debit mandate authorization starts here.
Stage 6: Security PIN Setup
Field: a 4-digit transaction PIN. Sequentially ascending (e.g. 1234), sequentially descending (e.g. 4321), and repeated-digit (e.g. 1111) PINs are typically rejected. Confirm against the live app if this matters for your integration. Once this step is complete, the account is active and an initial loan/savings tier applies.
Collects organization-specific custom data (e.g. Occupation, Employment Status, Monthly Income). Only appears if the lender has configured custom form questions for their organization.
3. Back-Office Admin User Creation (Offline Enrolment)
Lenders can manually create a customer or perform bulk imports directly from the admin console, without the customer going through the self-service web app flow above. See How to onboard customers in bulk with Lendsqr.
Information fields typically required: Full name, phone number, email, date of birth, and physical address, with optional fields like ID documents, BVN, and disbursement bank details depending on the lender’s region and configuration.
Business rules: if identity details (BVN/bank account) are provided, they run through the same verification checks as self-service sign-up. The customer’s record is created before the customer has logged in themselves, and an onboarding email/SMS is typically sent with next steps for accessing their account.
4. Platform Data Validation Standards
Formatting rules confirmed on both the organization and borrower sign-up forms:
Target Parameter
Confirmed Rule
Passwords
Minimum 8 characters; must contain at least 1 uppercase letter, 1 lowercase letter, 1 number, and 1 symbol (from the set @, ., %).
Business description (organization sign-up)
Minimum 15 words.
Phone Numbers
Must be a valid number for the selected country; duplicate numbers across profiles are rejected.
Transaction PINs
Exactly 4 digits.
Email Addresses
Must be a valid, unique email per organization.
Rate limits, OTP expiry windows, and bank-name-matching enforcement were not independently re-verified in this pass; treat any such numbers as indicative rather than a guaranteed contract.
5. User Classification Tiers
As users move along the registration path, the platform assigns verification tiers that influence loan limits and platform features. See How to assign a tier to your users and What is tier management? for how lenders configure and assign these:
Tier 0 (Unverified): Account started but basic verification is incomplete. Restricted from transacting.
Tier 1 (Basic KYC): Confirmed phone number and, where applicable, verified BVN details. Unlocks basic micro-loan access.
Tier 2 (Enhanced KYC): Passed Tier 1 checks and added a confirmed address. Unlocks medium credit limits.
Tier 3 (Full KYC): Completed all requirements and uploaded official verification documents. Unlocks the platform’s full capability and highest available limits.
Exact tier thresholds and unlocked limits are configured per lender rather than fixed platform-wide. Check your own organization’s Tier Management settings for the values in effect on your account.