Access your Back Office at your fingertips.
Download the app now on Google Play Store.
Scan the QR code
You can also scan QR code with your phone to download the app.
How to configure address verification for your customers
Updated
On this page
Address verification allows your organisation to confirm that the physical addresses provided by your customers are real and belong to them. It is powered by Dojah, a regulated identity verification provider, and is embedded directly into your Lendsqr-powered lender web app and mobile app via a widget.
As a lender, you control:
Whether address verification is required on your platform at all
Which address types customers must verify (home, work, school, or custom)
Which loan products require a verified address before a customer can apply
How your team reviews verification outcomes and overrides them where necessary
Configure Address Verification on your organisation
The first configuration step is done at the organisation level. This is where you provide define which address types are active on your platform.
How to access the setting
Log in to the Lendsqr admin console.
Use the global search bar at the top of the page (or press Ctrl K) and search for “Address Verification”. Click the Address Verification Settings result to jump straight to it. Alternatively, click the Settings (gear) icon in the top navigation, then go to System Configuration > System.
On the System settings page, use the search box to filter for “address”, then click Edit on Address Verification Settings to expand the form.
What to fill in
The expanded form has three fields: Required (a toggle), Provider (a text field, currently only “dojah” is supported), and Parameters (a JSON text area holding your provider credentials and per-address-type configuration). Your Dojah secret key is entered separately, not inside Parameters — see “Setting your Dojah secret key” below. Together, Required, Provider, and Parameters map to this structure:
Field
Value
Notes
required
true / false
Master switch. If false, address verification is disabled across the entire platform regardless of loan product settings.
provider
“dojah”
Currently the only supported provider.
app_id, public_key
Your Dojah credentials
Go inside parameters.provider_config.dojah in the JSON. If you do not have a separate Dojah account, you can leave these as-is and use Lendsqr’s default. Your secret key is not part of this JSON object — see below.
widget_id (per address type)
Your Dojah widget ID
Set one per address type. Each address type you enable needs its own Dojah widget ID. Set required to true or false per type. If you do not have a separate Dojah account, you can leave it as it is using Lendsqr’s default.
In the current admin console, the top-level required and provider keys shown above correspond to the Required toggle and Provider field on the form. Only the parameters object (your provider_config credentials and the addresses map) needs to be pasted into the Parameters text area. Your Dojah secret key is not part of this JSON at all.
Setting your Dojah secret key
Your Dojah secret key is entered in its own setting, directly below Address Verification Settings on the same System page: Address Verification Secret. This field is used for verifying the signature on address-verification webhooks Dojah sends back to Lendsqr, and is kept separate from the Parameters JSON for that reason. Enter your secret key here, not inside provider_config.
You only need to update this field if you have your own Dojah account and are using your own credentials. If you do not have a separate Dojah account, leave the existing value as it is; your organisation will continue to use Lendsqr’s default Dojah credentials, the same default referenced for app_id and public_key above.
Tip: You only need to populate widget_id for address types you plan to use. Address types with required: false will still appear as optional verification steps for customers, but will not block loan applications.
Saving your configuration
Review all fields for accuracy, especially your app_id and public_key.
Click Save. The system will validate the structure of your configuration before saving.
If the structure is invalid or a required field is missing, an inline error message will appear. Nothing will be saved until errors are resolved.
On successful save, a confirmation message will appear. Your configuration is now active.
Return to the settings page at any time to review your configuration. Your credentials will be pre-populated.
Require Address Verification on a loan product
Once org-level configuration is in place, you can require specific address types on individual loan products. This means customers must have the selected address type(s) verified before they can apply for that product.
How to enable it
Require address verification on a loan product is not a simple on/off toggle. It is a multi-select dropdown listing every address type configured in your org-level Parameters JSON (for example, home, work, custom). You check off whichever of those address types this specific product should require.
Navigate to Product management > Loan Products and open the product you want to configure. If you have many loan products, use the search box at the top of the Loan Products list to find the one you need instead of scrolling through the table. See How to edit an existing loan product for a full walkthrough of locating and opening a loan product.
Click the Product settings tab (next to Product details).
Use the Search product settings box at the top of the settings list to jump straight to Require address verification, or scroll down to find it manually.
Click the Select dropdown and check the address type(s) this product should require (for example, just “home”, or “home” and “work” together).
Your selection saves automatically. There is no separate save or update step for this setting.
Dependency: Selecting address types here only takes effect if the org-level Required toggle (in Address Verification Settings) is also switched on. That toggle is the master switch for the whole feature — setting it to true is the one config change needed to make address verification actually enforce anywhere on your platform, whether or not you have selected specific types per product. If it is off, no product will block applications on address verification even if types are selected here.
Blocking loan approval on an unverified address
The settings above control whether address verification is required to apply for a loan. A separate, org-wide setting controls whether it also blocks the loan at the approval stage: Block Loan Approval On Unverified Address. When enabled, your team cannot approve a loan for a customer who still has an unverified address, even if the application itself was allowed to proceed.
This setting lives under Settings > System Configuration > Product (a different category from the System page used above). Use the global search bar and search for “Block Loan Approval”, or navigate there directly and scroll or search for the setting by name.
This toggle is off by default on this tenant. Based on its description (“loan approval is blocked if the customer has unverified addresses”), it acts as an org-wide check at approval time, separate from the product-level “Require address verification” selector covered above, which only gates whether a customer can start an application. We have not tested every interaction between the two settings live; if you enable this toggle, verify its exact behaviour against your own loan products before relying on it in production.
What this means for customers
When a customer attempts to apply for a loan product that requires address verification:
The system checks whether all required address types (as defined in your org config) have been verified for that customer.
If all required types are verified, the application proceeds normally.
If any required type is unverified or missing, the application is paused. The customer is shown their address section with the specific unverified type(s) highlighted and a message directing them to verify before continuing.
Once verification is complete, the customer can proceed with their application.
How the verification process works for customers
Understanding the customer journey will help your team support customers and interpret verification outcomes correctly.
Where customers verify their address
Customers can verify their address from two places:
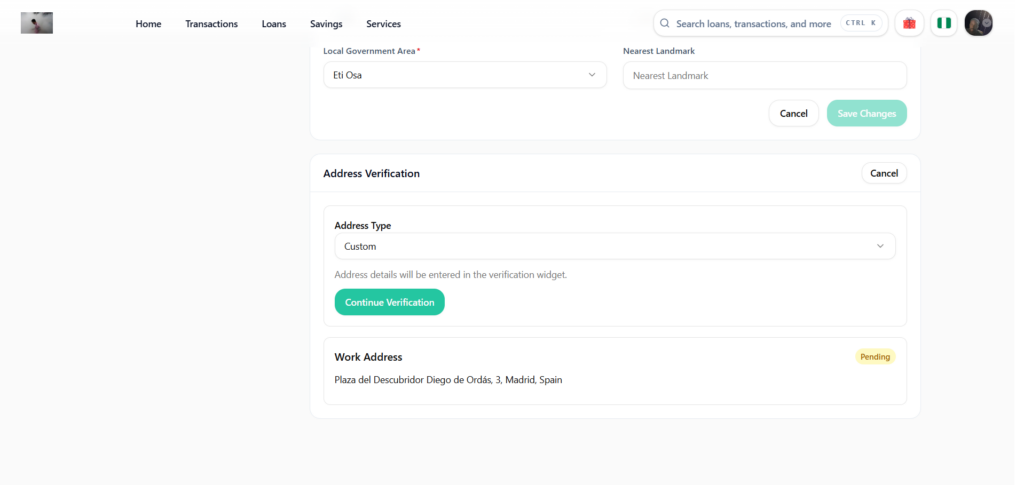
Settings / Profile: Customers can initiate verification at any time, independent of a loan application.
Loan application flow: If their address is not yet verified when they attempt to apply for a loan product that requires it, the system will direct them to verify before continuing.
The verification widget
When a customer clicks Verify on an address card, the widget opens as an overlay on the app. The widget is loaded using your organisation’s credentials (app_id and public_key) and the widget_id configured for that specific address type.
Depending on how your widget is configured, the customer may be asked to:
Enter or confirm their address details
Allow the app to access their device location
Upload a utility bill or proof-of-address document
Take photos as required by your widget configuration
After completing the steps, the customer submits. The widget closes and their address card updates to Pending status while the system awaits confirmation.
Verification status flow
Status
What it means
Pending
Customer has submitted their address. The system is awaiting confirmation from the provider or the provider requires manual user review before rejection.
Verified
The provider has confirmed the address as successfully verified.
Rejected
The provider was unable to verify the address. The customer can attempt verification again.
Inavalidated
A change was made on the provider side to reverify the user’s address. The customer must re-verify.
Reviewing and overriding verification status
Your admin team can view the address verification status for any customer and, where necessary, manually override the system’s decision.
Viewing verification status
To view a customer’s address verification status:
Navigate to the customer’s details page or open a specific loan request.
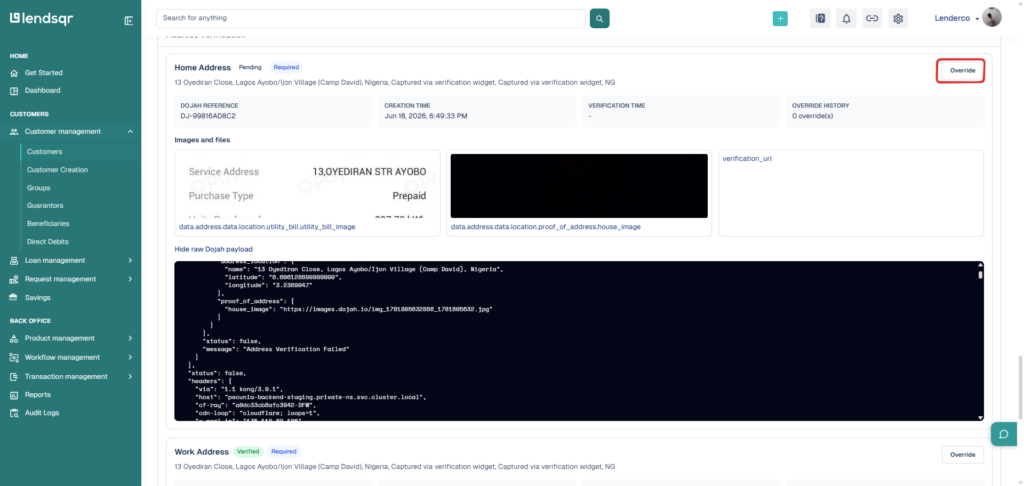
Locate the Address Verification section. It lists each configured address type with the following details:
Current status badge
Provider reference ID
Verification timestamp
Images and data returned by Dojah (utility bill, proof-of-address photos, GPS coordinates) where available
An Override button is available next to each address type for authorised admin users.
Overriding a verification status
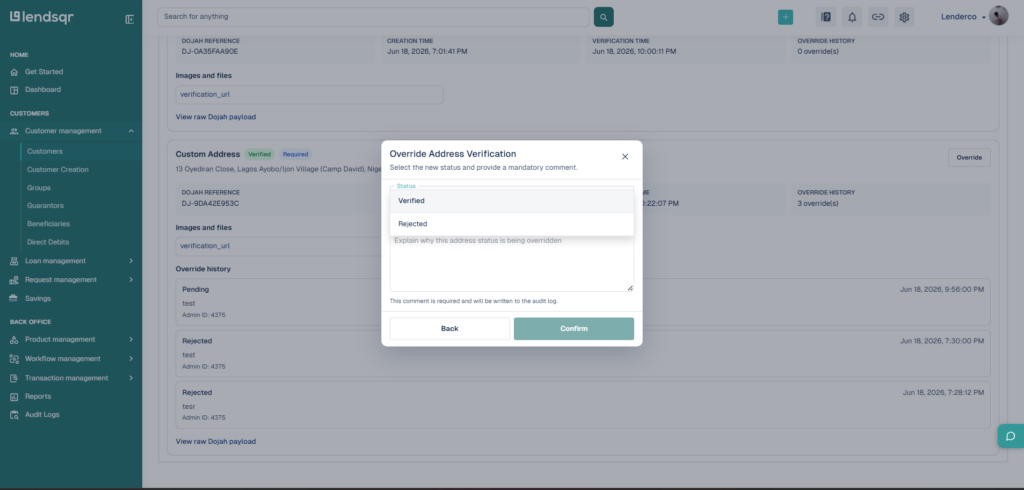
An override allows your team to manually set a customer’s address status to Verified or Rejected, for example when documents were reviewed outside of the automated process.
Click the Override button on the relevant address type.
A modal will appear. Select the new status: Verified or Rejected.
Enter a mandatory comment explaining the reason for the override. The confirm button will remain disabled until a comment is provided.
Click Confirm. The status updates immediately in the UI.
The override is recorded in the audit log with the admin’s identity, the previous status, the new status, the comment, and the timestamp.
Important: Overriding an address to Verified will trigger the system’s downstream eligibility checks, including tier upgrade evaluation. Ensure the override is accurate and well-documented, as the audit trail is permanent.
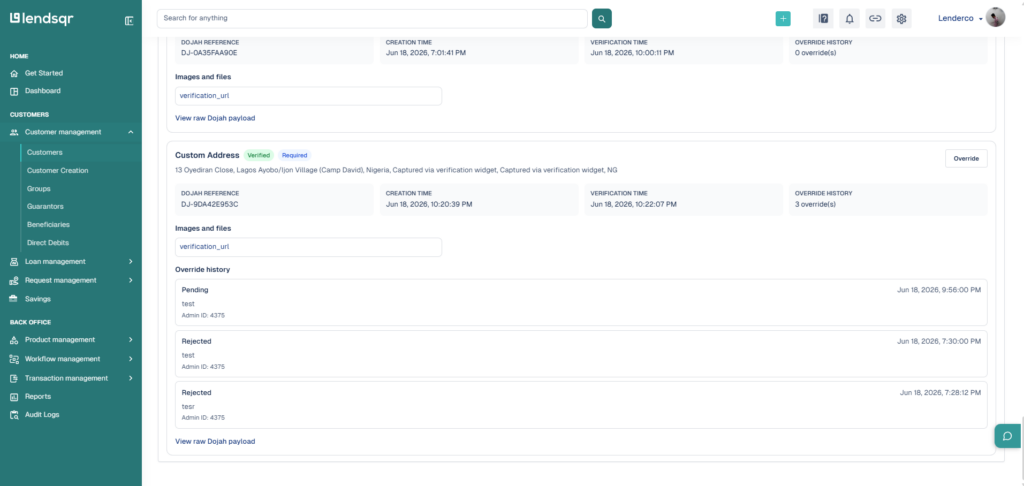
Override history
Every override is logged and visible in the override history for that address type on the customer details page. Your team can see who overrode, when, and what comment was left.
Frequently Asked Questions
Can I enable address verification on some loan products but not others?
Yes. The org-level Required toggle acts as a master switch that enables the feature on your platform. Individual loan products each have their own Require address verification multi-select, letting you choose which specific address type(s) that product requires, independently per product. Set the org-level toggle to true once, then use the product-level selector to decide where and which types are enforced.
What happens if a customer closes the verification widget without completing it?
The system records this as pending and abandoned. You can override this status to rejected directly from the admin console on the customer details page.
A customer’s address has been Pending for a long time. What should we do?
If a customer’s address remains Pending for longer than expected, check the response from the porvider to confirm the verification was received and the reason for the delayed verification. If there is a confirmed issue, your admin team can apply a manual override with a documented reason.
Can a customer verify more than one address type?
Yes. Customers can have multiple addresses verified simultaneously. Each address type (home, work, school, custom) has its own verification status and its own Verify button on the profile page. They are independent of each other.
What is the difference between required: true and required: false on an address type?
required: true means that address type must be verified before a customer can apply for loan products that have Require Address Verification enabled. required: false means the address type is available for optional verification on the customer’s profile, but it will not block a loan application.
Will customers be charged for address verification?
If your organisation is using Lendsqr’s provider API keys rather than your own, a charge event is recorded each time a customer completes a widget submission. If you are using your own credentials, billing is handled directly between your organisation and the provider.
Can I update my provider credentials after the initial setup?
Yes. Navigate back to the Address Verification settings page, update the relevant fields, and save. The system will validate and re-encrypt your credentials. Note that changes take effect immediately, so coordinate with your team before rotating credentials in a live environment.
How do I know if a customer’s address was verified via the automated process or via a manual override?
The override history on the customer details page clearly distinguishes between automated verification (with the provider reference ID and timestamp) and manual overrides (with the admin’s identity, timestamp, and the comment they entered). Both are also captured in the audit log.