Access your Back Office at your fingertips.
Download the app now on Google Play Store.
Scan the QR code
You can also scan QR code with your phone to download the app.
How to create a savings plan for a user on the admin console
Updated
On this page
Creating a savings plan for a user on the admin console allows you to proactively help customers reach financial goals through structured deposits. This guide walks you through the process step-by-step, along with important prerequisites, configuration dependencies, and common issues to watch out for.
Overview
A savings plan defines how a user sets aside funds over time based on predefined rules such as amount, frequency, and duration. Admin-created plans are especially useful in assisted onboarding scenarios, enterprise use cases, or when managing users who require manual setup.
Why create a savings plan manually?
Most borrowers on digital lending platforms create their own savings plans through a web or mobile app. But not everyone has consistent smartphone access, and not every lender runs a fully digital operation.
Consider a microfinance institution serving artisans in a market. A field agent collects savings contributions in cash from 40 customers every week. Without the ability to create savings plans from the admin console, all of that data lives in a spreadsheet — invisible to the platform and untrackable in real time.
On Lendsqr, administrators can manually create savings plans for any registered user directly from the admin console. This is useful for:
Creating plans on behalf of field customers enrolled by agents.
Onboarding non-digital users who do not use the web app.
Migrating historical savings data from a previous system.
Prerequisites
Before creating a savings plan, ensure the following conditions are met:
1. Admin Roles and Permissions
You must have the appropriate permissions to create and manage savings plans. Typically, this includes:
Savings Plan Create Permission
User Account Management Access
Product Configuration Visibility
If you are unable to access the savings module or create a plan, contact your system administrator to update your role permissions.
Savings plans are tied to predefined savings products. Before proceeding, ensure that:
2. Savings Product Configuration
Savings plans can only be created from existing products. Ensure that a savings product has been fully configured with the following:
Product Name and Description
Minimum and Maximum Amount
Interest Rate (e.g., 24%)
Interest Computation Type (Simple or Compounding)
Accrual Application Period (Daily, Weekly, Monthly, or End-of-period)
Minimum and Maximum Tenor
Month Calculation Type (Calendar or Fixed 30 days)
Penalty Charge (%) (if applicable)
Withholding Tax (%) (if applicable)
Valid collection/payment setup
If no product exists, create one in the Savings Product Settings section before continuing. Read here.
3. Customer Profile
The user must already be registered in your Lendsqr platform before you can create a savings plan for them. If they are not yet registered, create their profile first, then return to this step. Read here
How to create a savings plan for a user
1. Log in to your Lendsqr admin console.
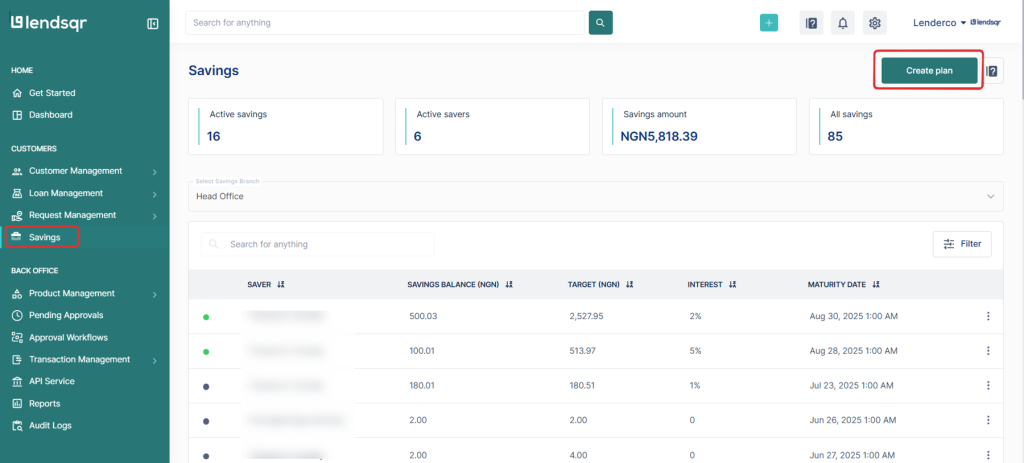
2. On the left-hand sidebar, find and click on the Savings tab to access all savings features.
3. On the top right corner of the savings dashboard, click Create a plan to begin.
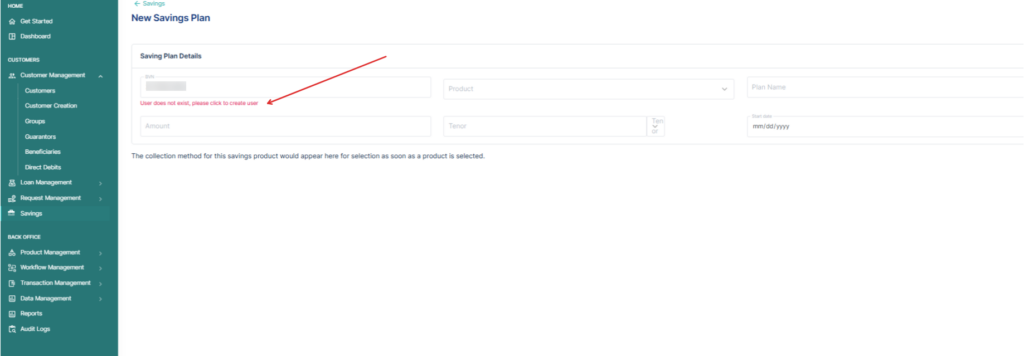
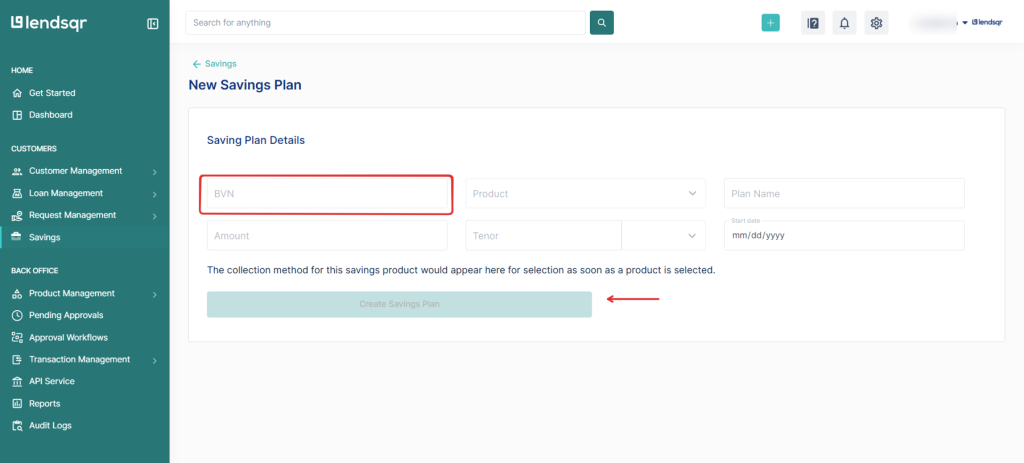
4. Type in the BVN of the user you’re creating the plan for. If the customer does not exist, a red prompt will appear, click the prompt to open the customer creation form.
If the user exists, a form will appear. Fill in the required fields:
Start Date — When contributions begin.
Savings Product — Select the savings product this plan will be based on. This determines the interest rate, tenor, and contribution schedule.
Plan Name — Give the plan a clear name the user will recognize (e.g., “School Fees Target” or “Emergency Fund”).
Amount — Enter the amount the user will contribute per cycle or as a total target, depending on product configuration. Ensure the amount falls within the allowed minimum and maximum limits defined in the savings product.
Tenor — Depending on the product:
You may define an end date manually
Or the system may auto-calculate it based on the selected tenor
Choose how often the user contributes: Daily, Weekly, Monthly
5. Once all fields are filled correctly, click the Create Savings Plan button to proceed.
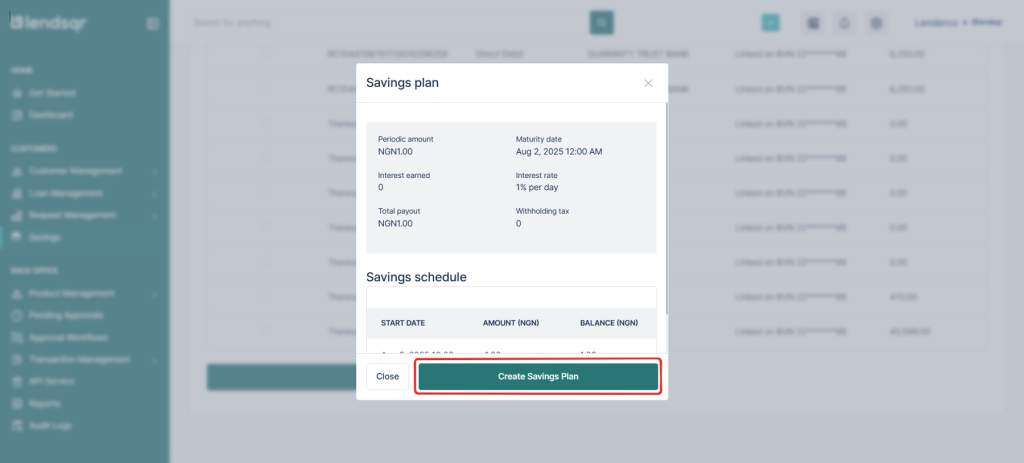
6. The system will generate a schedule based on your inputs. Take a moment to review the savings schedule, total target, and expected end date.
7. If everything looks good, click Create Savings Plan to finalize the savings plan. The user’s plan will now be active and visible in their profile.
Note: The savings plan will appear immediately on the user’s profile and can be funded manually or through the standard payment methods configured on the savings product.
Funding the savings plan after creation
Once the plan exists, you can also fund it directly from the admin console on behalf of the user — for example, to record a cash contribution made in person. Go to the Savings tab on the user’s profile, locate the plan, and click Fund Plan. Enter the amount and confirm.
Best Practices
Always verify product configuration before creating plans
Use clear and descriptive plan names
Communicate plan details to users (amount, schedule, duration)
Regularly monitor active plans for funding consistency
Frequently asked questions
Can the user see their savings plan on the web app after I create it?
Yes. Once you create a savings plan from the admin console, it is visible to the borrower on their web app under their savings section. They can track their balance and contribution history in real time.
What happens if I select the wrong savings product?
The savings product determines the interest rate, maturity rules, and contribution settings. If the wrong product is selected, you may need to close the plan and create a new one with the correct product. Check your product settings before proceeding.
Can I create multiple savings plans for the same user?
Yes, a single user can have multiple active savings plans simultaneously, each under a different savings product or goal. There is no platform limit on the number of concurrent plans per user.