Access your Back Office at your fingertips.
Download the app now on Google Play Store.
Scan the QR code
You can also scan QR code with your phone to download the app.
How to perform bulk disbursement to multiple borrowers on Lendsqr
If you lend to hundreds of borrowers, processing payments one by one is not just slow — it is a risk. A single wrong account number or a missed entry can delay payouts, frustrate borrowers, and create reconciliation headaches that take days to untangle. Bulk disbursement solves this by letting you send payments to multiple borrowers in a single upload.
You prepare a spreadsheet with all the payment details, upload it to the Lendsqr admin console, and the system processes every transaction in that batch automatically. As a result, what would normally take hours of manual work gets done in minutes, with a clear record of every payout.
This guide explains how bulk disbursement works, how to prepare your file correctly, what to do when something goes wrong, and a quick checklist to help you execute faster every time.
When bulk disbursement makes sense
Bulk disbursement is particularly useful for lenders who regularly process high volumes of payments. Consider a microfinance institution that approves fifty payroll-backed loans every Friday. Instead of processing each disbursement individually, a credit officer uploads a single spreadsheet, and the system handles the rest. Furthermore, at month-end, when savings withdrawals are due for hundreds of customers simultaneously, the same feature handles it all in one batch.
Beyond loan disbursements, the feature also supports savings payouts, vendor payments, and any other scenario where money needs to reach multiple recipients at the same time. In each case, the outcome is the same: faster processing, fewer manual errors, and a clean audit trail for every transaction.
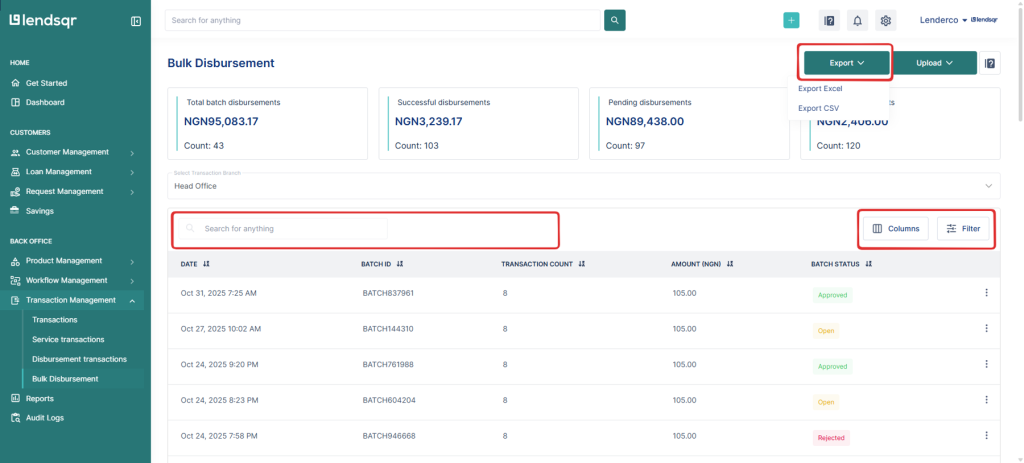
How to access bulk disbursement on Lendsqr
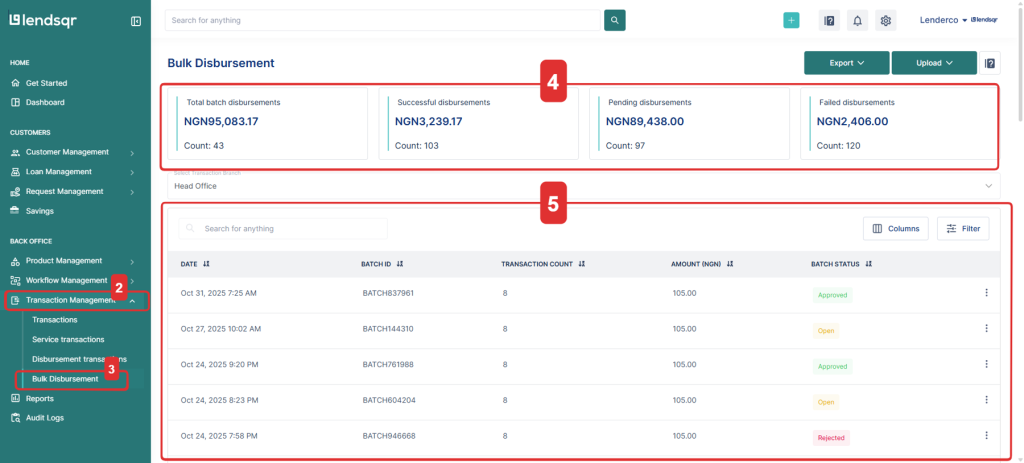
Log in to your Lendsqr dashboard.
Navigate to Transaction Management on the left sidebar.
Select Bulk Disbursement.
You’ll see a summary section showing:
Total batch disbursements
Successful disbursements
Pending disbursements
Failed disbursements
Below the summary, you’ll find a list of all your uploaded batches along with their batch IDs, transaction counts, amounts, and statuses (Approved, Open, or Rejected).
How to upload disbursements
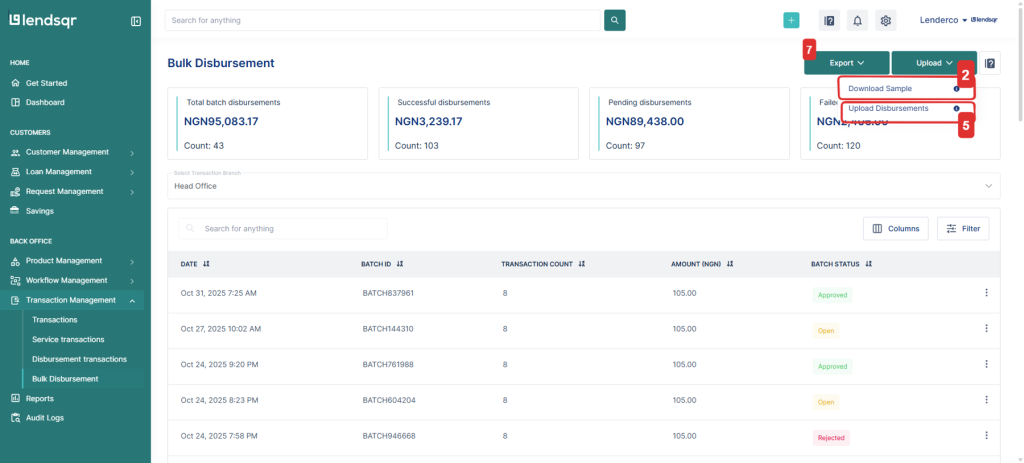
To create and upload a new disbursement batch:
Click the Upload button at the top-right corner of the page.
Download the sample template — this shows the correct format for your upload.
Fill in your disbursement details following the template’s structure.
Save the file as an Excel (.xlsx) format.
Upload the completed file.
If your organization uses an approval workflow, the batch will automatically move through the required approval stages before final disbursement.
You can also export bulk disbursement data at any time for record-keeping, reconciliation, or audit purposes.
Bulk Disbursement Template Format
Your Excel file should include the following columns exactly as listed below:
Field Name
Description
customer_name
The full name of the customer receiving the disbursement.
phone_number
The customer’s mobile number.
bank_code
The unique code identifying the customer’s bank (e.g., 058 for GTBank, 044 for Access Bank).
bank_name
The customer’s bank name.
account_number
The 10-digit bank account number of the customer.
transaction_reference
A unique reference ID for tracking the transaction (e.g., TXN123456).
transaction_type
Type of disbursement. Examples: loan-disbursement, savings-disbursement, normal-disbursement, others.
user_id
The system user ID associated with the customer.
amount
The payout amount.
narration
Description or note for the transaction (e.g., “Loan payout for John Doe”).
Tracking and Managing Bulk Disbursements
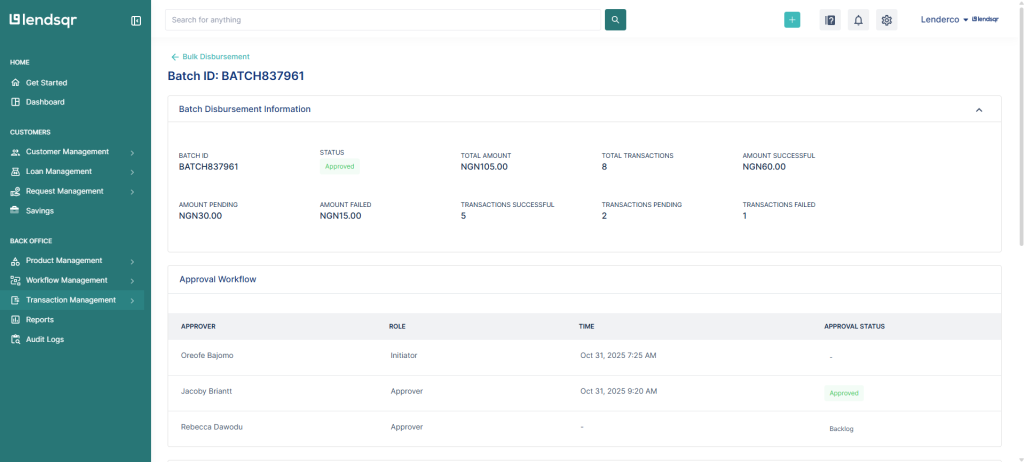
After upload, you can monitor your batches directly from the Bulk Disbursement page. Each batch will display its status:
Approved — Successfully processed and completed.
Open — Still pending or under review.
Rejected — Requires correction or re-upload.
You can also click on a specific batch to get more details on the disbursement.
You can also filter, search, or export data to help with reconciliation and reporting.
Troubleshooting common upload and processing errors
Even with a careful setup, issues can arise. Here are the most common problems and how to resolve them:
The file fails to upload: This usually happens when the file is saved in the wrong format. Make sure you are uploading an .xlsx file and not a .csv or .xls version. Also, confirm that no columns from the original template have been removed or renamed.
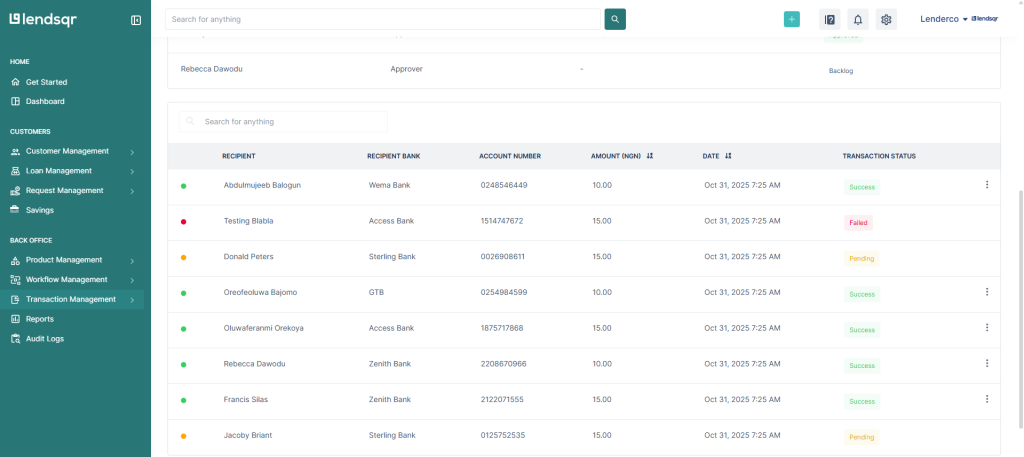
Some transactions in a batch show as failed: Individual transactions within an approved batch can still fail if the account number or bank code for that row is incorrect. In that case, open the batch detail view to identify which rows failed, correct the data in your file, and re-upload only the failed transactions as a new batch.
The batch status stays as Open for too long: If your organization uses an approval workflow, the batch will not process until the required approvers have signed off. Check with whoever holds approval authority on your platform to confirm the batch has been reviewed.
Duplicate transaction references: Each transaction reference must be unique. If you reuse a reference from a previous batch, the system may reject the new entry. Use a consistent naming convention that includes the date and a sequence number to avoid this.
A borrower’s account number is wrong: Unfortunately, once a batch is approved and processed, individual transactions cannot be reversed from the bulk disbursement page. In that case, you will need to handle the correction through your standard transaction management process.
Quick checklist before every upload
Use this checklist to catch common mistakes before they reach the system. Ensure that:
The file is saved as .xlsx
All required columns are present and correctly named
Every transaction reference is unique
All account numbers are 10 digits
Bank codes match the correct banks
No empty rows between data entries
Narrations are clear and meaningful for each row
Total amount in the file matches your expected payout figure
Running through this list before uploading takes less than two minutes and saves you the time and effort of fixing a rejected batch afterwards.


 feature")

